Kali Linux is one of the most popular distributions for penetration testing and offensive security. It comes preloaded with hundreds of security tools used for network analysis, vulnerability assessment, exploitation, wireless testing, password auditing, web application testing, and much more. It’s a ready-to-use environment designed specifically for cybersecurity professionals and enthusiasts like us.
Having a proper lab environment is one of the best ways to learn, experiment, and improve your technical skills safely. Whether you want to understand how attacks work, practice penetration testing, or explore offensive security tools, building your own virtual lab is an essential step. So, I decided to create a dedicated lab environment using Proxmox VE as my hypervisor. The goal is to build a flexible infrastructure where I can deploy multiple VMs and simulate real-world scenarios in an isolated environment. To complement this lab, one operating system quickly becomes a must-have: Kali Linux.
This article is the first step in a larger series of hands-on cybersecurity experiments. Before launching attacks, testing defenses, or building realistic scenarios, we first need a stable attacker machine inside the lab. In this guide, we’ll deploy a Kali Linux virtual machine on Proxmox VE and prepare the foundation of our future pentesting environment.
Importing the Kali Linux ISO
The first step is to download the Kali Linux installation image from the official website : Get Kali | Kali Linux.
There are multiple ways to import an ISO into Proxmox VE. You can upload it manually from your computer, use SCP, or directly download it from a URL. I’ll use the direct URL method, it’s faster and much more convenient.
I use the NetInstaller version of Kali Linux. It’s lightweight because it only contains the minimum required packages. The remaining packages are downloaded directly from Kali repositories, ensuring you install the latest available packages and avoids downloading a large ISO file unnecessarily.
On the Kali download page, locate the NetInstaller tile and right-click on the download button to copy the ISO URL.
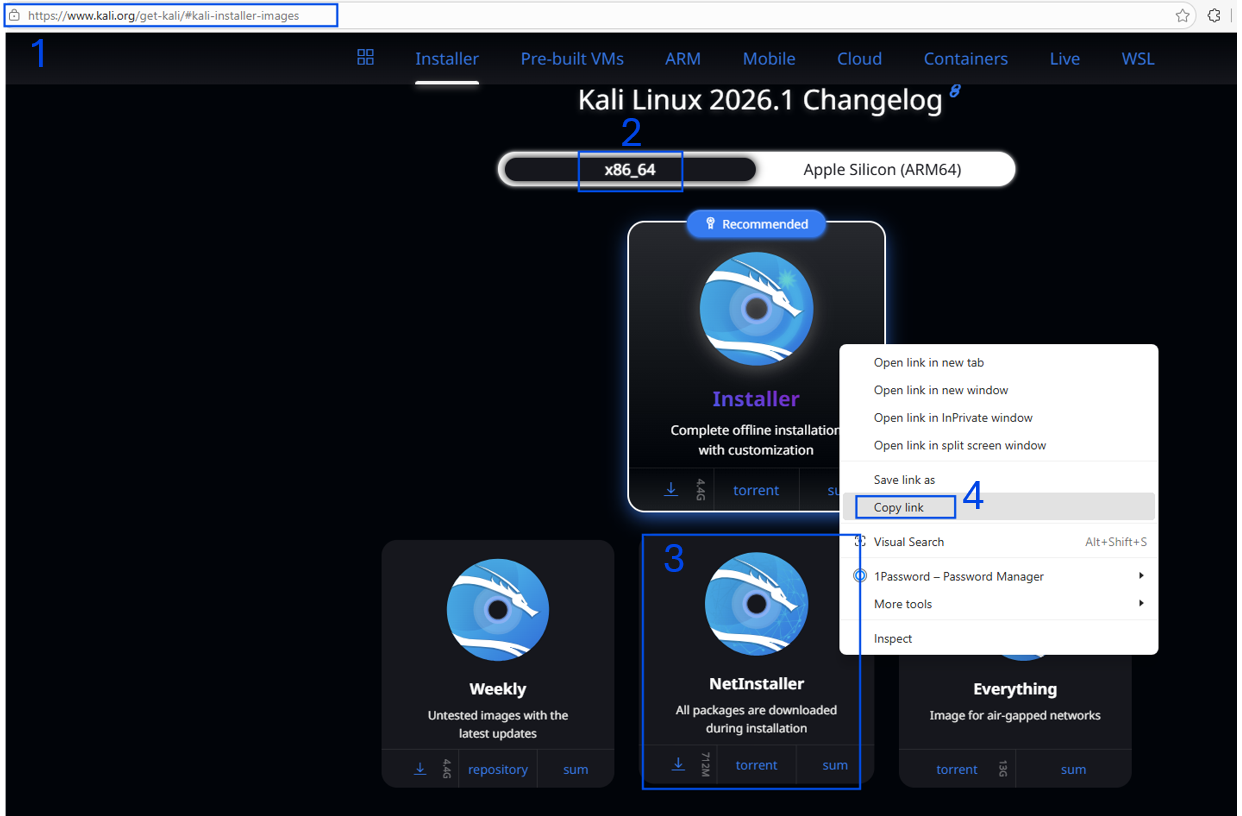
The link should look similar to this: https://cdimage.kali.org/kali-2026.1/kali-linux-2026.1-installer-netinst-amd64.iso
While you’re there, also copy the SHA256 checksum associated with the ISO image 🔐 It’s a security best practice, it allows you to verify the integrity of the downloaded file. It confirms that the ISO has not been corrupted during download and hasn’t been tampered with. To retrieve it, simply click on sum on the same NetInstaller tile and note down the SHA256 value.
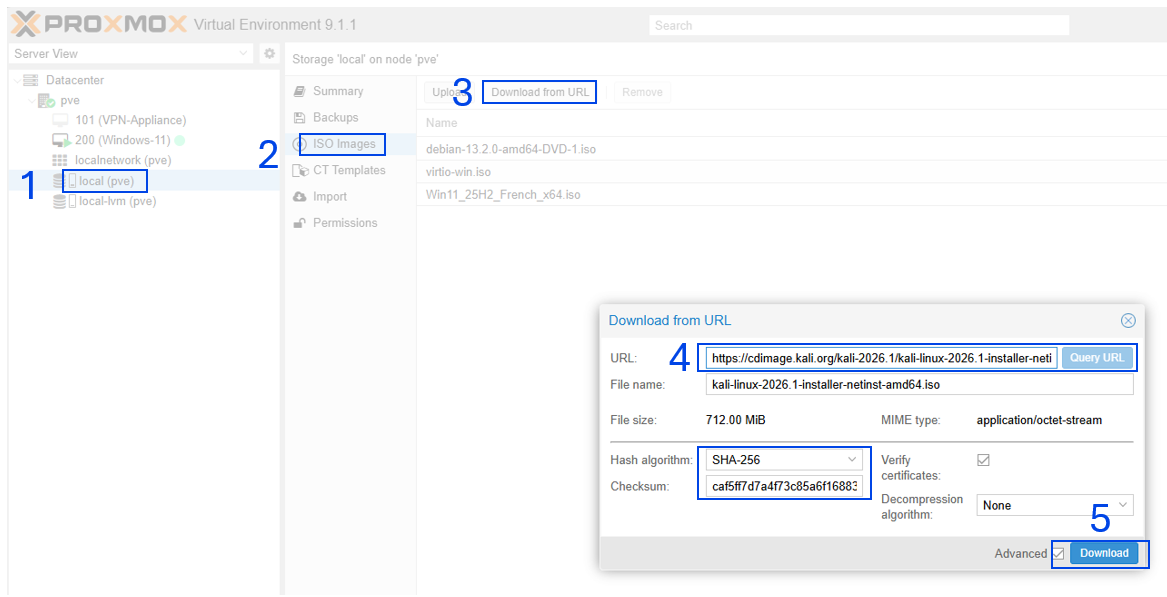
After that, let’s switch to the Proxmox VE web interface and navigate to:local (pve) > ISO Images > Download from URL
Paste the Kali Linux ISO URL into the URL field, then click Query URL so Proxmox can retrieve the file information automatically.
Before starting the download, make sure to configure:
– Hash algorithm: SHA-256
– Checksum: paste the SHA256 checksum copied earlier.
Proxmox will validate the downloaded ISO against the official checksum provided by Kali Linux. It’s a simple and essential security measure to ensure the file is authentic and intact.
You can now start the download process. The NetInstaller image is very small compared to a full installer, so the download should complete quickly. Once finished, wait until you see: Checksum verified followed by TASK OK
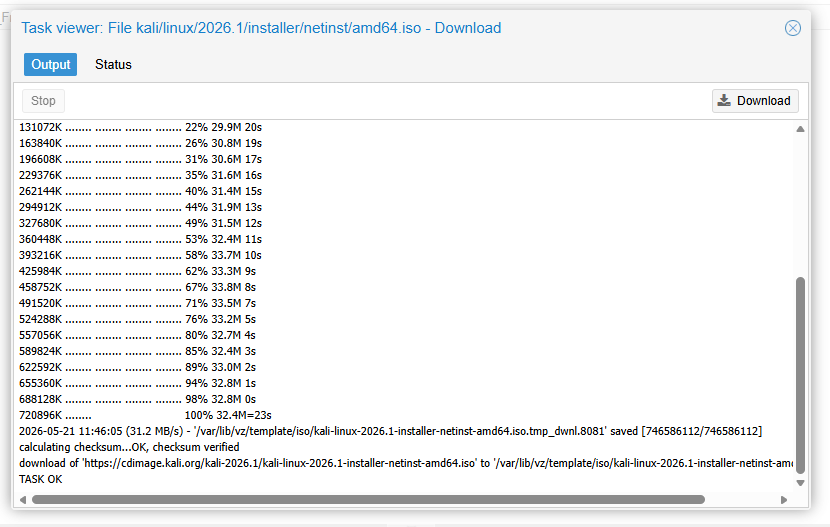
This confirms that the ISO has been successfully downloaded, verified, and is now available on your Proxmox VE hypervisor, ready for the VM creation process.
Creating the Kali Linux Virtual Machine
Now that the ISO image is available on the hypervisor, we can create the virtual machine 🖥️ In the Proxmox VE interface, click Create VM in the top-right corner.
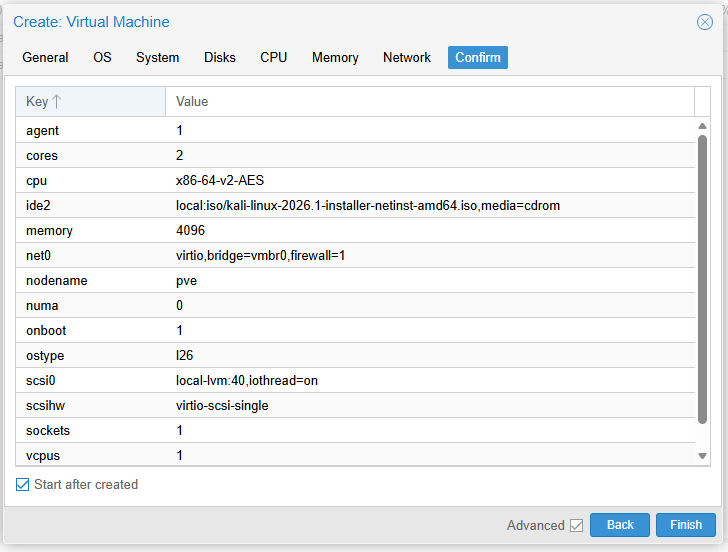
Here is the configuration I used for my VM, named Kali:
OS: select the Kali Linux ISO image you downloaded previously.
System: you can safely keep the default settings here, including the default BIOS configuration.
Also make sure to enable the QEMU Agent. The QEMU Guest Agent improves communication between the VM and the hypervisor. It allows better shutdown handling, IP reporting, and overall VM management directly from Proxmox.
Disk: I recommend allocating at least 40 GB. Although Kali Linux officially requires around 20 GB, giving the VM more storage is recommended for a cybersecurity lab. Once you start installing additional tools, wordlists, captures, vulnerable machines, scripts, or datasets, disk usage grows very quickly.
CPU: allocate at least 2 vCPUs. If your server has enough resources, feel free to assign more cores to improve responsiveness during scans or heavier security workloads.
Memory (RAM): 2 GB to 4 GB RAM. 2 GB is enough for basic usage, but 4 GB provides a smoother experience when using the graphical interface and running multiple tools simultaneously.
Network: Select your bridge interface, typically vmbr0 or whichever bridge is connected to your lab network. It allows the VM to communicate with the rest of your environment and future target machines.
Once everything is configured, enable Start after created and Finish
Starting the Kali Installer
In the left panel, select your newly created VM, then open Summary > Console.
This opens the graphical installer for Kali Linux. We can now begin the operating system installation ⚙️
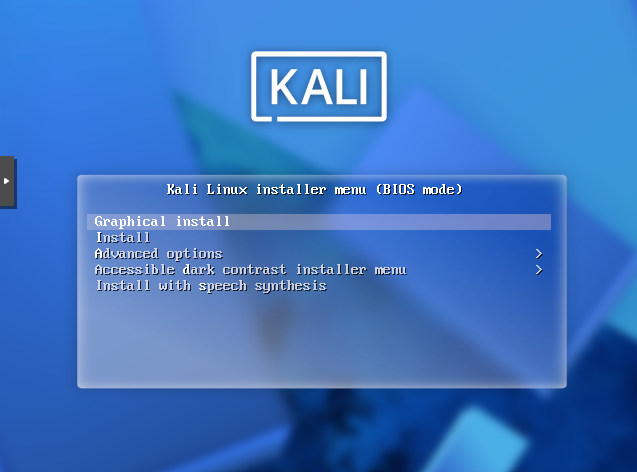
Start by selecting your language, geographical location and keyboard layout.
Hostname: Enter a hostname for your VM.
Domain Name: enter your domain name if you own one. In my case, I used: homelab.lablim38.fr.
This step is optional but helps simulate a more realistic enterprise environment.
Create your user account: you’ll now create your main user account with a display name, username and a password. Choose a strong password, especially if your lab will eventually be accessible from your local network or remotely. Avoid using weak or reused passwords, even in a lab environment.
Disk Partitioning: for simplicity, keep the default partitioning scheme: All files in one partition.
This option is fine for a lab VM and keeps management simple.
Choose “Finish partitioning and write changes to disk.”
HTTP Proxy: unless your environment requires an HTTP proxy, leave this section blank and continue.
Software Selection: keep the default desktop environment Xfce. Xfce is lightweight, fast, and very well suited for virtualized lab environments.
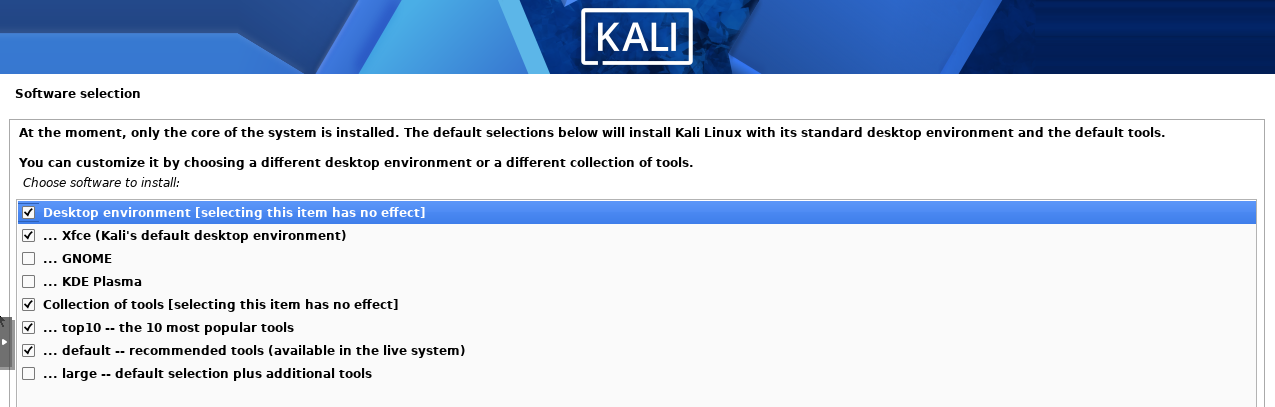
The installer downloads and installs packages directly from Kali repositories. Since we chose the NetInstaller image earlier, most components are retrieved online during installation instead of being bundled inside the ISO.
Installing the GRUB Bootloader: Yes. GRUB is the bootloader responsible for starting Kali Linux when the VM powers on. Without it, the operating system would not boot correctly. Install it on the main virtual drive proposed by the installer.
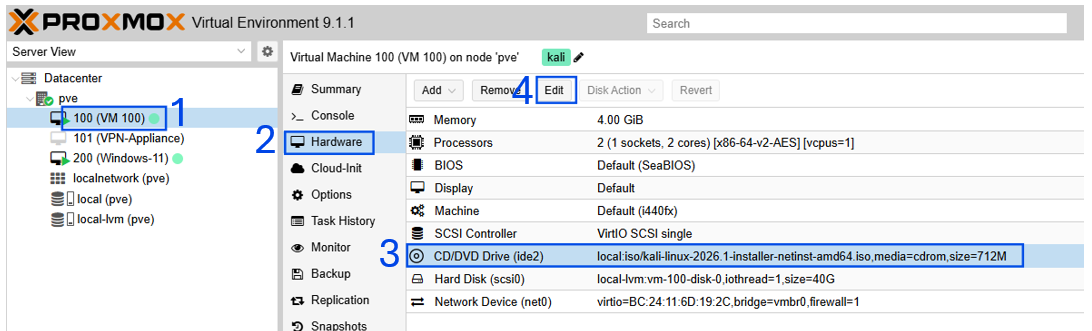
Finalize the installation: at the end of the installation process, the installer will ask you to remove the installation media before rebooting. This prevents the VM from booting back into the installer after the next reboot. To do this, return to the Proxmox VE interface:Select the Kali VM > Hardware > CD/DVD Drive > Edit > Do not use any media.
Launch your VM and update Kali Linux
Your VM should now reboot directly into Kali Linux. Log in using the credentials you created during the installation process.
Once you reach the desktop environment, open a terminal and update the system with the following command:
sudo apt update && sudo apt upgrade -y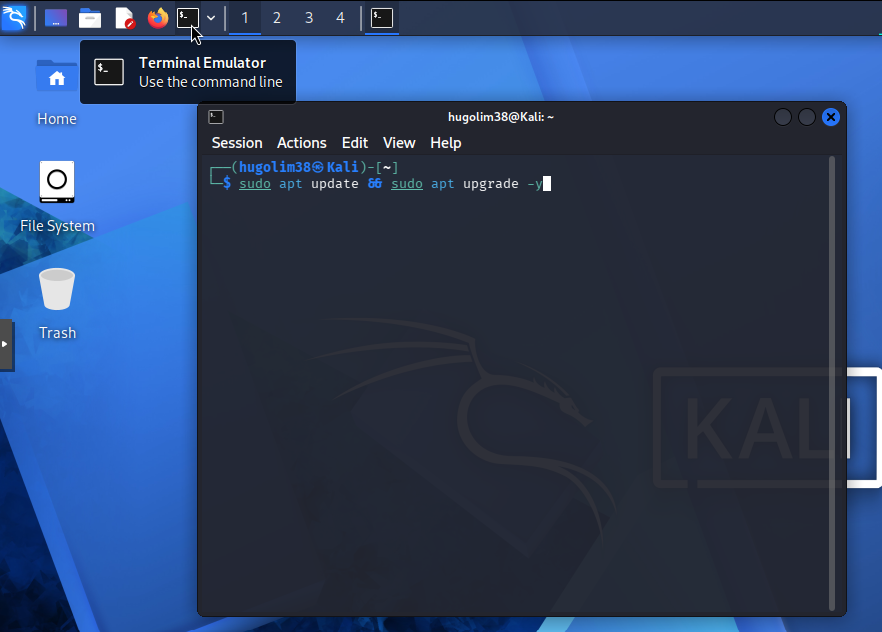
When prompted, enter your user password (the same password you configured during installation). This command will refresh the package list from Kali repositories, download the latest package versions and will install security patches and system updates automatically. Running a full update immediately after installation is considered a best practice. It ensures your lab starts with the latest security fixes, updated tools, and the most recent package versions available.
Your Kali Linux virtual machine is now fully operational and ready for future cybersecurity experiments, penetration testing practice, attack simulations, and offensive security scenarios inside your Proxmox VE lab environment.
This is only the beginning of the lab ⚡In the next articles, I’ll start deploying a vulnerable machine, experimenting with offensive security tools, and simulating real-world attack scenarios inside this environment. Stay tuned 👨💻
Cheers,