

In today’s cybersecurity landscape, vulnerable systems remain a common reality. Organizations still rely on outdated applications, misconfigured services, weak authentication mechanisms, and unpatched software that expose critical security gaps. Attackers continuously take advantage of these weaknesses, often exploiting vulnerabilities that have been publicly known for years but never properly addressed.
Despite years of security awareness, many organisations still run systems that are trivially exploitable. In this lab, we intentionally embrace insecurity to better understand it. For that, we need an intentionally vulnerable machine specifically created for penetration testing and cybersecurity training. This is exactly the role of Metasploitable 2.
What is Metasploitable?
Rapid7’s Metasploitable 2 is a deliberately insecure Linux virtual machine designed for cybersecurity education and penetration testing practice. The system includes outdated software, vulnerable services, weak configurations, and exploitable applications that allow users to safely simulate real-world attack scenarios within an isolated lab environment. It is built to help cybersecurity students, aspiring penetration testers, and security professionals develop practical offensive security skills without interacting with production systems.
The virtual machine contains a wide range of vulnerable network services and applications frequently encountered during security assessments, including insecure FTP servers, outdated web applications, poorly configured databases, weak authentication mechanisms, and vulnerable Linux packages. It’s an ideal environment for practicing reconnaissance, vulnerability scanning, exploitation techniques, privilege escalation, and defensive security analysis.
Step 1 – VM Isolation and Lab Network Setup
Before deploying the Metasploitable VM, we first need to build a clean and isolated lab network. The goal is to place both Kali Linux and Metasploitable inside a dedicated virtual environment using vmbr1, separated from the home network and from production devices.
Metasploitable 2 is intentionally insecure by design. Because of this, it should never be exposed directly to the Internet or connected to a production LAN. The safest approach is to isolate the vulnerable machine inside a private virtual network dedicated exclusively to cybersecurity testing.
If Metasploitable were connected to vmbr0, it would share the same bridge as the physical home network connected to the switch. In that scenario, every device on the LAN could potentially access, scan, or interact with the vulnerable VM. Even if the VM itself cannot directly compromise other devices, it could still expose vulnerable services, be exploited remotely, or even serve as a pivot point during an attack simulation.
To avoid these risks, we first secure the lab architecture inside Proxmox VE by separating the networks:
vmbr0→ Home network + Internet access.
This bridge is connected to the physical switch. It provides Internet connectivity and access to the home network for Proxmox and Kali Linux.vmbr1→ Isolated cyber lab network.
Internal virtual bridge without any physical network port attached. This creates a fully isolated environment where only virtual machines connected tovmbr1can communicate together.
For this lab, I created a second virtual bridge named vmbr1 with the IP address 192.168.50.1/24. This bridge will serve as the isolated network dedicated entirely to the cybersecurity lab environment. Both Kali Linux and Metasploitable 2 will communicate through this internal network, ensuring that the vulnerable machine remains separated from the home LAN and from the Internet.
Unlike vmbr0, which is attached to the physical network adapter connected to the home switch, vmbr1 is configured as an internal-only bridge without any physical interface attached to it. This creates a fully isolated virtual network where only virtual machines connected to vmbr1 can communicate together.
Proxmox VE Node > Network > Create Linux Bridge
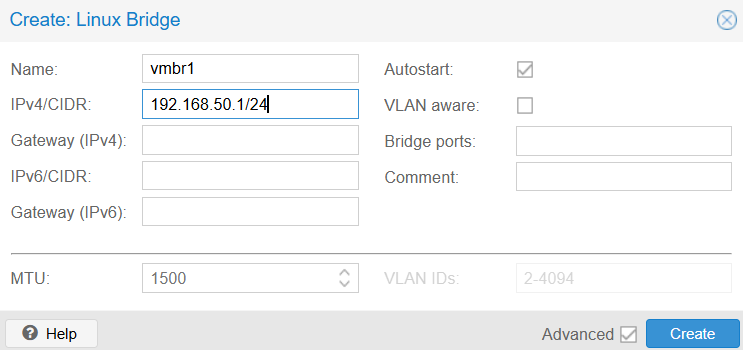
Once created, the bridge may initially appear as inactive. This is normal because no VM is currently connected to it. It becomes active as soon as a virtual machine starts using it.
One important detail: do not forget to click “Apply Configuration” after creating the bridge. Otherwise, the configuration will not actually be applied to the host system, a mistake that cost me some troubleshooting time 😄

Adding a second network interface to Kali Linux
Our Kali Linux virtual machine uses a dual-homed network configuration with two separate network interfaces. This allows Kali to act as the attacker machine while still maintaining Internet connectivity for downloading tools, updates, and packages.
During the initial VM creation, only one network interface was configured and connected to vmbr0. To respect the architecture, Kali must also be able to communicate with the Metasploitable VM located inside the isolated vmbr1 network. We need to add a second virtual network interface to Kali Linux.
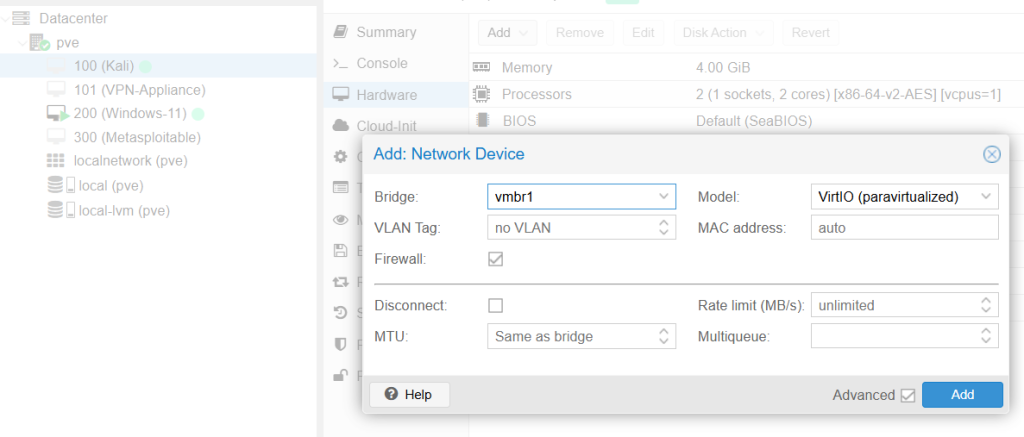
Proxmox VE Node > Your Kali VM > Hardware > Add > Network Device
The new network interface should be attached to vmbr1.
Keep the VirtIO model, it provides better performance and lower overhead compared to emulated network adapters.
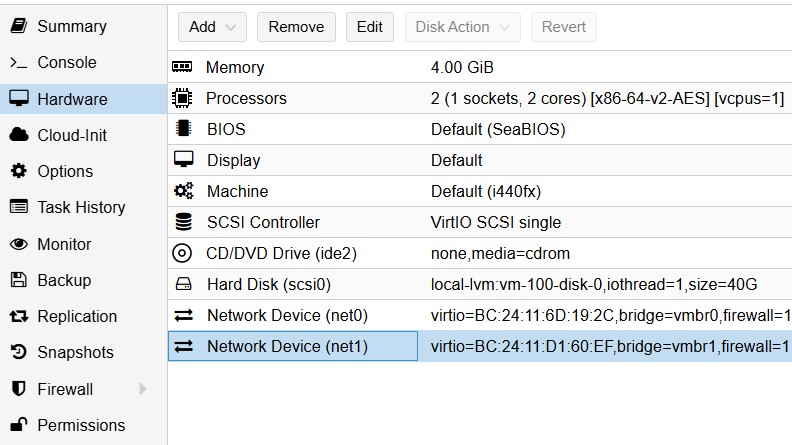
Here is the final network configuration of my Kali Linux VM after adding the second network interface:
Step 2 – Creating the Metasploitable 2 VM
Let’s download the official Metasploitable 2 image directly from Rapid7 Metasploitable 2. The archive includes a preconfigured virtual machine, which can be easily imported into most virtualization platforms. Unlike a traditional Linux deployment, Metasploitable 2 does not require a full installation process. The OS is already installed and preconfigured, so the deployment process is faster.
Creating the empty VM in Proxmox
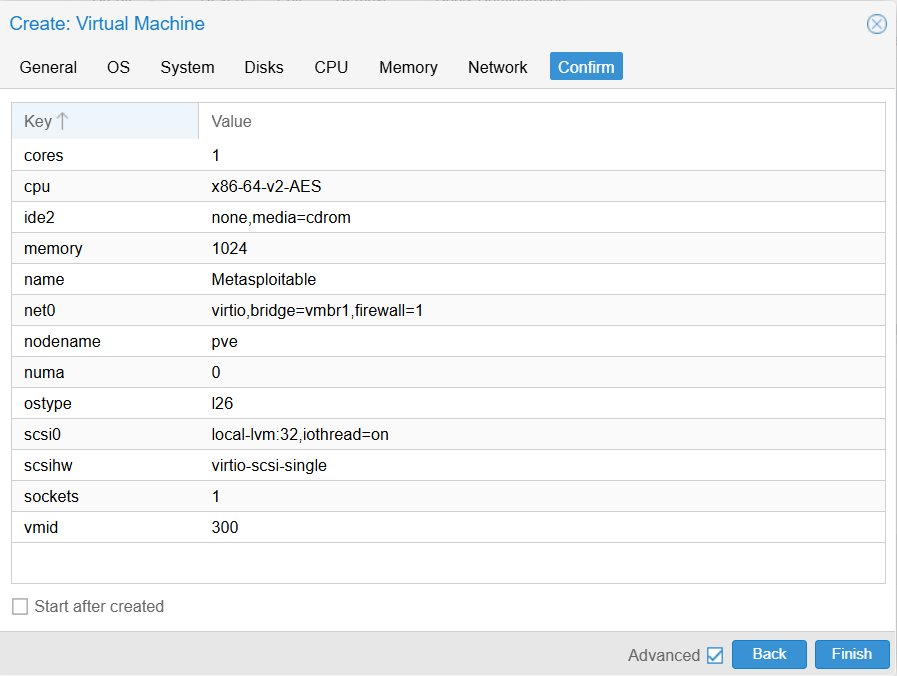
Inside Proxmox VE, create a new virtual machine.
Give the VM a name and a VM ID. I called it Metasploitable and the VM ID is 300.
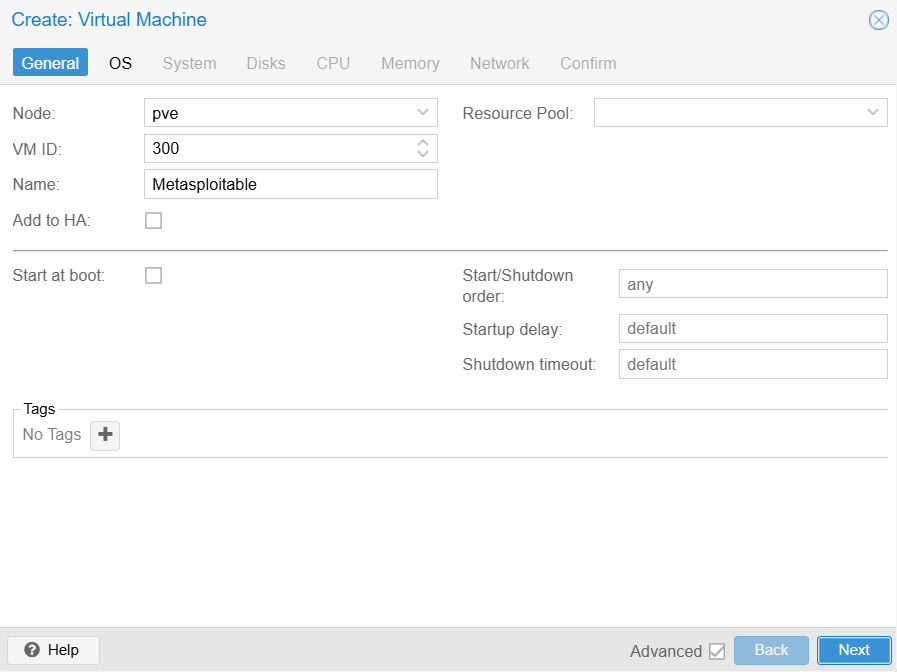
OS: Do not use any media since we will import the existing virtual disk later.
System: leave the default settings.
Disk: Proxmox automatically creates a virtual disk during the VM creation process. Since we will import an existing disk image, this default disk can later be removed if necessary.
CPU: 1 vCPU is sufficient for the lab
Memory: 1024 MB RAM
Network: select the isolated bridge we created previously: vmbr1.
Uploading the Metasploitable Disk Image
Once the archive is extracted on your local computer, open a PowerShell terminal in the directory containing the image.
In my case, the file was located inside: Downloads\Metasploitable2
Inside the folder, we can see the virtual disk image: Metasploitable.vmdk
So the next step is to copy this disk image to the Proxmox server using scp:
scp .\Metasploitable.vmdk root@PROXMOX_IP:/var/lib/vz/images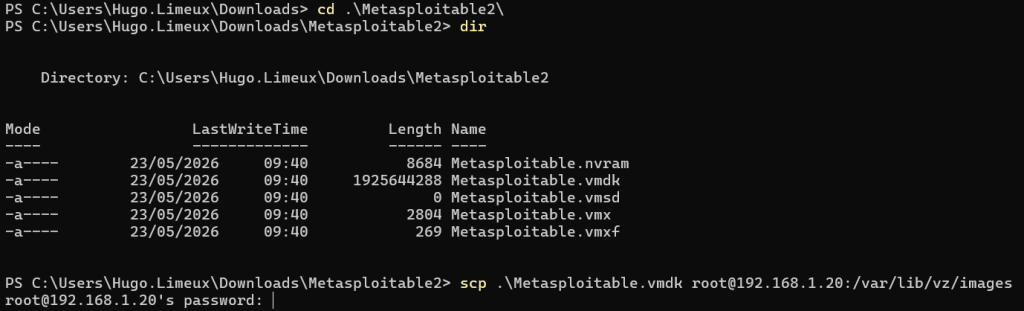
You will be prompted for the Proxmox root password, then the transfer will begin.
Once completed, it is always a good idea to verify that the image is correctly present on the Proxmox server:
ls -lh /var/lib/vz/imagesThe file should appear with a size of approximately 2 GB.

Importing the Disk into the VM
We can now import the VMDK disk image into the virtual machine.
qm importdisk 300 /var/lib/vz/images/Metasploitable.vmdk local-lvm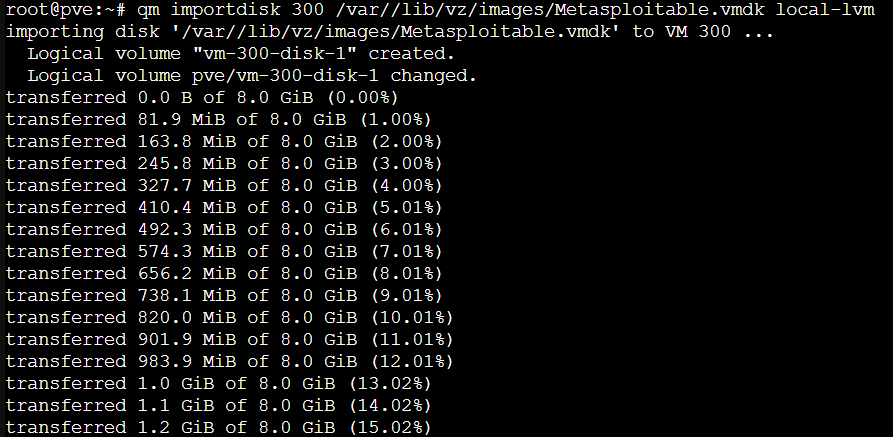
At this stage, the disk is only imported into the storage pool. It is not yet attached to the VM. We need to manually attach the imported disk:
qm set 300 --ide0 local-lvm:vm-300-disk-1The first command imports the disk image into Proxmox storage, while the second command attaches the imported disk to the virtual machine as the primary IDE disk.
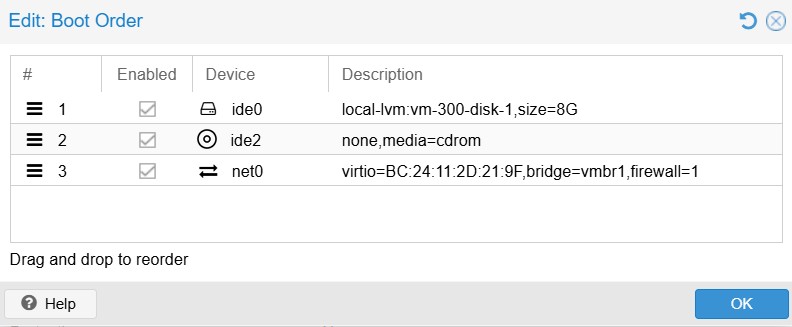
Configuring the Boot Order
We must now ensure that the VM boots from the imported disk. Since we are already on the Proxmox shell, it can be done with this command:
qm set 300 --boot order=ide0Or from the graphical interface: VM → Options → Boot Order
Make sure that ide0 with vm-300-disk-1 appears first in the boot sequence.
When going to the Proxmox Shell, you can check the configuration of your VM:
qm config 300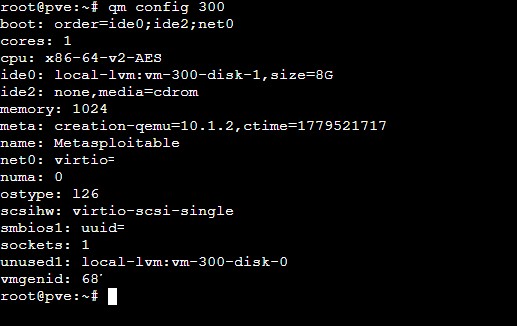
Step 3 – Starting the VM and Verifying Network Isolation
Our VMs are configured, we can start them and validate that our network architecture behaves exactly as expected.
From the Proxmox VE interface, start both virtual machines: Kali Linux and Metasploitable.
Once Metasploitable has fully booted, log into the system using the default credentials:
Username: msfadmin
Password: msfadmin
Assigning Static IP Addresses for Kali Linux
Our virtual bridges (vmbr0 and vmbr1) only provide Layer 2 connectivity. Proxmox acts as a virtual switch/bridge, but it does not automatically configure IP addresses inside the guest operating systems. That means the network interfaces must be configured directly from within each VM. To ensure stability and avoid reconfiguring IP addresses after each reboot, we will configure static IP addresses inside our virtual machines.
Since Kali Linux belongs to two separate networks, it requires two IP addresses: one IP address for the home network (vmbr0) and one IP address for the isolated cyber lab network (vmbr1)
In our setup, for Kali Linux:
eth0→ Home network / Internet accesseth1→ Isolated cyber lab network
Edit the network configuration file:
sudo nano /etc/network/interfacesAdd the following configuration:
auto eth1
iface eth1 inet static
          address 192.168.50.10
          netmask 255.255.255.0

auto eth0
iface eth0 inet static
          address 192.168.1.50
          netmask 255.255.255.0
          gateway 192.168.1.1
          dns-nameservers 8.8.8.8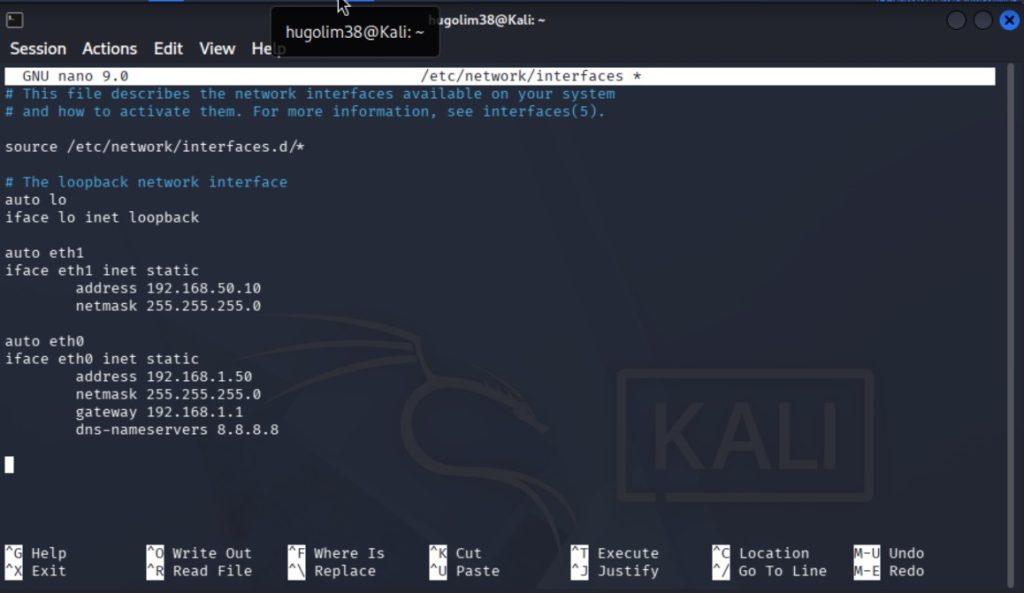
eth1 is assigned to the isolated lab network (192.168.50.0/24)eth0 is configured for Internet access via the home network
The default gateway allows outbound connectivity
The DNS server enables domain name resolution
Once the configuration is complete, restart networking:
sudo systemctl restart networking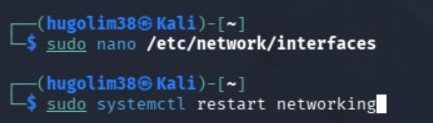
Metasploitable Network Configuration
In theory, the configuration process should be similar for Metasploitable. In practice, things are slightly different. Metasploitable 2 is based on an older Linux distribution, and the traditional /etc/network/interfaces method may not always work reliably. In my case, the network configuration was not properly applied, and the interface could not be brought up using standard tools.
Practical workaround: configure IP at boot.
Instead of relying on the default network configuration system, we use a more reliable approach by applying the configuration at startup.
Edit the rc.local file:
sudo nano /etc/rc.localAdd the following lines before exit 0:
ip link set eth0 up
ip addr flush dev eth0
ip addr add 192.168.50.20/24 dev eth0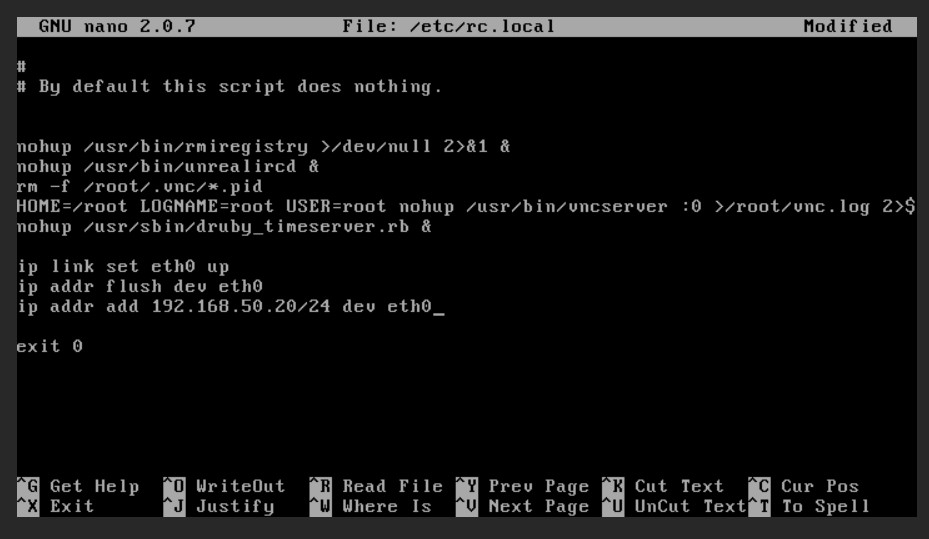
This script ensures that the interface is brought up and the correct IP address is applied at boot
Then reboot the VM:
sudo rebootRemember, we want to keep the vulnerable machine completely isolated from the outside world. We intentionally do not configure the default gateway, Internet access, or DNS resolution.
The interface used here is eth0 simply because Metasploitable has only one network adapter assigned to it. In Linux, interface naming is based on the order in which network cards are detected by the system, not on the type of network they are connected to. Since this VM only has a single NIC attached to vmbr1, it is automatically mapped to eth0.
Verifying Network Configuration
We can verify that both machines are correctly configured.
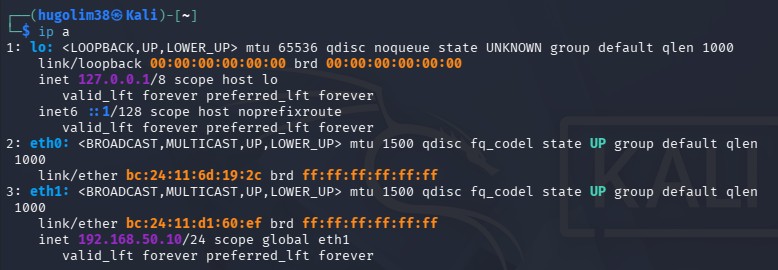
From Kali Linux:
ip aThis command displays all network interfaces and their associated IP addresses.
We should see:
– eth0 –> connected to the home network
– eth1 –> connected to the isolated cyber lab
Both interfaces in the UP state
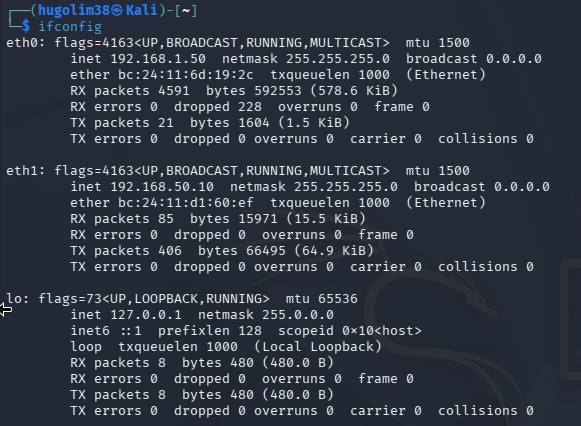
We can also use:
ifconfigThe output confirms the assigned IP addresses, interface status, MAC addresses and the transmitted and received packets.
Testing connectivity and internet isolation
The communication between Kali and Metasploitable
From Metasploitable, try reaching Kali Linux: ping 192.168.50.10.
If the configuration is correct, the ICMP packets should reach the Kali Linux VM.
Both machines are connected to vmbr1, the isolated cyber lab network is functioning correctly.
You can also access Metasploitable from Kali using a web browser:
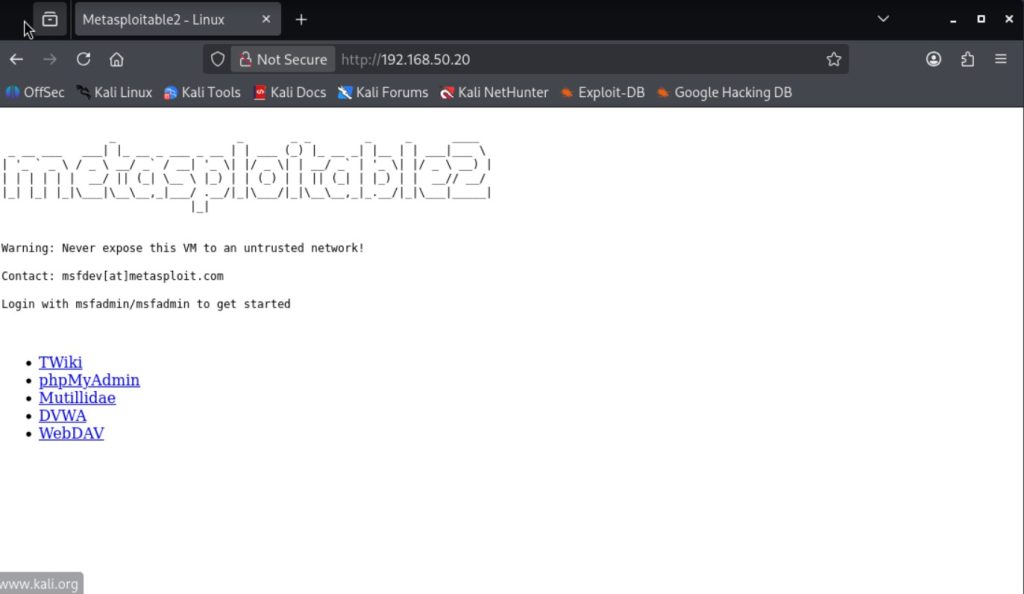
Testing Internet Isolation:
Let’s verify that Metasploitable cannot access the Internet. From Metasploitable: ping 8.8.8.8
The request fails while attempting to reach Google’s public DNS server.
Metasploitable is not connected to vmbr0, the vulnerable VM has no direct Internet access.

Cyber lab Architecture Overview
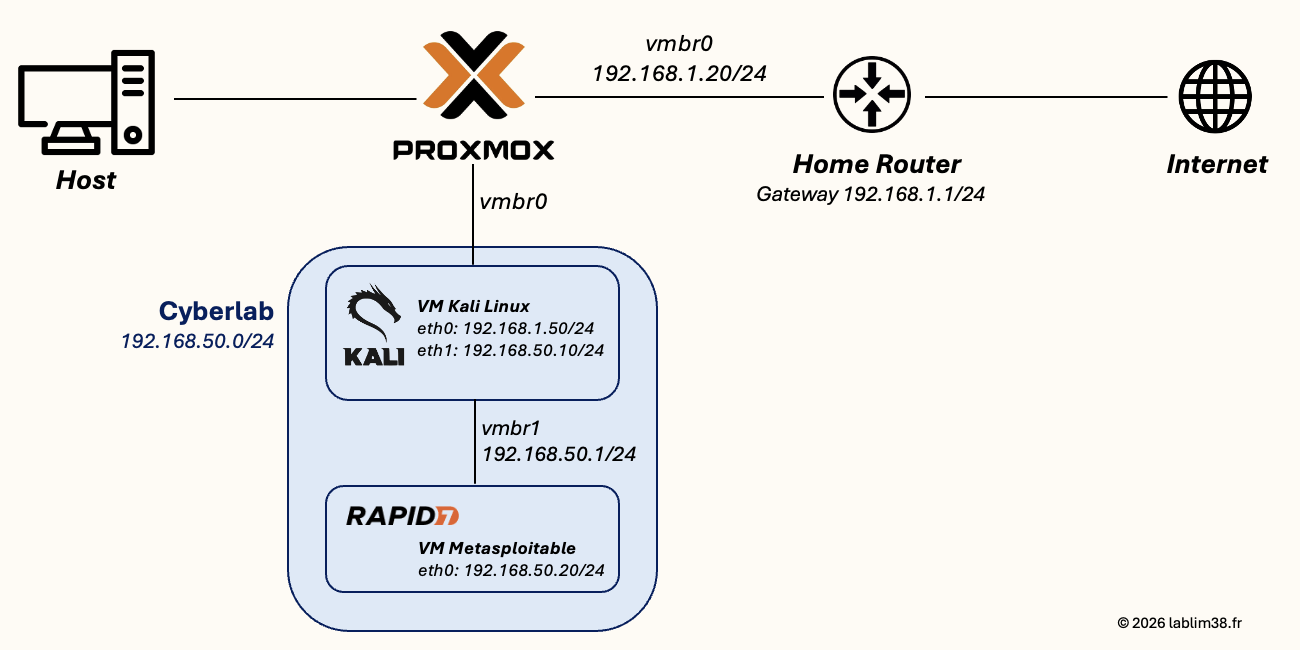
And that’s it! Our cyber lab is fully operational with both virtual machines correctly isolated and connected. This isolation is a critical security measure when working with intentionally vulnerable machines. Even inside a home lab, vulnerable services should never be exposed to the Internet or to production devices.
With this setup, we now have a safe environment where we can perform penetration testing, vulnerability research, enumeration, exploitation practice, and defensive analysis without risking damage to real systems or violating legal boundaries.
The next step is where the fun really begins: exploring the wide range of tools included in Kali Linux and learning how to safely interact with, and attack our Metasploitable target machine inside the lab.
Cheers,
1 thought on “Building my Cyber Lab (2/3) – Preparing the Victim: Metasploitable 2”