

Photo by Nataliya Vaitkevich / Plexels
AWS offers an incredible ecosystem of cloud services. Today, it’s possible to build and manage an entire online business using AWS alone, from hosting and authentication to databases, storage, monitoring, and scalability. One of the most impressive aspects of AWS is how easily its services integrate together. Even without advanced software engineering skills, you can rapidly deploy scalable and production-ready architectures using AWS managed services.
In this article, I’ll walk through the architecture of a simple eCommerce platform fully built on AWS. Rather than focusing only on deployment, the goal is to understand how the different AWS services interact together across the various architectural layers and demonstrate that AWS services are far more accessible and user-friendly than many people imagine. This article is designed as an architectural breakdown and learning experience for anyone interested in cloud computing, AWS, or launching an online business in the cloud.
For this project, I’m following and adapting the excellent training by Chetan Agrawal: Let’s Build on AWS: eCommerce Application from Scratch. I highly recommend his content for anyone learning AWS. His courses helped me successfully prepare for the AWS Certified Cloud Practitioner and AWS Certified Solutions Architect Associate certifications, while also giving me hands-on experience building my first real cloud infrastructures.
The Architecture Overview
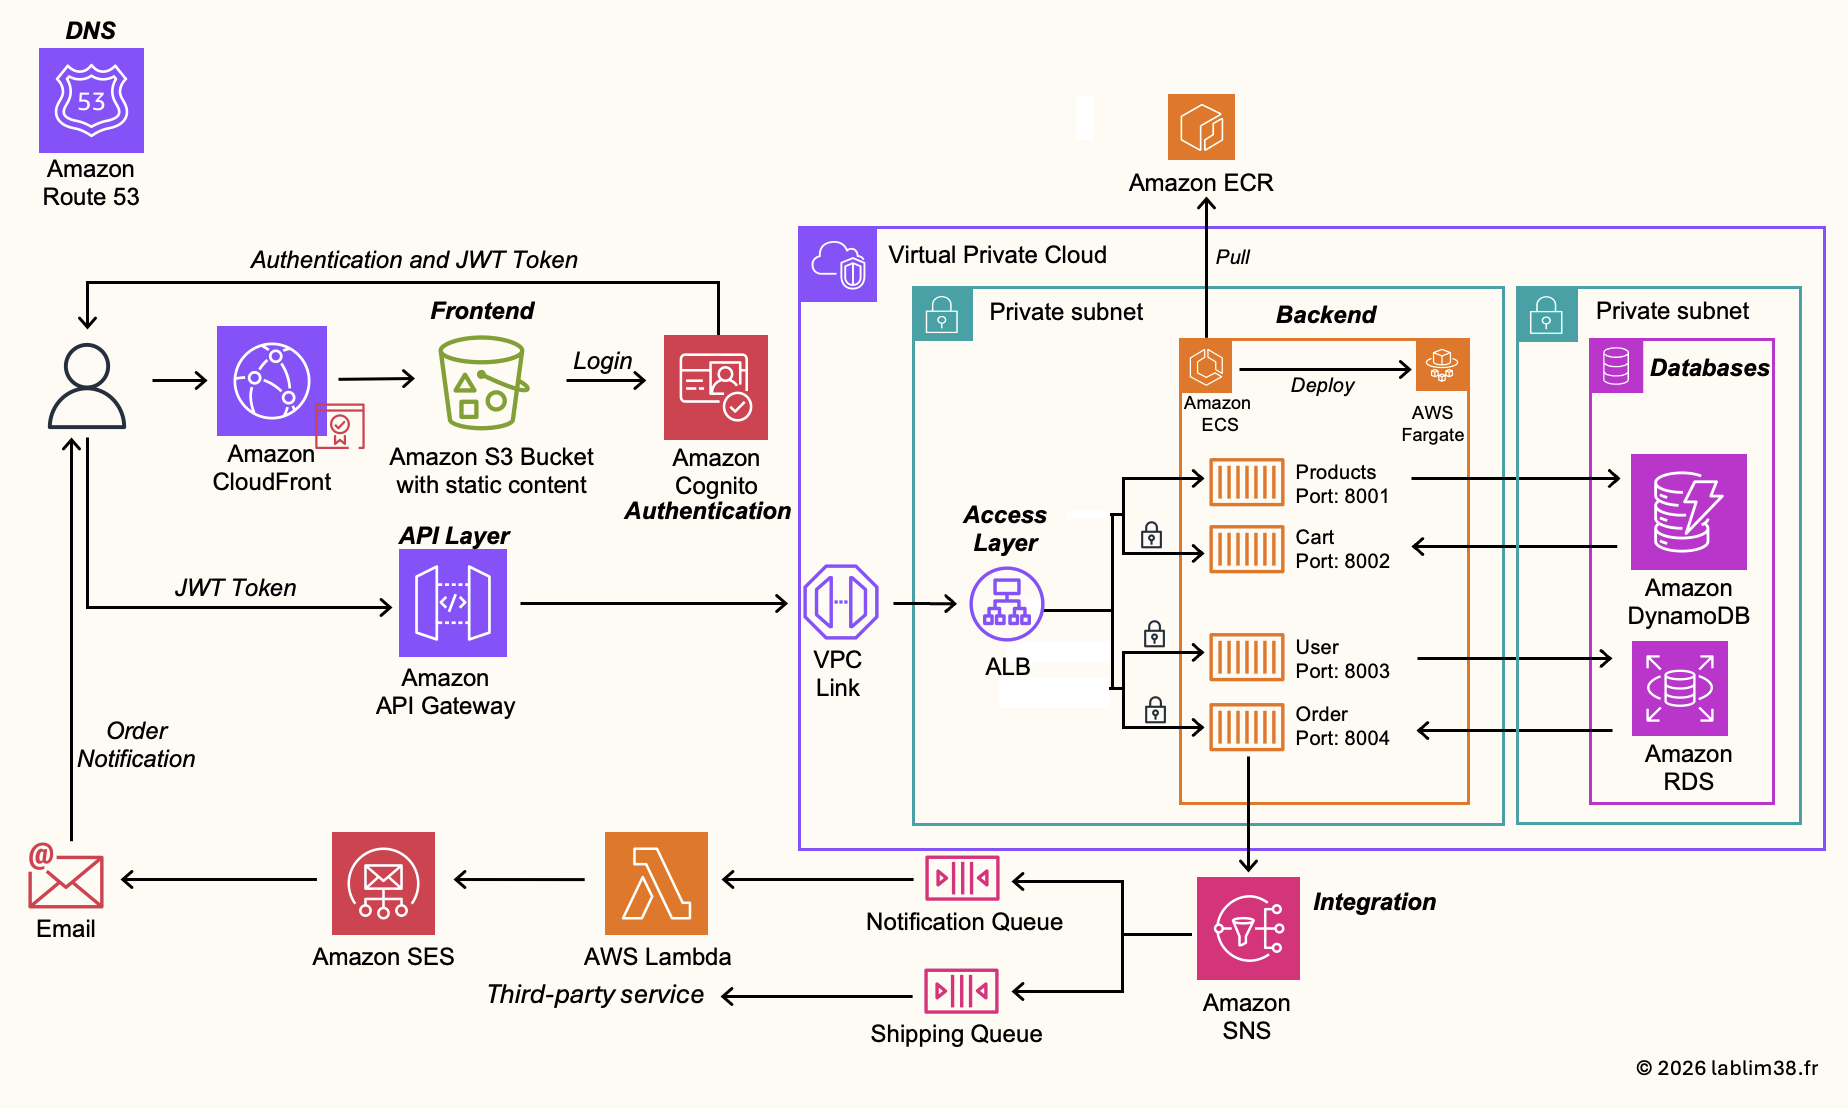
Before diving into the implementation details, let’s first take a step back and look at the global architecture of the application. This project includes most of the architectural layers commonly found in modern cloud-native applications:
- A frontend layer
- Backend microservices
- Databases
- An API management layer
- Authentication and authorization
- Networking and security components
- Notification and integration services
The objective of this article is to understand how all these managed services interact together to build a scalable, resilient, and production-ready platform. One of the most important concepts behind this architecture is decoupling. Each component has a very specific responsibility:
- The frontend is isolated from the backend
- Backend services are separated into microservices
- Authentication is managed independently
- Databases are adapted to their specific use cases
- Notifications rely on event-driven services 🔄
This separation makes the platform easier to maintain, easier to scale, more secure 🛡️ and more resilient to failures. Another key aspect of this architecture is the heavy use of containers and managed AWS services. The backend services run inside Docker containers orchestrated by Amazon Elastic Container Service (ECS) with AWS Fargate, meaning we do not have to manage servers manually. The frontend is hosted statically on Amazon S3 and accelerated globally using Amazon CloudFront. Authentication is handled by Amazon Cognito, while API exposure and authorization are managed through Amazon API Gateway. The entire infrastructure is deployed inside a secure Amazon Virtual Private Cloud (VPC) with public and private subnets distributed across multiple Availability Zones for High Availability.
In short, this architecture represents a very typical modern AWS production environment and showcases how AWS managed services can be combined together to build a complete online business platform without managing physical infrastructure.
Alright, let’s get started and break all of this down step by step across the 9 major stages of the project
Step 1 – Network Architecture
The foundation of any AWS infrastructure starts with the Amazon Virtual Private Cloud (VPC). Everything begins there. A VPC allows you to build your own isolated network environment in AWS and control how your resources communicate with each other and with the internet.
That said, if we look back at the global architecture presented earlier, not every AWS service will reside inside the VPC itself. Only a few core components will operate within the network layer:
* The Application Load Balancer
* Amazon Elastic Container Service (ECS) 📦
* The relational database powered by Amazon Relational Database Service (RDS).
The other services used in this architecture are fully managed by AWS and operate outside of the VPC scope.
Here is the network architecture we are going to build on AWS.
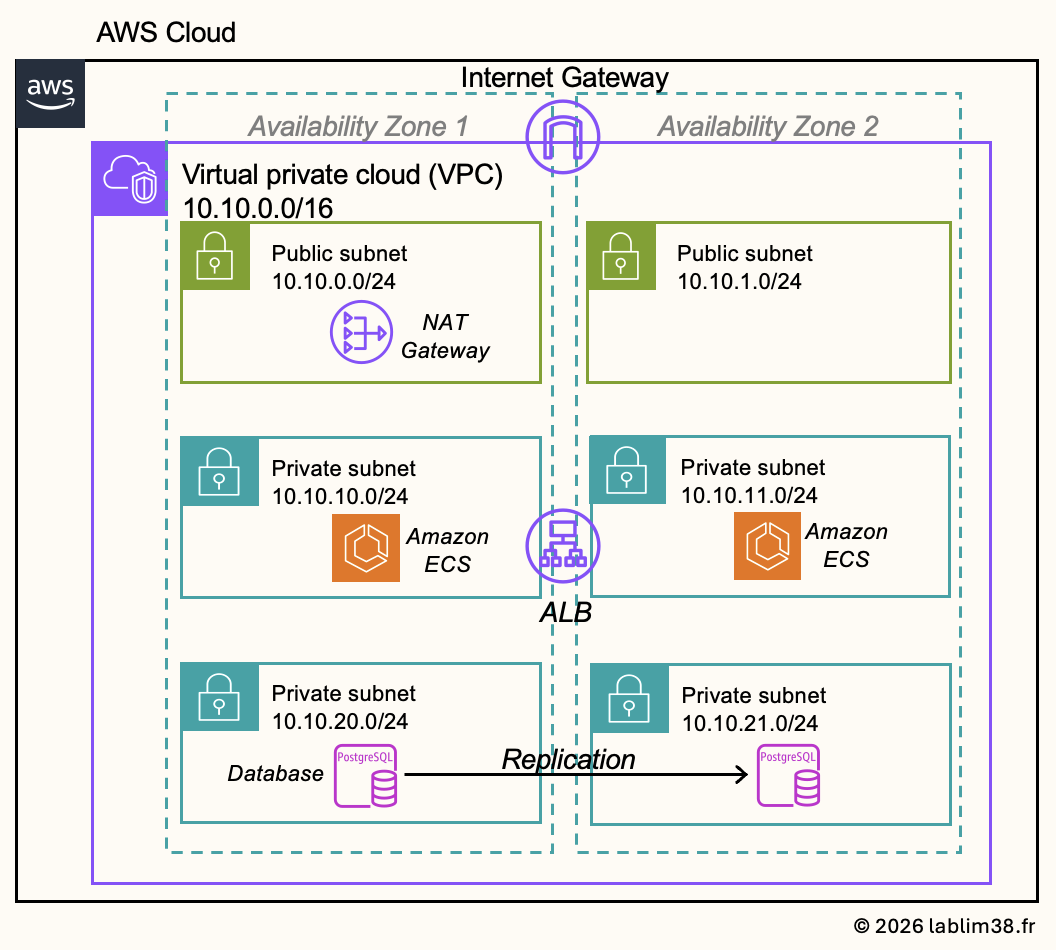
This is a very common and production-ready architecture pattern widely used across AWS environments. It is based on a VPC containing both public and private subnets distributed across multiple Availability Zones in order to improve resilience and high availability. The architecture includes:
– A VPC connected to the internet through an Internet Gateway
– A public subnet exposed to the internet via the Internet Gateway
– A private subnet isolated from direct internet access for security purposes
In our infrastructure, we will deploy micro-services using Amazon Elastic Container Service (ECS) inside a private subnet 📦 . Even though these containers are not publicly accessible, they still require outbound internet access in certain situations, for example to pull Docker images, communicate with external APIs, download updates, or send logs and metrics to AWS services. To enable this outbound connectivity while keeping the services private, the ECS tasks will access the internet through a NAT Gateway located inside the public subnet.
The PostgreSQL database hosted on Amazon RDS for PostgreSQL will reside in a second private subnet. Unlike ECS, this subnet will remain fully isolated from the internet to maximize security and reduce the attack surface 🛡️
The infrastructure will be deployed across multiple Availability Zones to ensure redundancy and comply with High Availability (HA) best practices. The Application Load Balancer will distribute incoming traffic across the ECS services running in different zones, ensuring better fault tolerance and scalability.
Step 2 – Identity & Authentication
For user authentication and identity management, we will use Amazon Cognito. Cognito acts as the identity layer of the application. It’s AWS’s fully managed authentication and authorization service. It allows developers to easily add user sign-up and sign-in, password management and reset, multi-factor authentication (MFA), session management, etc.
You can use it as a standalone identity provider or integrate it with third-party identity services. We will use it as our standalone identity center because we want to fully secure the backend infrastructure and avoid exposing our APIs or services publicly. As soon as a user performs sensitive actions (placing an order, updating a profile), the request must be authenticated and authorized. This is where API Gateway and Cognito work together. The API Gateway will be integrated with Cognito in order to validate user identity before allowing access to protected backend services. This ensures that only authenticated users with valid tokens can execute secured API calls.
Creating a user pool
The first step when configuring Amazon Cognito is creating a User Pool. It’s a managed user directory where Cognito stores user accounts, passwords, authentication settings, sign-up and sign-in configurations.
Configuring Authentication Flows
Once the user pool is created, AWS automatically generates an App Client. The App Client represents the application allowed to communicate with Cognito.
This architecture follows modern cloud security best practices by separating public content access, protected business operations and the authentication & authorization layers while keeping the infrastructure scalable and fully managed by AWS.
Step 3 – Frontend
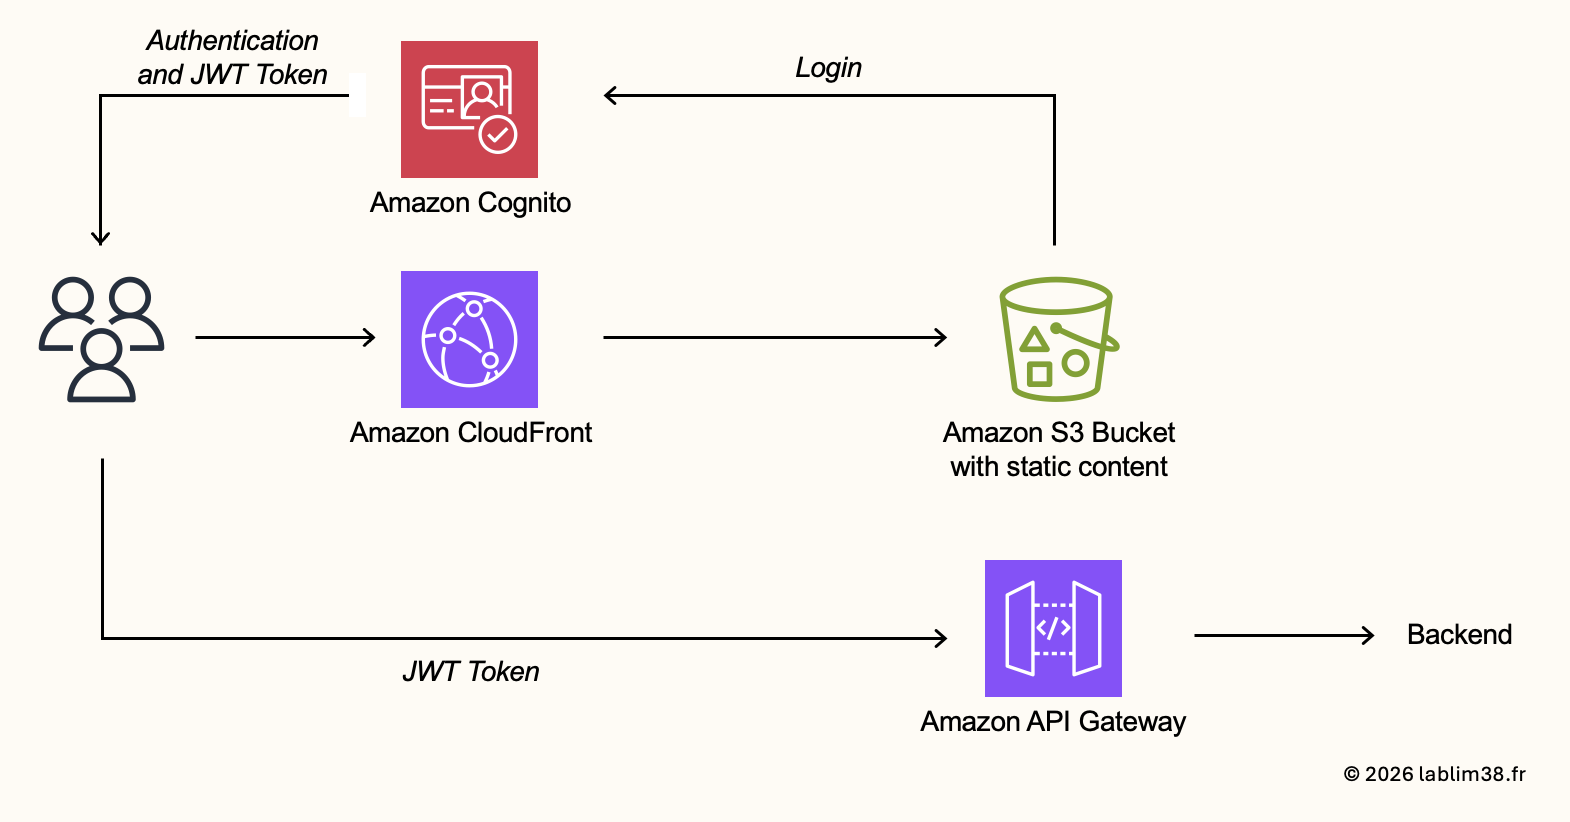
At this stage, we now have the network foundation and the authentication layer in place. We can move to the frontend architecture of the application. It’s mainly built around two AWS services: Amazon S3 and Amazon CloudFront.
Why Amazon S3 for Frontend hosting?
In modern cloud-native architectures, frontend applications are often composed of static files: HTML, CSS, JavaScript, images, fonts. These static assets can be hosted directly inside an Amazon S3 bucket. In our case, Amazon S3 acts as the storage layer for the frontend application. When users access the website, their browser downloads these static files from S3 in order to render the application.
Why using CloudFront ?
Technically, we could make the S3 bucket public and access it directly from the internet. But this approach has several limitations: the bucket becomes publicly exposed, there is no intelligent caching layer, no network optimization. There could be higher latency for distant users and a reduced security control.
The better and production-ready approach is to place CloudFront between users and the S3 bucket. CloudFront is AWS’s global Content Delivery Network (CDN). Its role is to distribute content efficiently through AWS edge locations spread around the world. Instead of users directly contacting the S3 bucket, they interact with CloudFront first. We secure the S3 bucket with CloudFront Origin Access Control (OAC): CloudFront will retrieve the content from S3, cache static assets at edge locations, optimize network paths. It will improve the performance and add an additional security layer. This is one of the most common frontend architectures used in AWS production environments.
How to enable CloudFront Origin Access Control (OAC)?
OAC allows CloudFront to securely access private S3 content without exposing the bucket publicly. Users cannot bypass CloudFront and directly access the storage layer.
To validate that your S3 bucket policy is correctly configured, you should see a policy similar to this:
{
    "Version": "2008-10-17",
    "Id": "PolicyForCloudFrontPrivateContent",
    "Statement": [
        {
            "Sid": "AllowCloudFrontServicePrincipal",
            "Effect": "Allow",
            "Principal": {
                "Service": "cloudfront.amazonaws.com"
            },
            "Action": "s3:GetObject",
            "Resource": "arn:aws:s3:::<bucket-name>/*",
            "Condition": {
                "ArnLike": {
                    "AWS:SourceArn": "arn:aws:cloudfront::<account-id>:distribution/<distribution-id>"
                }
            }
        }
    ]
}
This architecture significantly improves security, scalability, global performance and content delivery optimization. It represents a modern best practice for hosting frontend applications on AWS.
Integrating the Frontend with Amazon Cognito.
Since we already configured authentication with Amazon Cognito, we can now integrate it into the frontend application. The frontend must be configured with the Cognito User Pool ID and the app Client ID
It allows the application to redirect users to the Cognito authentication process whenever login is required.
The authentication flow works like this:
- The user accesses the frontend application
- The application redirects the user to Cognito
- The user authenticates with email and password
- Cognito validates the credentials
- Cognito returns authentication tokens to the application
Among those tokens, the most important one is the JWT token (JSON Web Token). This token becomes the user’s identity proof and will be included in authenticated API requests sent to backend services (placing orders, updating profiles, accessing private customer data, etc.). The JWT token will later be validated by API Gateway before allowing access to backend micro-services.
Step 4 – Data Layer
Now it’s time to move deeper into the backend architecture and focus on the data layer. The backend services of our eCommerce application are hosted on Amazon Elastic Container Service (ECS). Like many modern cloud-native applications, the backend is split into several microservices, each responsible for a specific business domain 📦.
In our architecture, we have four core services:
– Product service
– Cart service
– User service
– Order service
Each service interacts with its own dedicated data layer depending on its usage pattern and performance requirements. This is where the architecture becomes interesting: instead of using a single database for everything, we combine multiple AWS database technologies depending on the type of data we need to manage. Not all application data behaves the same way. Some datasets require very fast read/write performance and massive scalability while others require relational consistency and structured relationships. Our architecture combines Amazon DynamoDB and Amazon Relational Database Service (RDS).
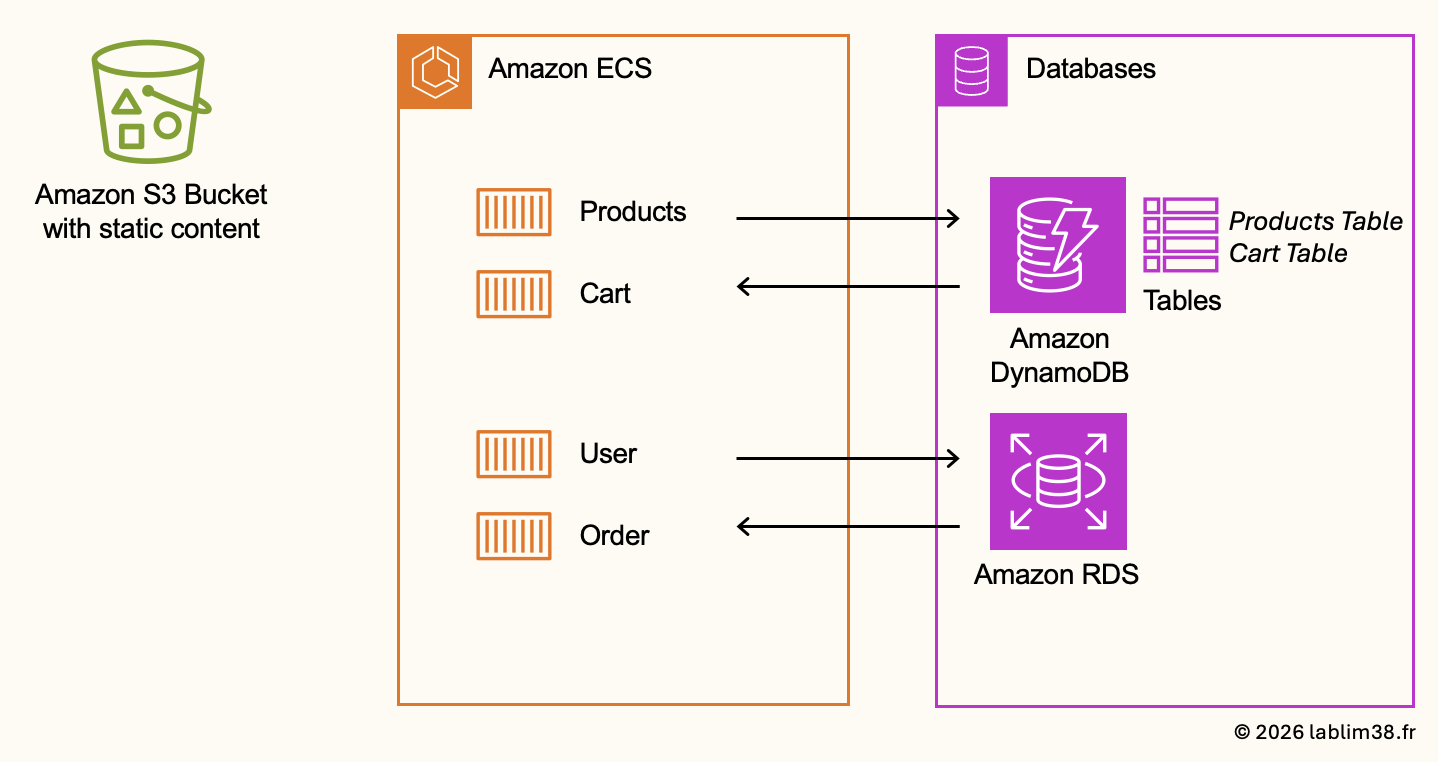
DynamoDB for Product and Cart services
Amazon DynamoDB is AWS’s fully managed NoSQL database service designed for low latency, high scalability and flexible data models. It’s the perfect choice for eCommerce product catalogs and shopping carts because these services require fast access, rapid scaling during traffic spikes and flexible product attributes. Unlike traditional relational databases, DynamoDB handles this type of semi-structured data very efficiently.
Inside DynamoDB, we will create two tables:
– Products Table to store information about all products available in the application. Typical attributes include product ID, name, description, price, category, etc.
– Cart table to store temporary shopping cart data for each user. Whenever a user adds a product to their cart, the item is inserted into the cart table and the cart remains associated with the authenticated user.
Once the user validates the purchase, the order is processed and the cart entries are cleared for that user.
Amazon RDS for User and Order services
Some services require stronger relational consistency. This is why the User and Order services will use Amazon Relational Database Service (RDS). Orders and user data usually involve relationships between entities, transactions and structured schemas. Relational databases are much better suited for these use cases.
In our architecture, the PostgreSQL RDS database is deployed inside the isolated private subnets we created earlier. From a security perspective, this ensures that sensitive customer and order data is never publicly accessible from the internet.
1. Create a DB subnet group and associate the two private subnets dedicated to the RDS database.
2. Configure the database Security Group. It should allow access only to the PostgreSQL port (TCP 5432) and only from the private VPC range used by the ECS services.
Product images and S3 storage
One important architectural decision concerns product images. Even though product metadata is stored inside DynamoDB, the images themselves should not be stored in the database. Databases are optimized for structured data, not large media files. Product images will be stored inside an Amazon S3 bucket.
Because the S3 bucket is already connected to CloudFront, product images will automatically benefit from CDN caching. That means images are replicated to AWS edge locations closer to users around the world, significantly improving loading times and user experience.
Step 5 – Backend services
Now we can finally move to the heart of the application: the backend services. This is where the business logic lives with product management, cart operations, user management and order processing. Backend services are usually deployed as containerized microservices. This is the approach we will use with Docker, Amazon Elastic Container Registry (ECR), Amazon Elastic Container Service (ECS) and AWS Fargate.
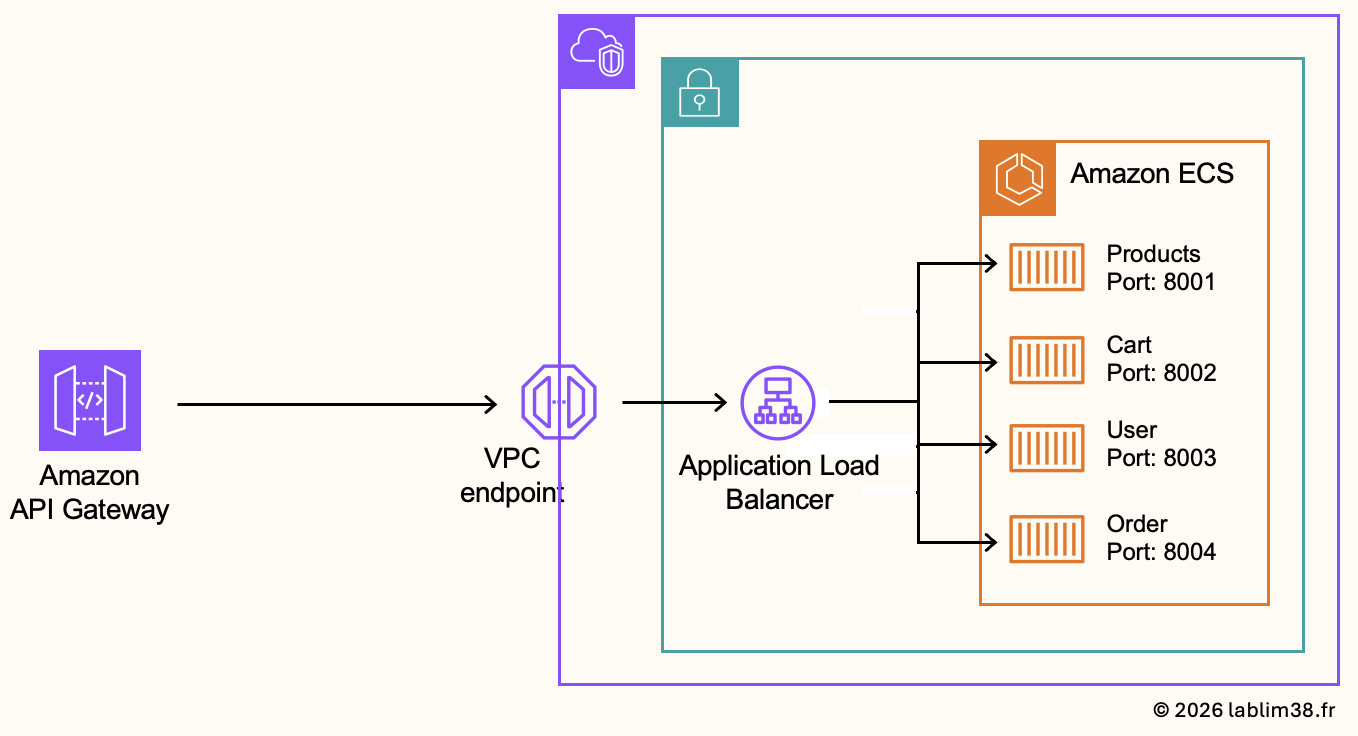
Creating the internal application load balancer
One important part of this architecture is the use of VPC networking components and private communication flows. The internal Application Load Balancer receives traffic through VPC endpoint and redistributes requests to the backend ECS services. The backend communication remains internal to the AWS network as much as possible. This design reduces public internet exposure, provides a better security posture and a better control of network flows.
Creation of the ALB Security Group:
To connect API Gateway with private resources inside the VPC, AWS provides a VPC Link. When created, the API Gateway automatically creates a dedicated Elastic Network Interface (ENI) inside your VPC. This ENI receives a private IP address from your VPC CIDR range and the traffic from API Gateway to the internal ALB is sent through this private ENI.
Because we don’t know yet the private IP address assigned to the VPC Link ENI, we will temporarily configure the ALB security group to allow HTTP traffic from the entire VPC CIDR range (10.10.0.0/16). Later, once the VPC Link ENI IP addresses are known, the security group can be tightened further to allow traffic only from those specific IPs.
Creation of the Target groups:
A target group represents a logical group of backend resources that the load balancer can forward traffic to. In our case, each micro-service will have its own dedicated target group:
- Product Service → Port 8001
- Cart Service → Port 8002
- User Service → Port 8003
- Order Service → Port 8004
They are essential because they allow the load balancer to route traffic dynamically, to separate micro-services cleanly and to monitor backend health. We will also use /health for health checks. It allows the ALB to continuously verify whether backend services are functioning correctly.
Creation of the listener rules:
Listener rules allow the load balancer to route requests to the correct backend service depending on the URL path. For example: /products* → Product Service target group. It allows multiple backend services to share a single load balancer while remaining logically separated.
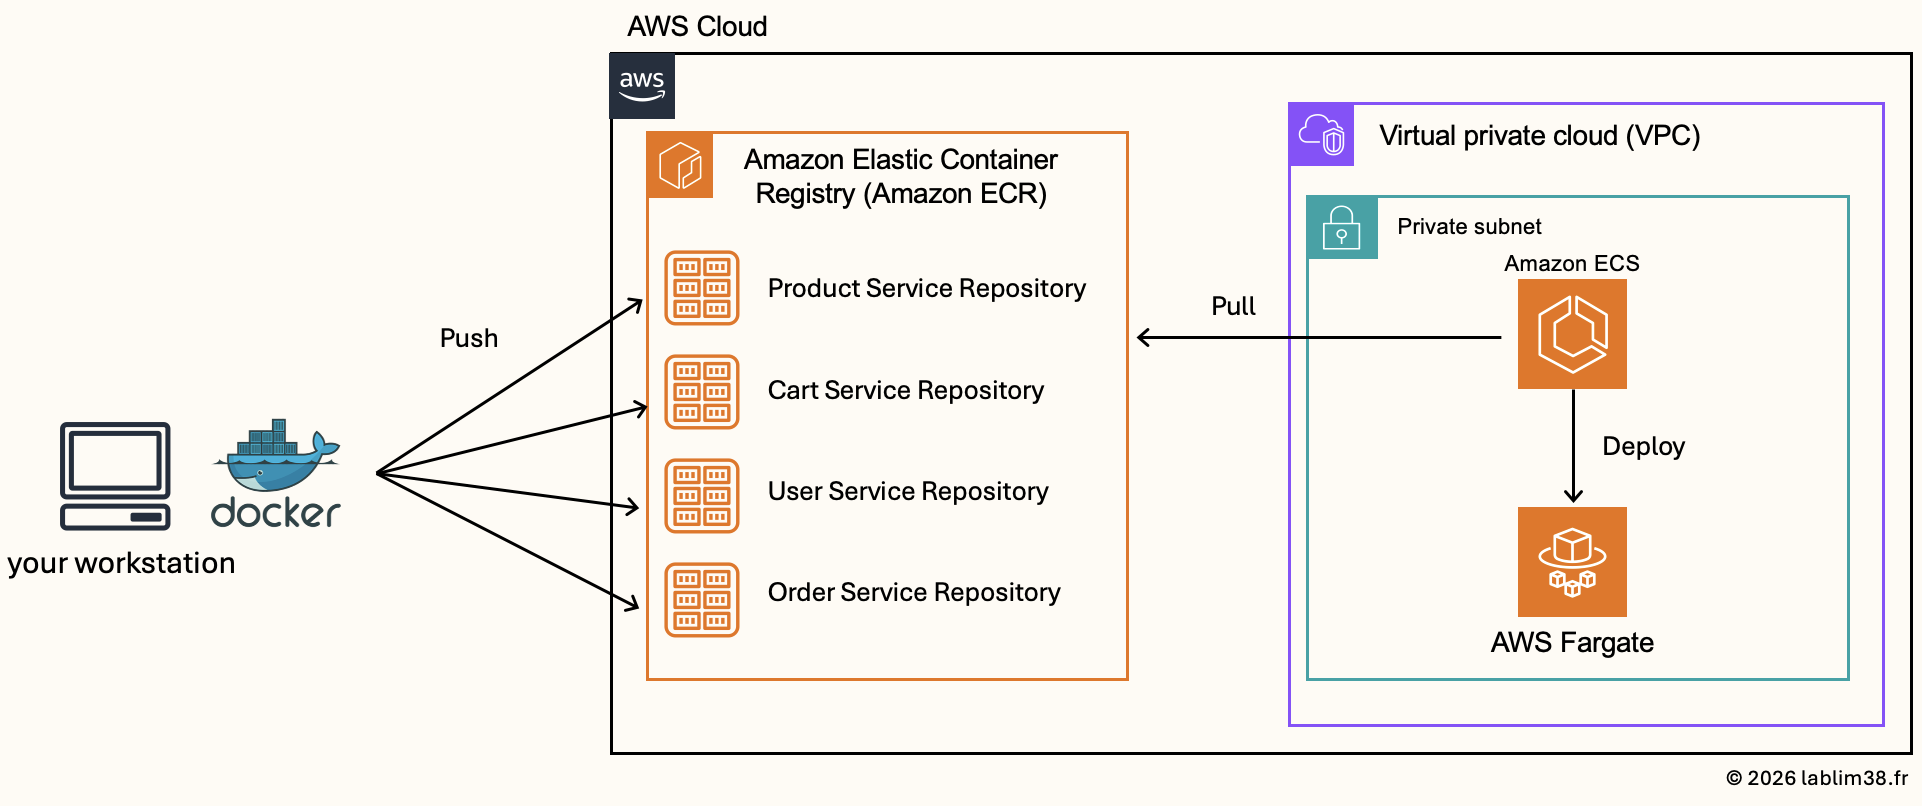
Creating the ECR repositories
We need a place to store our Docker images. This is where Amazon Elastic Container Registry (ECR) comes into play. Amazon ECR is AWS’s managed container image registry. It allows us to securely store, version, and manage Docker images before deployment.
Each backend micro-service will have its own dedicated ECR repository to evolve independently. Having dedicated repositories makes deployments cleaner and easier to manage in production environments. If tomorrow you build a new Docker image version for the Product service, it will simply be pushed to the Product ECR repository without impacting the other services.
Step 1 : create the ECR repositories
Step 2 : build and push docker images
At this stage, the application source code is still located on the local workstation, so we need to package each service into a Docker image before AWS can deploy it.
Step 3 : authenticate Docker to Amazon ECR.
Step 4 : Build the Docker image locally
Step 5 : push the image to Amazon ECR
Creating ECS Task Definitions for all services
Now that the Amazon Elastic Container Registry (ECR) repositories are created and all Docker images have been pushed successfully, we can configure the ECS services themselves. And before launching containers on Amazon Elastic Container Service (ECS), we need to create the ECS task definitions.
The task definition essentially tells ECS how to launch a container for a specific service. We define critical parameters such as:
- Which Docker image to use
- Which port the container should listen on
- CPU allocation
- Memory allocation
- Environment variables
- IAM permissions
- Logging configuration
- Networking settings
Creating the Security Group for ECS Tasks
Since our containers will run on different ports (8001-8004), the security group must allow inbound traffic on these ports. We will use a common security group shared across all backend services. However, remember, traffic should only come from the internal Application Load Balancer. That means the source of the inbound rules will be the ALB security group itself. This configuration ensures that backend containers remain private and only receive traffic routed through the internal load balancer.
Creating the IAM Role for ECS Tasks
Containers often need permission to interact with other AWS services. Our backend services needs to read and update Amazon DynamoDB tables, access Amazon RDS, send logs to Amazon CloudWatch and publish notifications to Amazon SNS. Instead of embedding credentials directly inside the application, ECS automatically provides temporary credentials to the containers through the IAM role, with ECS Task Role.
Creation the ECS Task Definitions
Now, we can finally create the ECS task definitions for each backend service.
- Launch type: AWS Fargate
- Task role: previously created ECS task IAM role
- CPU & Memory allocation
- Container port
- Docker image URI from ECR
At this point, ECS has all the information required to launch and manage the backend containers automatically.
Creating the ECS cluster
We can create the Amazon Elastic Container Service (ECS) cluster that will host all backend microservices. For this architecture, we will use Fargate-only infrastructure. AWS will fully manage the compute layer for us. It simplifies container deployments and allows us to focus entirely on the application architecture.
We create the ECS services corresponding to each backend micro-service. An ECS service is responsible for :
– Launching tasks
– Keeping containers running
– Replacing unhealthy containers automatically
– Integrating with the load balancer
– Managing deployments
Each ECS service will use the task definitions created earlier in order to launch the correct Docker container on AWS Fargate. During the configuration, we associate each ECS service with its dedicated target group behind the internal Application Load Balancer. This architecture allows all backend services to remain private inside the VPC while still being accessible securely through the API layer.
Step 6 – API Gateway
Our application is now starting to take shape. We need to properly connect it to the outside world. For this, we will use Amazon API Gateway as the public entry point for all backend APIs. The API Gateway will expose the backend APIs publicly, route requests to the internal load balancer and handle authentication and authorization with security controls.
Connecting API Gateway to the internal ALB
The internal ALB resides inside the VPC and private subnets, while API Gateway itself is a managed AWS public service that does not live directly inside our VPC.
Our backend services need to stay private. For that, API Gateway communicate securely with the private load balancer thanks to VPC Link. As explained earlier, the VPC Link creates a private integration between API Gateway and resources located inside the VPC.
Configuring Authentication and Authorization
Another key responsibility of the API Gateway is controlling access to backend services. Not all API routes require authentication. You don’t need authentication to access products of a website so the Product API will remain public while cart, user and order APIs will require authentication. This is why the API Gateway layer becomes extremely important. We will configure different API routes depending on the required security level.
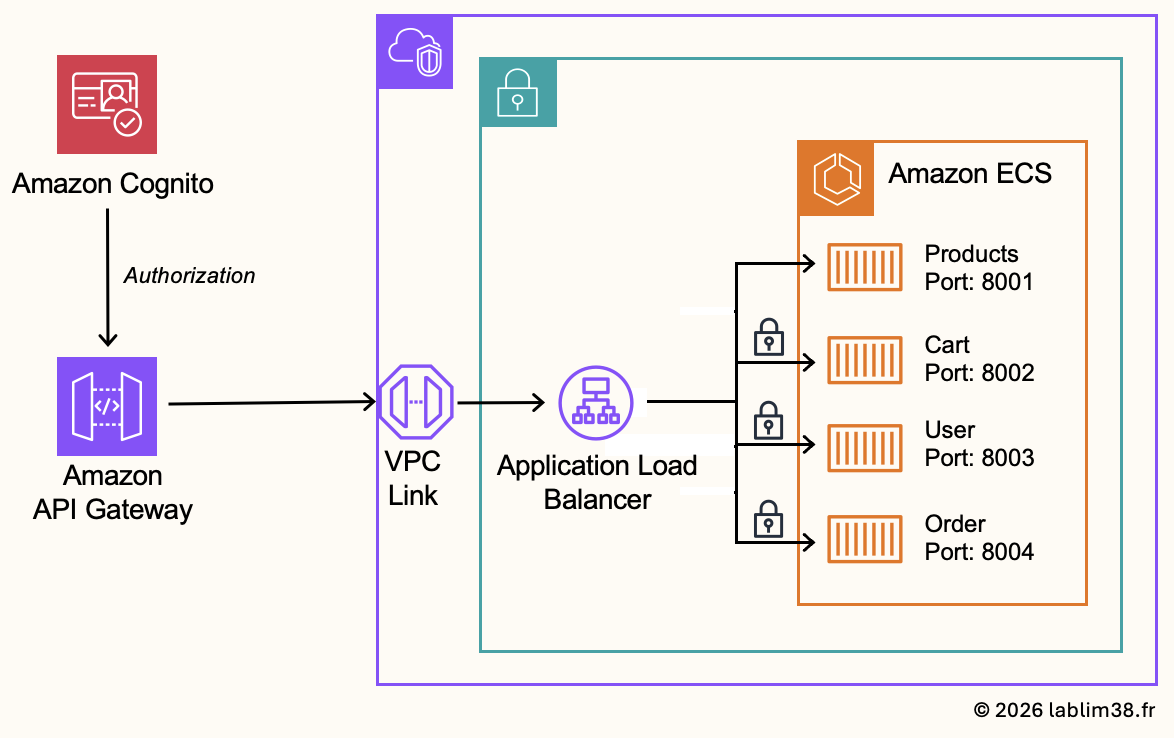
Public route for Product Service
Route: GET /products
This route will forward traffic to the Product service by using the VPC Link integration, without authentication
Protected routes for authenticated APIs
All other backend APIs will require authentication.
Route: ANY /{proxy+}
The proxy+ pattern captures every other route dynamically: GET / POST / PUT / DELETE / etc.
These requests will be protected using the Cognito JWT authentication previously configured. The API Gateway will validate the JWT token before forwarding requests to backend services.
CORS Configuration
CORS (Cross-Origin Resource Sharing) is required because the frontend domain and API domain may differ. Browsers enforce strict security rules for cross-origin requests, so API Gateway must explicitly allow them. Without proper CORS configuration, browsers will block API requests even if the backend itself is working correctly. This route usually does not require authentication.
Route: OPTIONS /{proxy+}
Deployment steps:
1/ Create the Security Group for the VPC Link
2/ Create the VPC Link
3/ Create the HTTP API Gateway
4/ Create the private integration
5/ Create the JWT Authorizer
6/ Configure the API routes
Step 7 — Frontend & Backend integration
Now we need to connect the frontend to the backend layer. The frontend application needs to know where to send API requests for our products, cart operations, user profile actions and order processing.
This is done by configuring the API Gateway base URL inside the frontend configuration file. This URL becomes the central entry point for all backend communication. Once configured, every frontend action will call the appropriate API route exposed by API Gateway, which will then forward requests to the internal backend services.
Updating the Frontend Configuration
We need to update the API endpoint configuration by replacing placeholder values with the actual API Gateway URL. This defines how the frontend communicates with the entire backend architecture.
Rebuilding and redeploying the Frontent
After updating the configuration, the frontend must be rebuilt. Since we are using a static frontend hosted on Amazon S3, any change in configuration requires rebuilding the frontend bundle and uploading the updated files to the S3 bucket. This ensures that users receive the latest version of the application when accessing the site through CloudFront.
CloudFront cache invalidation
CloudFront caches static content at edge locations for performance, updates may not be immediately visible. In some cases, we need to invalidate the CloudFront cache and force edge locations to fetch the latest version from S3 🌍. This ensures that users always receive the most up-to-date frontend version after deployment changes.
Step 8 – Notifications
The final step is adding notifications and event-driven integrations 🔄. In a real production eCommerce platform, placing an order usually triggers many additional processes:
– Sending a confirmation email to the customer
– Notifying the shipping department
– Updating inventory systems
– Triggering analytics workflows
– Integrating with third-party logistics providers
In AWS, two services are commonly used for this: Amazon Simple Notification Service (SNS) and Amazon EventBridge. Let me show you how to get a decoupled architecture between the ordering system, the notification system and third-party integrations.
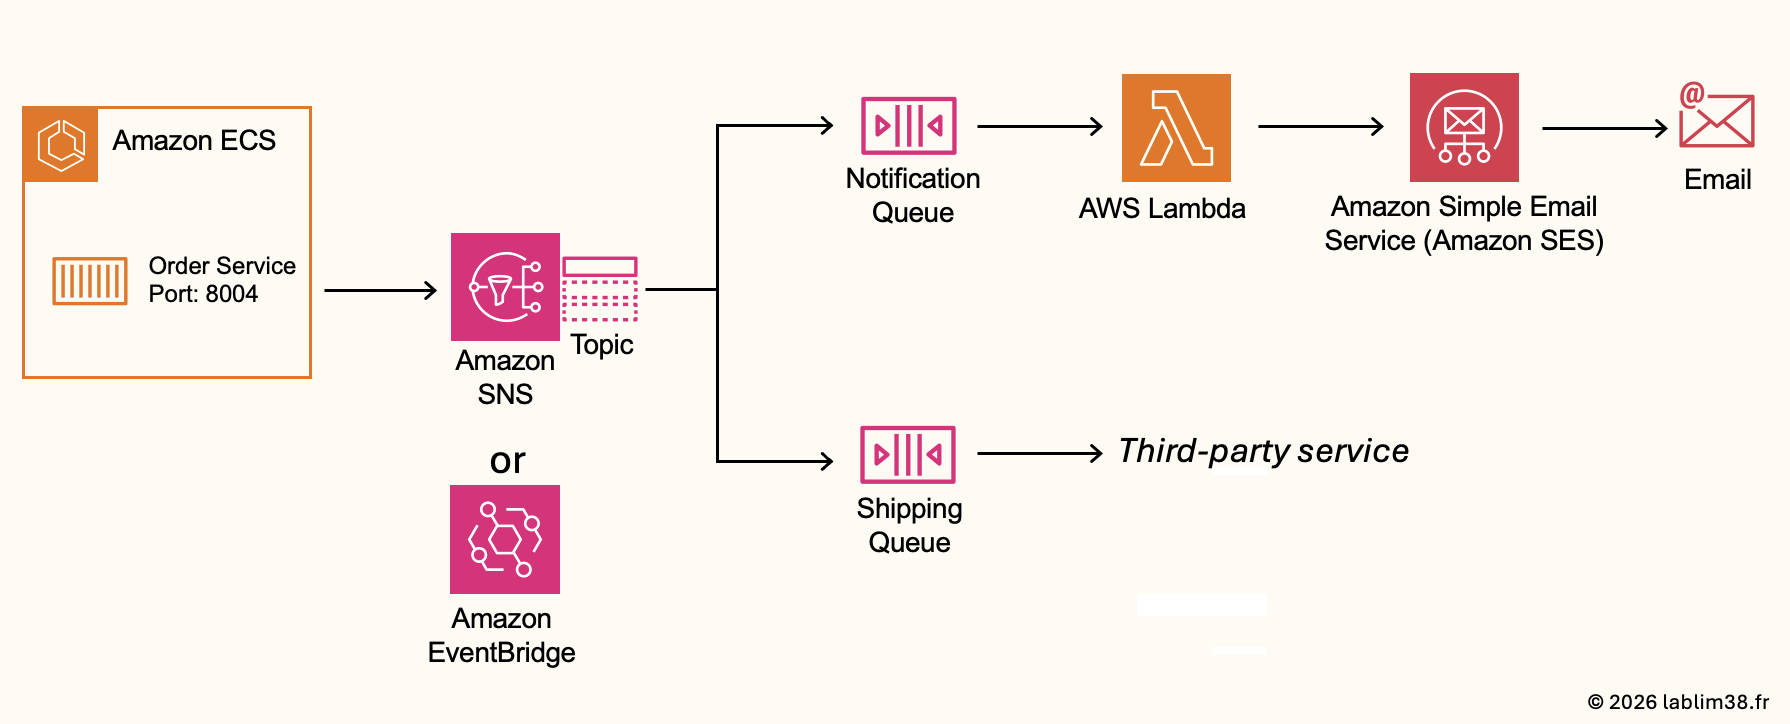
Amazon SNS
Amazon SNS is AWS’s fully managed publish/subscribe messaging service. A service publishes a message to an SNS topic and multiple subscribers can receive that message simultaneously. For example, when an order is created a notification service can send an email to the customer, the shipping service can receive the order information and another system could trigger analytics or reporting workflows. This architecture is called fan-out messaging because one message can be distributed to multiple downstream systems at the same time.
Amazon EventBridge (alternative to Amazon SNS): another AWS service often used for event-driven architectures. EventBridge is more advanced than SNS and is designed for complex event routing, event filtering, SaaS integrations and multi-service event orchestration.
EventBridge is more flexible and event-oriented but we will continue with SNS because it’s simpler and excellent for pub/sub messaging.
Working with SQS queues.
One limitation of SNS is that if a subscriber is temporarily unavailable, messages may be lost. To make the architecture more resilient, we introduce Amazon Simple Queue Service (SQS) queues.
SQS acts as a buffer between systems. Instead of processing messages immediately, messages are first stored safely in queues. The downstream services consume them asynchronously and temporary failures no longer result in data loss. In our architecture, we can imagine two queues: notification queue and shipping queue. This provides a much more decoupled and scalable architecture.
The Notification workflow with Lambda and Amazon SES
AWS Lambda: the Notification queue contains events related to customer notifications. An order is placed, a message is published to SNS. Then, SNS distributes the message to the Notification queue and a processing service reads the message to send an email to the customer. The process layer is implemented using AWS Lambda. Lambda is perfect for this kind of event-driven workflow because it automatically executes code whenever a new message arrives.
Amazon Simple Email Service (SES): For sending emails, SES allows applications to send transactional emails like order confirmations, shipping updates and other notifications.
The Shipping Queue and Third-party integrations
The Shipping queue follows the same logic. Instead of sending emails, the queue may be consumed by an internal shipping application or a third-party logistics provider. This allows external systems to process orders independently without directly impacting the core application.
Step 9 – SSL certificates
Our application is fully operational and accessible through CloudFront. However, there is one last topic to address: securing communications using SSL/TLS certificates. SSL is the technology that encrypts communications between the user’s browser and the web application. This is what enables HTTPS: communications are encrypted, user authentication is secure, API calls are protected and browsers trust the website. Without SSL/TLS, data travels in plain text, which is not secure at all.
CloudFront as SSL Termination Layer
Right now, SSL is already partially handled automatically by Amazon CloudFront. Because the default CloudFront domain is owned and managed by AWS, AWS automatically provides and manages the SSL certificate for that domain. Everything works out-of-the-box without any additional configuration.
However, if you purchased your own domain name and configured DNS redirection using Amazon Route 53 (like in my first article), you probably want users to access your application using https://yourdomain.com instead of the default CloudFront URL. In that case, we need to tell CloudFront to use our custom domain name and attach a valid SSL certificate for this domain.
AWS Certificate Manager (ACM)
To generate and manage SSL certificates, AWS provides AWS Certificate Manager. It requests SSL certificates, manages renewals automatically, deploys certificates to AWS services and it can import external certificates if needed.
Step 1: Service scope consideration.
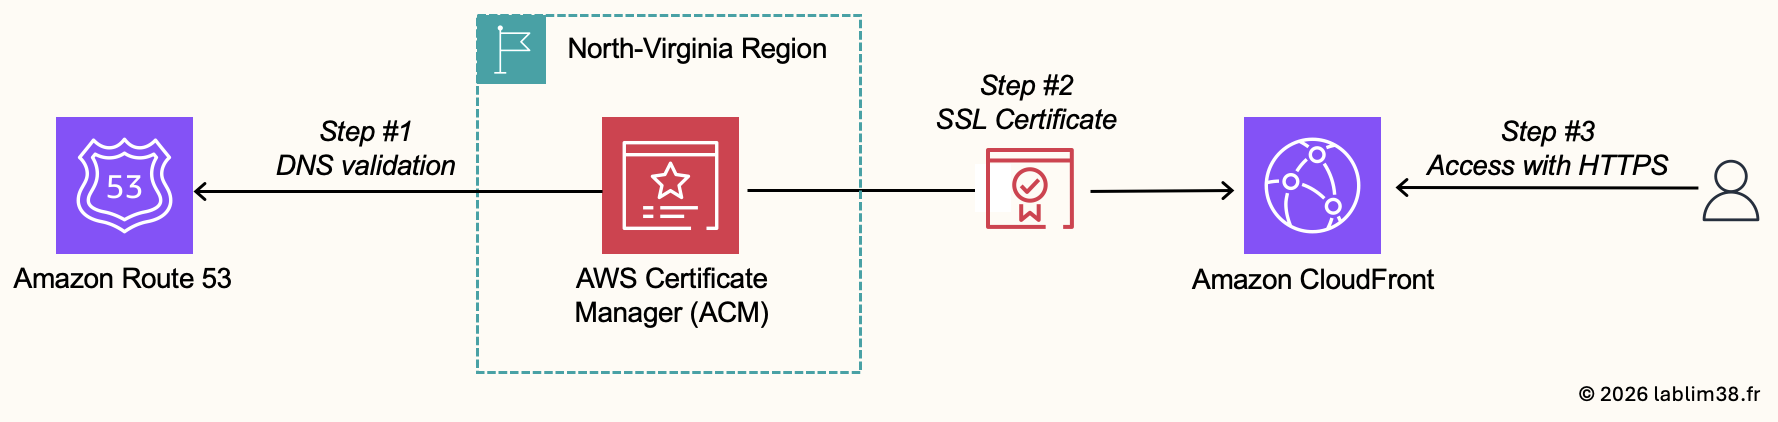
CloudFront is a global AWS service while ACM is a regional service. For CloudFront specifically, SSL certificates must be created in: US East (N. Virginia) — us-east-1.
By default, ACM automatically opens in your current AWS region, so do not forget to manually switch to North Virginia region before requesting the certificate.
Step 2: Proving Domain Ownership.
AWS will not issue an SSL certificate without verifying that you actually own the domain name. To validate ownership, ACM provides some methods, and the easiest one is through DNS validation. Since we already use Amazon Route 53, the process is extremely simple. ACM automatically generates DNS validation records and can directly create them inside Route 53. Once validated, the certificate becomes available for deployment.
Step 3: Deploying the Certificate to CloudFront.
We attach the ACM certificate to the CloudFront distribution. Once deployment is completed, CloudFront serves HTTPS traffic using your own domain, SSL/TLS encryption is fully enabled.
Conclusion
Congratulations if you made it this far ⚡ The entire application stack is fully operational and production-ready. Through this project, we explored how a complete eCommerce platform can be built using a modern cloud-native AWS architecture. The main objective was to understand the architecture and how AWS managed services interact together to build scalable and resilient applications. One of the biggest strengths of AWS is precisely this ecosystem approach: you can combine dozens of managed services together without having to manage physical infrastructure manually.
Possible improvements:
Of course, this architecture can still be improved and hardened further for real production workloads. For example, we could add AWS WAF to protect public endpoints against malicious traffic and AWS Shield for additional DDoS protection on public-facing services like CloudFront and API Gateway. Security and automation are typically the next major steps after getting the architecture functional.
Using AI to improve the project
Another interesting improvement path is leveraging AI agents to accelerate development and infrastructure management. Amazon Kiro is a very powerful option for AWS-related projects. You can point the AI agent directly to your repository and ask it for architecture improvements, security recommendations, infrastructure enhancements, etc. Kiro understands AWS services and cloud-native architectures extremely well. For AWS-focused projects, it can become a very valuable assistant for both learning and accelerating development workflows.
If there is one thing to remember from this project, it is that building modern applications in the cloud is no longer only about writing code. Personally, this type of project is exactly why I enjoy working with AWS so much. It combines architecture, networking, security, automation and scalability into a single ecosystem where everything integrates surprisingly well together. I hope this walkthrough helped you better understand how all these AWS services fit together to build a real-world application from frontend to backend.
Cheers,