

Since Broadcom acquired VMware, more and more service providers have started looking for alternatives and Proxmox has quickly become one of the most popular choices. The good news? Acronis fully supports Proxmox environments and makes it possible to build a complete Disaster Recovery strategy with backup, failover, orchestration, and automated testing. In this article, I’ll show you how to build a resilient Site-to-Site Disaster Recovery environment for a Proxmox infrastructure using Acronis Cyber Protect Cloud.
It has been official for several months now, but I felt I had to write an article about it since more and more service providers are using Proxmox. Acronis is fully compatible with Proxmox and enables organizations to protect and back up their Proxmox environments efficiently. Beyond backup, Acronis also allows businesses to implement a complete Disaster Recovery strategy to minimize downtime and recover critical workloads quickly.
What is a Disaster Recovery Plan?
In today’s IT landscape, companies need to reinvent themselves while maintaining control over their infrastructures. Most importantly, they must always have a reliable Disaster Recovery Plan (DRP) in place to ensure business continuity in case of outages, cyberattacks, or unexpected disasters.
A Disaster Recovery Plan (DRP) is a strategy designed to ensure business continuity in the event of a major incident such as a cyberattack, hardware failure, human error, or natural disaster. The objective is to restore critical services, applications, and data as quickly as possible while minimizing downtime and operational impact. A DRP relies on backups, replication, and a pre-configured recovery infrastructure ready to take over when needed.
What is Site-to-Site Connectivity?
Site-to-Site connectivity is a network architecture designed to ensure Disaster Recovery (DR) and Business Continuity by securely connecting two different infrastructures together.
Site-to-Site connectivity is a secure network connection established between two different infrastructures, usually through a VPN tunnel. It allows the recovery site to function as an extension of the primary local network, enabling seamless communication between both environments. This type of connectivity is particularly useful for Disaster Recovery scenarios where an entire infrastructure is hosted in a single location and needs a reliable secondary site for failover and recovery operations.
The Disaster Recovery infrastructure is pre-configured and ready to be used. The backups are part of a complete Disaster Recovery Plan (DRP), allowing organizations to restore services rapidly with minimal downtime. It provides a secure and efficient way to maintain service availability while keeping full control over your infrastructure and recovery processes.
Prerequisites
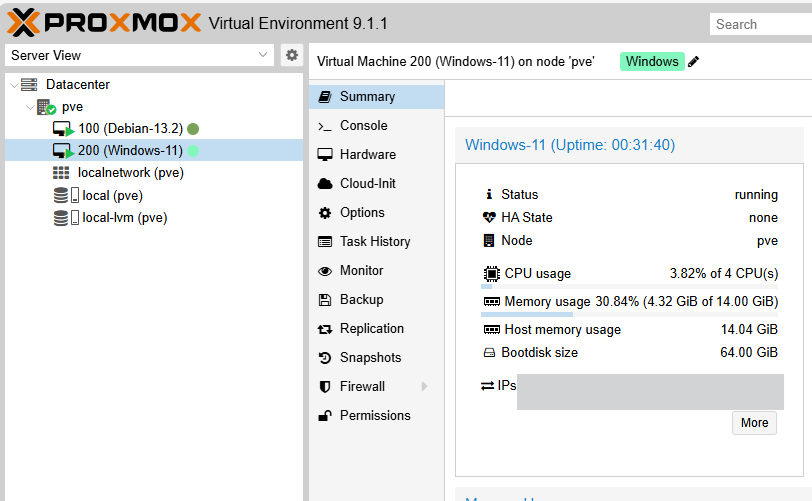
The first prerequisite for this setup is, of course, having an infrastructure running on Proxmox. I will cover the Proxmox installation process itself in a future article, but that is not today’s focus. To demonstrate the experience, I built a relatively simple infrastructure hosted on Proxmox. My lab environment contains two virtual machines: one Debian 13.2 VM and one Windows 11 VM. On the Windows 11 VM (VMID 200), I configured 4 vCPUs, 14 GB of RAM, and a 64 GB system disk.
This is obviously a small infrastructure, but you will quickly see that the overall process remains exactly the same, and relatively simple, regardless of the size of the infrastructure behind it.
This tutorial is mainly intended for Acronis service providers, since the second prerequisite is access to the Acronis Cyber Protect Cloud console. You must have the Acronis agent installed on the machines you want to protect with a protection plan. The protection plan must be properly configured so that both Backup and Disaster Recovery are enabled.
Below is the protection plan associated with my Windows 11 VM. In this configuration:
– Offsite backups are scheduled every weekday (excluding weekends) at 10:45 AM.
– The Disaster Recovery option is also enabled. Once enabled, Acronis automatically provisions a recovery server for the protected machine, which will later be used during failover operations.

Honestly, Acronis handles a huge part of the heavy lifting for you. As soon as Disaster Recovery is activated in the protection plan, the DISASTER RECOVERY tab almost appears “like magic” on the left-side menu of the console.
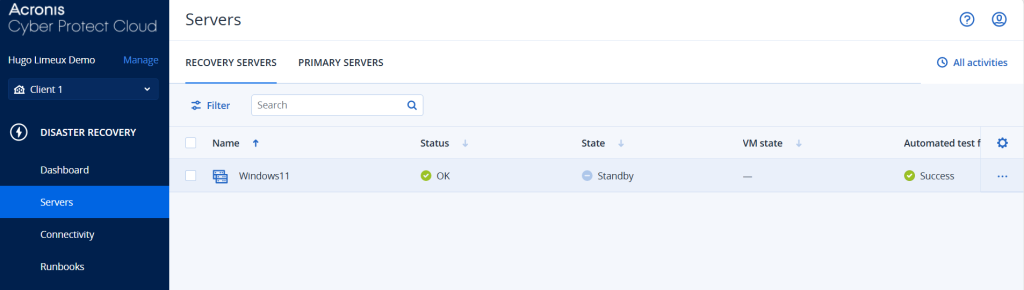
You can then navigate to: Disaster Recovery → Servers to view and manage the recovery servers automatically provisioned by Acronis.
Setting Up Site-to-Site VPN Connectivity
Our work here will focus exclusively on configuring the network connectivity required for Disaster Recovery.
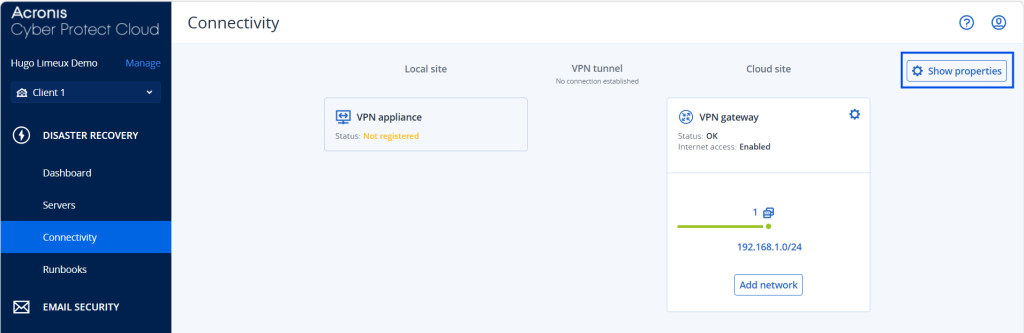
By navigating to the Connectivity tab, you get a clear overview of the infrastructure and the three main components that must be configured correctly:
- The VPN appliance deployed on your local site
- The VPN gateway hosted by Acronis
- The VPN tunnel connecting both environments
In practice, our main responsibility is simply to deploy and configure the VPN appliance on the customer side. Acronis automatically manages both the VPN gateway and the VPN tunnel in the cloud environment.
Installing the VPN Gateway
From the cloud console, navigate to: Disaster Recovery → Connectivity
Then select: Site-to-Site OpenVPN Connection → Configure
At this stage, the system automatically starts deploying the VPN gateway in the cloud. This operation may take a few minutes. Meanwhile, you can already proceed with the next step: deploying the VPN appliance locally.
Installing the VPN Appliance
The VPN appliance is directly provided by Acronis.
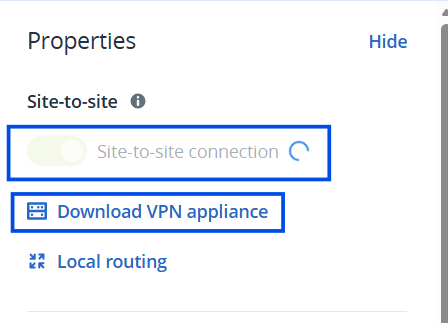
By clicking on Show properties, you can review the different connectivity methods available for Disaster Recovery environments. Depending on the infrastructure and customer requirements, several options may exist, but in this tutorial we will focus specifically on the Site-to-Site OpenVPN deployment model.
Today, we will focus specifically on the Site-to-Site connectivity model. I invite you to enable this connectivity method and download the VPN appliance provided by Acronis.
Acronis guides us through the deployment process with 8 configuration steps. Let’s start with the first one: downloading the appliance. Since Proxmox is based on KVM/QEMU virtualization, the appliance is provided in the QCOW2 format, which is perfectly compatible with Proxmox environments.
The second step does not concern us here. The requirement to ensure that Promiscuous Mode / MAC Address Spoofing is enabled only applies to infrastructures running on ESXi or Hyper-V hypervisors.
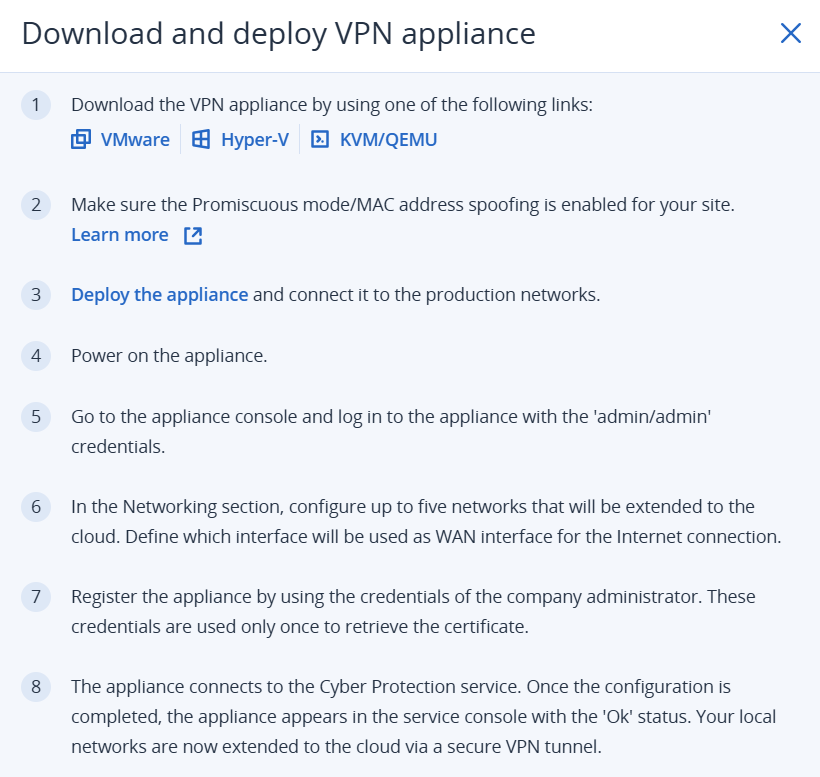
We can therefore move directly to the third step, which consists of deploying the appliance and connecting it to the production network.
Once the appliance has been downloaded, we will transfer it to our Proxmox hypervisor, directly into the root directory. To do that, open a shell on your local machine, navigate to the folder containing the appliance, and run the following command:scp .\APPLIANCE-NAME.qcow2 root@PROXMOX-IP:/root/

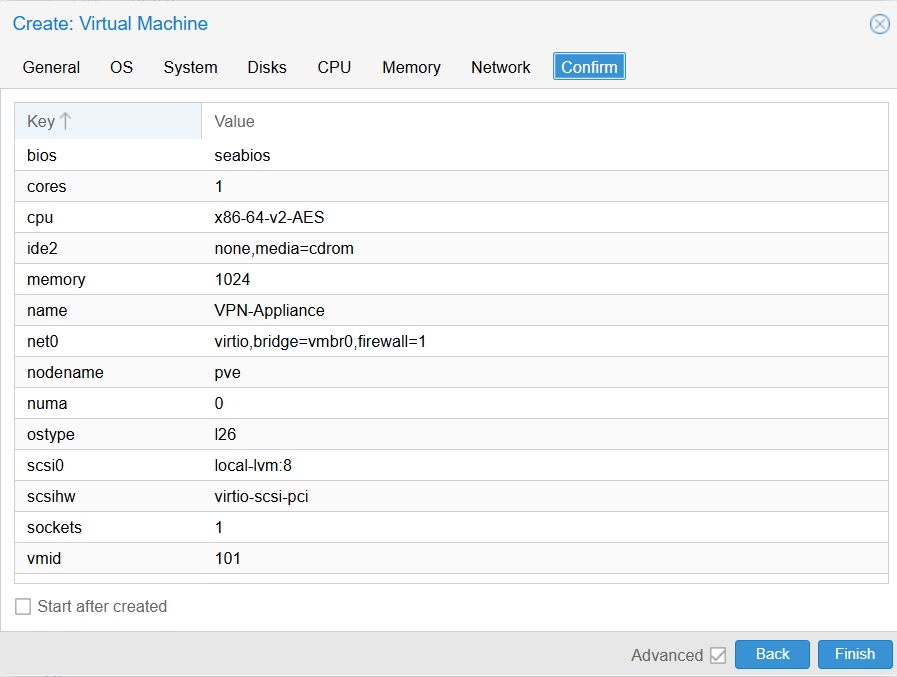
Next, create a lightweight virtual machine in Proxmox with the following specifications:
– 1 vCPU
– 1 GB RAM
– 8 GB disk space
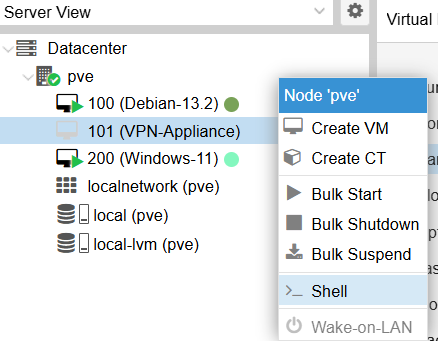
Once the VM has been created, open the Proxmox shell.
We will now import the appliance disk into the newly created VM using the following command:qm importdisk VMID /root/APPLIANCE-NAME.qcow2 local-lvm
This command imports the QCOW2 disk into the Proxmox storage and attaches it to the VM configuration.
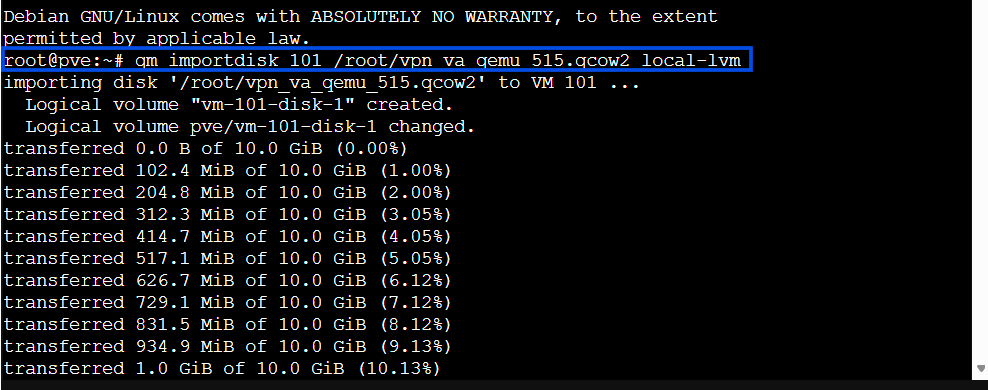
Once you get the following message : unused0: successfully imported disk 'local-lvm:vm-VMID-disk-1'
Congrats! The hardest part is already behind you 😄 From there, you simply need to attach the imported disk to the VM hardware configuration, configure the boot order correctly, and start the appliance.
Attaching the imported disk:
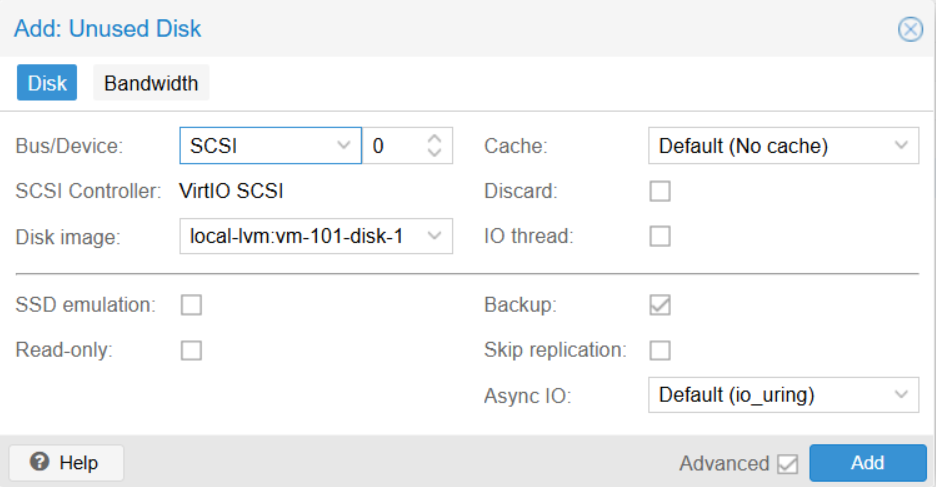
In the Proxmox UI, navigate to: VM → Hardware → Unused Disk
You should see the newly imported disk listed there.
Click on it and attach it to the virtual machine.
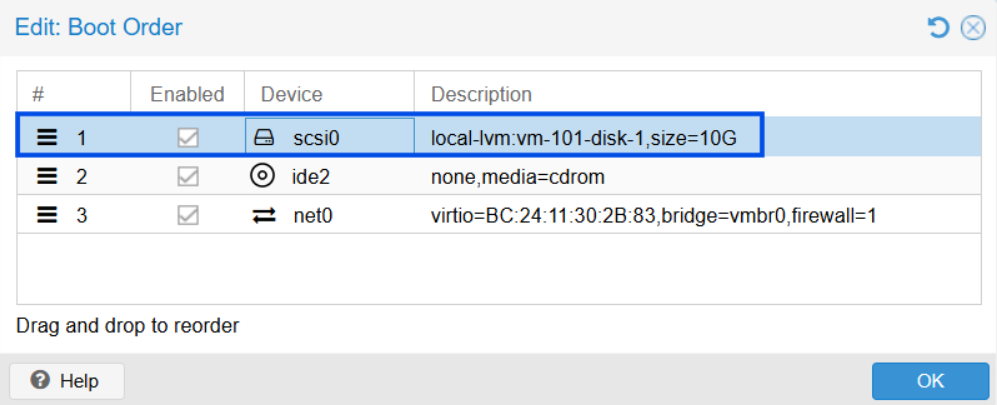
Configuring the Boot Order:
Make sure the VM boots from this imported disk first
Navigate to: Options → Boot Order
Then move scsi0 to the first position in the boot sequence.
Verifying the SCSI Controller:
Go back to the Hardware section and verify that the SCSI Controller is configured as VirtIO SCSI
The VPN appliance is optimized for VirtIO drivers under KVM/QEMU environments. It ensures better compatibility, improved disk performance, and avoids potential boot or detection issues with the imported QCOW2 disk.
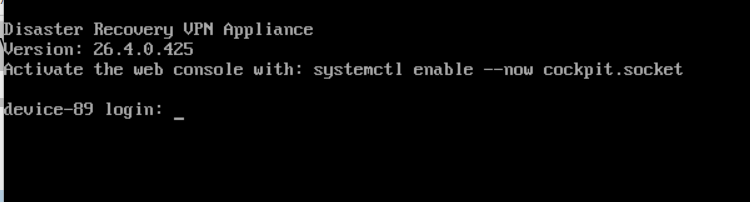
Starting the VPN appliance
We can finally start the appliance. At boot, you will be prompted to log in using the default credentials:login: admin
password: admin
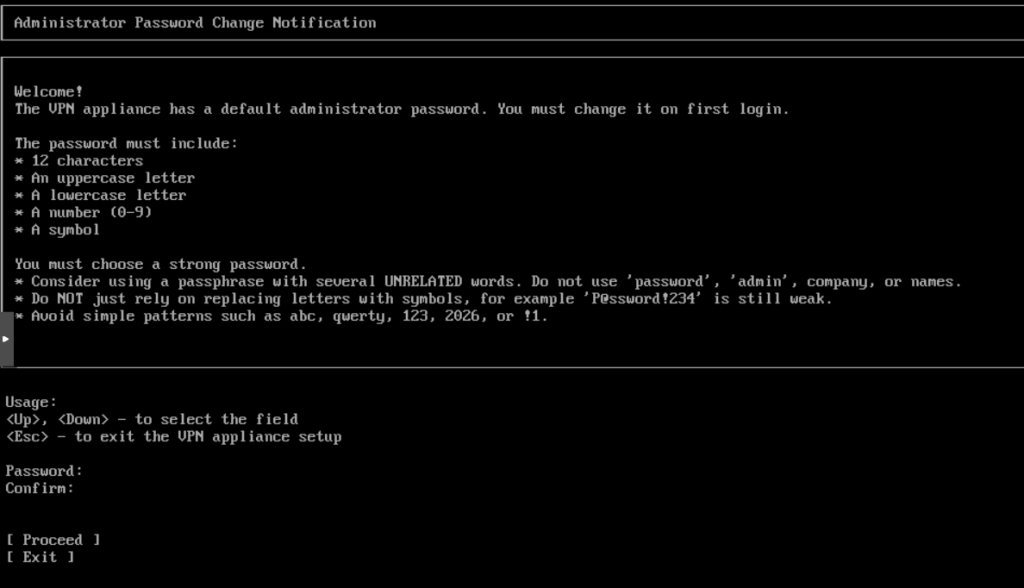
And of course, for security reasons, the very first thing the system asks you to do is change the default password 🙂
The VM console is configured with a QWERTY keyboard layout by default, so be careful when typing your new password. Trust me, this can become confusing very quickly for AZERTY users 😅
If we go back to the 8 deployment instructions mentioned earlier, we are now at step 6 since we have successfully logged into the appliance and changed the default password. You should now see the following screen:
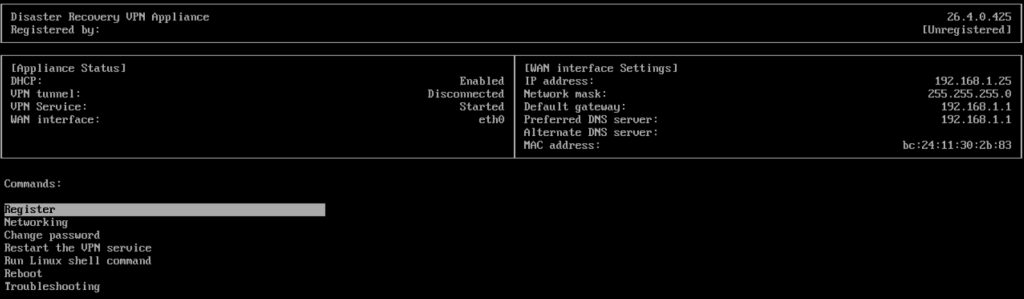
At this stage, the appliance is not yet registered, which is completely normal. However, the VPN service has already started running. The next step is to configure the network settings. You can configure up to five networks that will be extended to the cloud through the Site-to-Site VPN tunnel. You also need to define which network interface will be used as the WAN interface for internet connectivity.
Since my infrastructure is relatively simple, I only need to verify the consistency of the IP addresses and confirm the production network that will be extended to the cloud.

Once the network configuration is completed, return to the main page by pressing Escape and proceed with the appliance registration. You will be asked to enter the administrator credentials of your customer tenant in Acronis Cyber Protect Cloud.
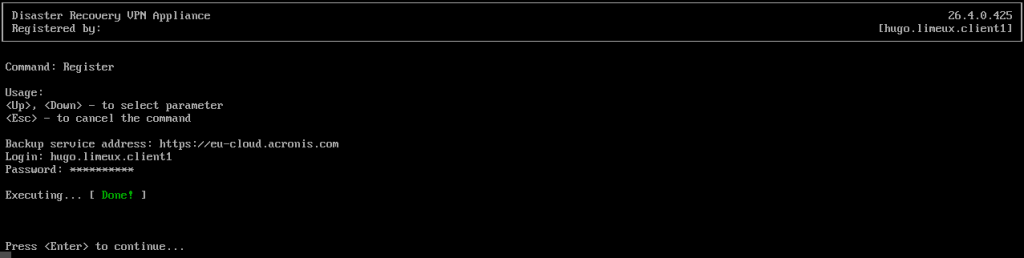
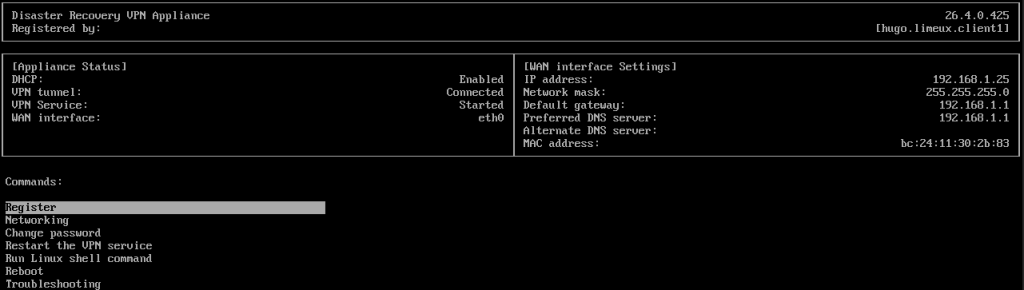
After the registration process is completed, the appliance status will change and you will see the administrator account login displayed on the interface.
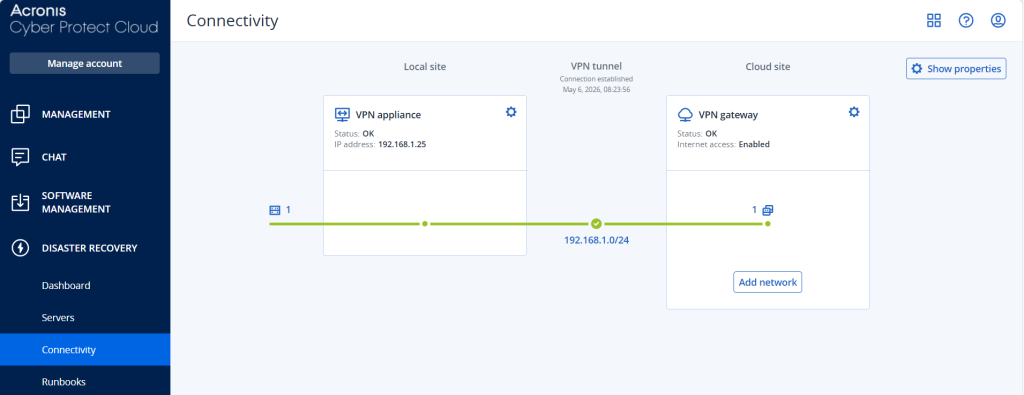
And that’s it! When you go back to the web interface under: DISASTER RECOVERY > Connectivity
You can now visually confirm:
- The extension of the local network to the cloud
- The successful deployment of the VPN appliance
- The VPN gateway hosted by Acronis
- The active VPN tunnel connecting both environments
Congratulations 🎉 Your Site-to-Site Disaster Recovery connectivity is now fully operational.
Orchestrate and automatically test your Disaster Recovery Plan
At this point, the Disaster Recovery setup for our infrastructure is fully operational, and technically we could stop here. However, I would like to go a little further and present a few best practices that can significantly improve your Disaster Recovery strategy.
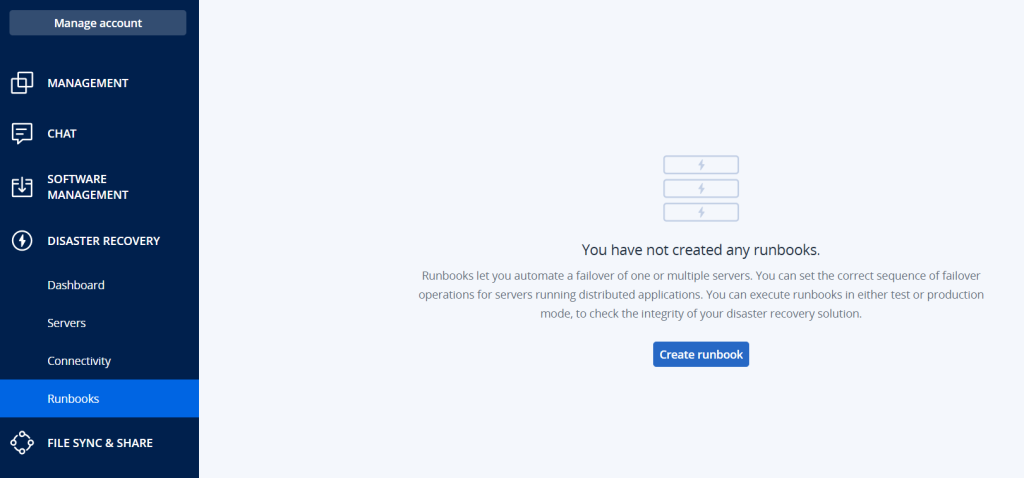
Orchestration with Runbooks
During a real disaster, the last thing you want is manually powering on 15 VMs in the right order while everyone is panicking 😄 If your infrastructure is more complex than mine, you will probably want your servers to start in a specific order:
- Database servers before application servers
- Domain Controllers before user-facing services
- DNS and Active Directory before file servers
- Authentication services before web applications
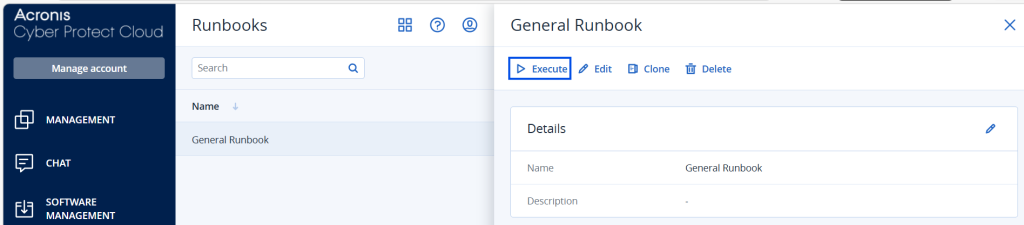
This is exactly where Runbooks become extremely useful. With runbooks, you can orchestrate and automate the startup sequence of your infrastructure directly from Acronis.
Runbooks are configured through the Runbooks tab using a very intuitive visual editor.
The editor is simple and easy to understand. You define a list of steps and actions that must be executed in a precise order. As long as the actions from one step are not successfully completed, the workflow will not move to the next one. This prevents chaotic failovers and reduces the risk of service inconsistencies or data corruption during a disaster scenario.
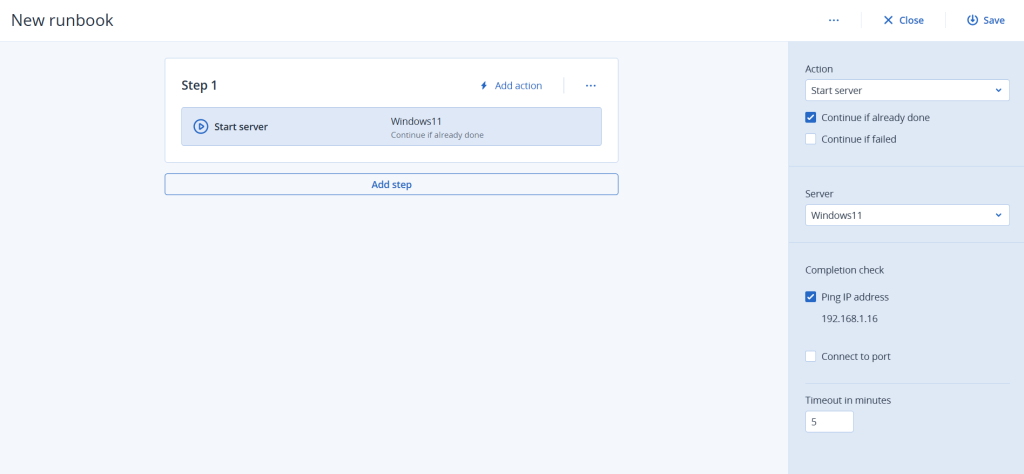
Everything can run automatically unless you intentionally add manual validation steps. In that case, you will receive a notification requesting validation before the runbook proceeds to the next stage. This can be useful where certain actions still require human approval.
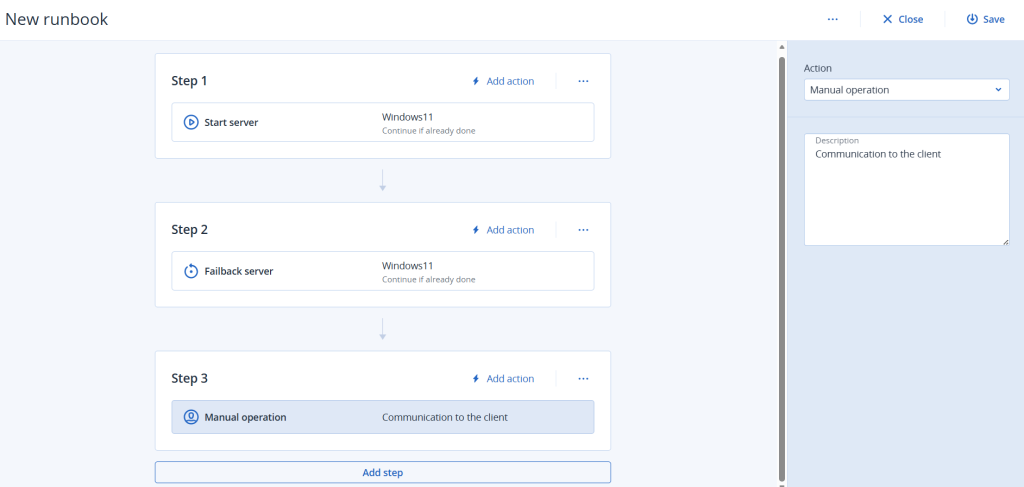
You can also call and nest other runbooks inside a master runbook. For example, you have one runbook per department / service or per application stack. Then a global Disaster Recovery runbook can orchestrate all those secondary runbooks together. This modular approach makes Disaster Recovery procedures much easier to maintain and scale over time.
In the middle of a disaster situation, instead of manually managing dozens of recovery tasks under pressure, you simply execute the runbook and let the automation handle the recovery process calmly and consistently.
Automated Disaster Recovery Testing
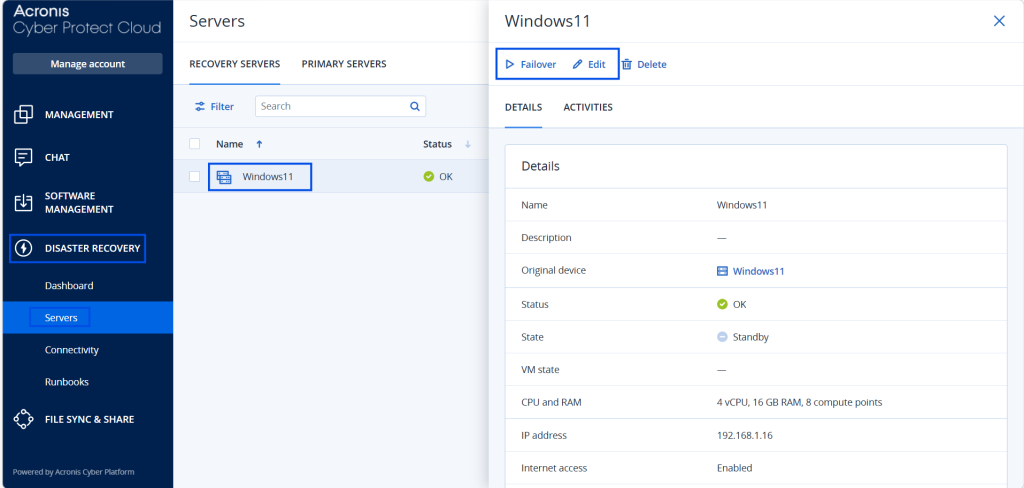
If you want to test the Disaster Recovery process for a specific machine, you can do it manually or automatically. To access these options, navigate to DISASTER RECOVERY > Servers and click on the VM you want to test. You will find several useful pieces of information there, including:
- Allocated CPU and RAM resources
- IP address configuration
- Current RPO status
- Failover options
You can directly launch a failover test from this interface. The VM will start inside the Acronis cloud environment, allowing you to verify that the recovery process works correctly. Once the test is completed, do not forget to perform the failback operation to return production workloads to the original infrastructure.
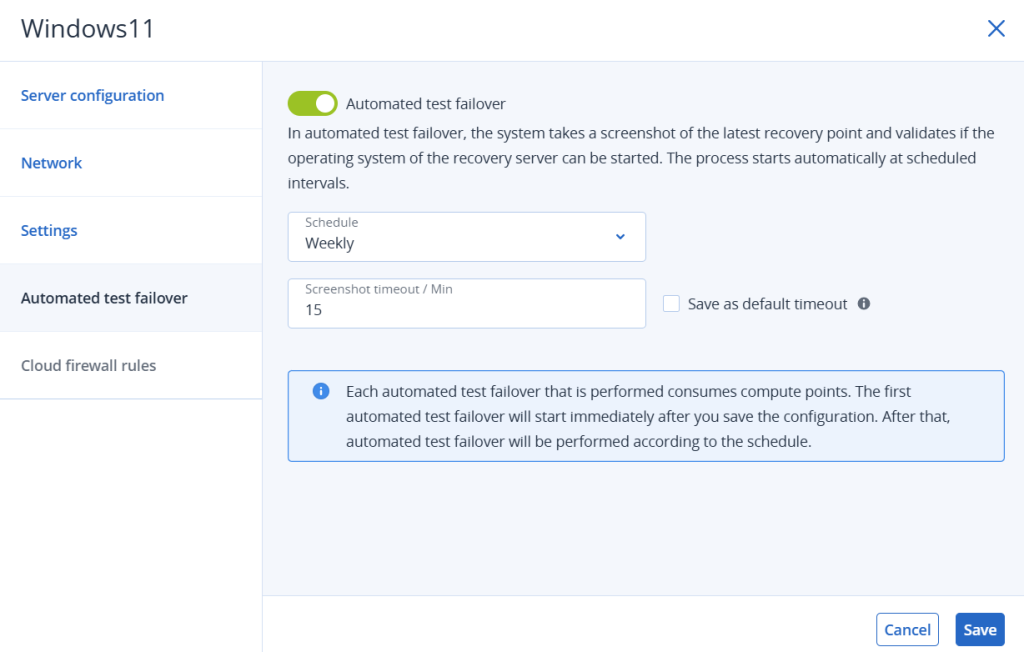
If you click on Edit, you can review and modify server configuration, network settings, automated test failover and cloud firewall rules
If you do not want to manually perform failover/failback tests every week just to ensure everything is working properly, you can ask Acronis to automate those tests for you using the Automated Test Failover feature.
In the example below, Acronis automatically performs a recovery test every week. The VM is automatically started in the cloud and remains powered on for 15 minutes. Then, a screenshot of the VM console is captured automatically. It gives you a quick and reliable way to verify that the Disaster Recovery Plan remains fully operational over time.
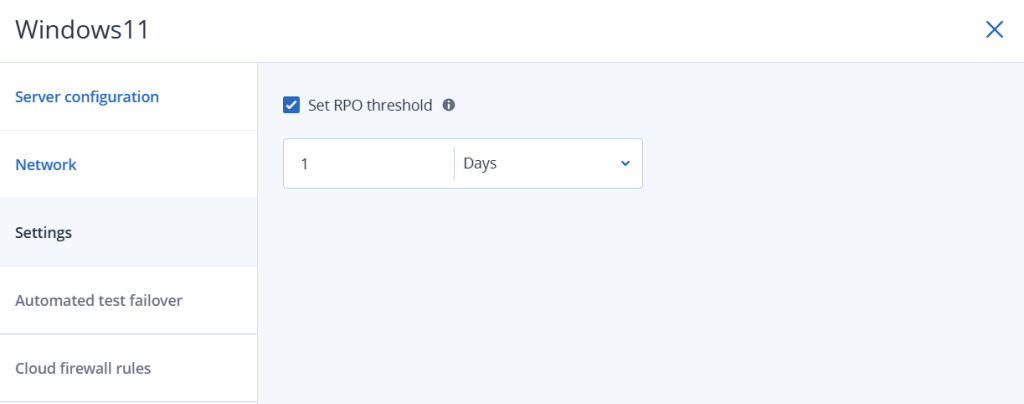
Understanding and Monitoring RPO Compliance
The last point I really want to emphasize is the importance of maintaining consistency between backup frequency, customer compliance requirements and business expectations. This is where the concept of RPO (Recovery Point Objective) becomes critical.
RPO defines the maximum amount of data your customer is willing to lose during a disaster.
For example: if backups are performed once per day but the customer can only tolerate 4 hours of data loss then the backup policy clearly needs to be adjusted.
To help maintain compliance, you can configure the expected RPO directly in the Settings module.
In my example here, I configured an RPO of one day, meaning I accept losing up to 24 hours of data in a worst-case scenario.
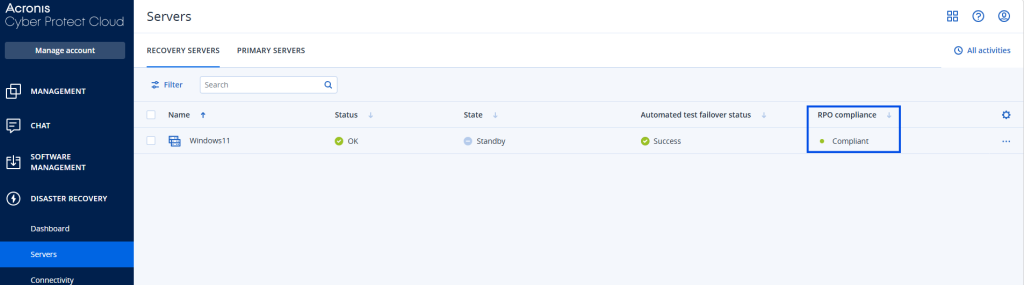
This allows you to immediately visualize which servers are compliant with customer expectations and which ones are not. As a good admin, a backup was performed this morning so my RPO compliance indicator is green 🙂
I hope this tutorial was helpful and comprehensive enough to guide you through setting up Disaster Recovery with Acronis and Proxmox. I also wanted to go a bit further by sharing a few operational best practices that can truly improve the reliability of a Disaster Recovery strategy over time.
Disaster Recovery is not only about technology, it’s also about preparation, automation, testing, and maintaining operational discipline.
Feel free to reach out if you have questions, feedback, or if you would like to discuss Disaster Recovery, Proxmox, or Acronis deployments further.
Cheers,
Great job mate 🙂