

Here we are! My very first post! And what better way to kick things off than by breaking down the infrastructure behind this blog from scratch? In this article, I’ll walk you through how everything is built: from domain management with GoDaddy, to DNS configuration with AWS Route 53, all the way to hosting on AWS Lightsail and running WordPress. A complete, hands-on breakdown of the architecture, the choices behind it, and why each piece fits into the bigger picture.
Over the past few weeks, I’ve been diving into AWS Cloud training and running my own hands-on labs to better understand how everything works behind the scenes. I’ll be documenting these experiments and projects over the coming weeks. And then I thought: why not host this blog on AWS as well?
The goal here isn’t to build some ultra-scalable enterprise platform. It’s to understand how to host a simple WordPress blog on AWS while keeping costs under control. One of the biggest fears when starting with cloud platforms is getting surprised by the bill at the end of the month. So I challenged myself to build a lightweight, secure, and low-cost hosting setup. Aside from the domain name, this blog will cost me less than 8€/month to run. Not bad for a real cloud-hosted environment? In this article, I’ll walk you through the entire setup in 6 simple steps.
Overview of the architecture
The architecture behind this blog is simple. The goal was to create a clean, affordable, and easy-to-manage AWS environment to host a personal WordPress blog while learning cloud fundamentals along the way.
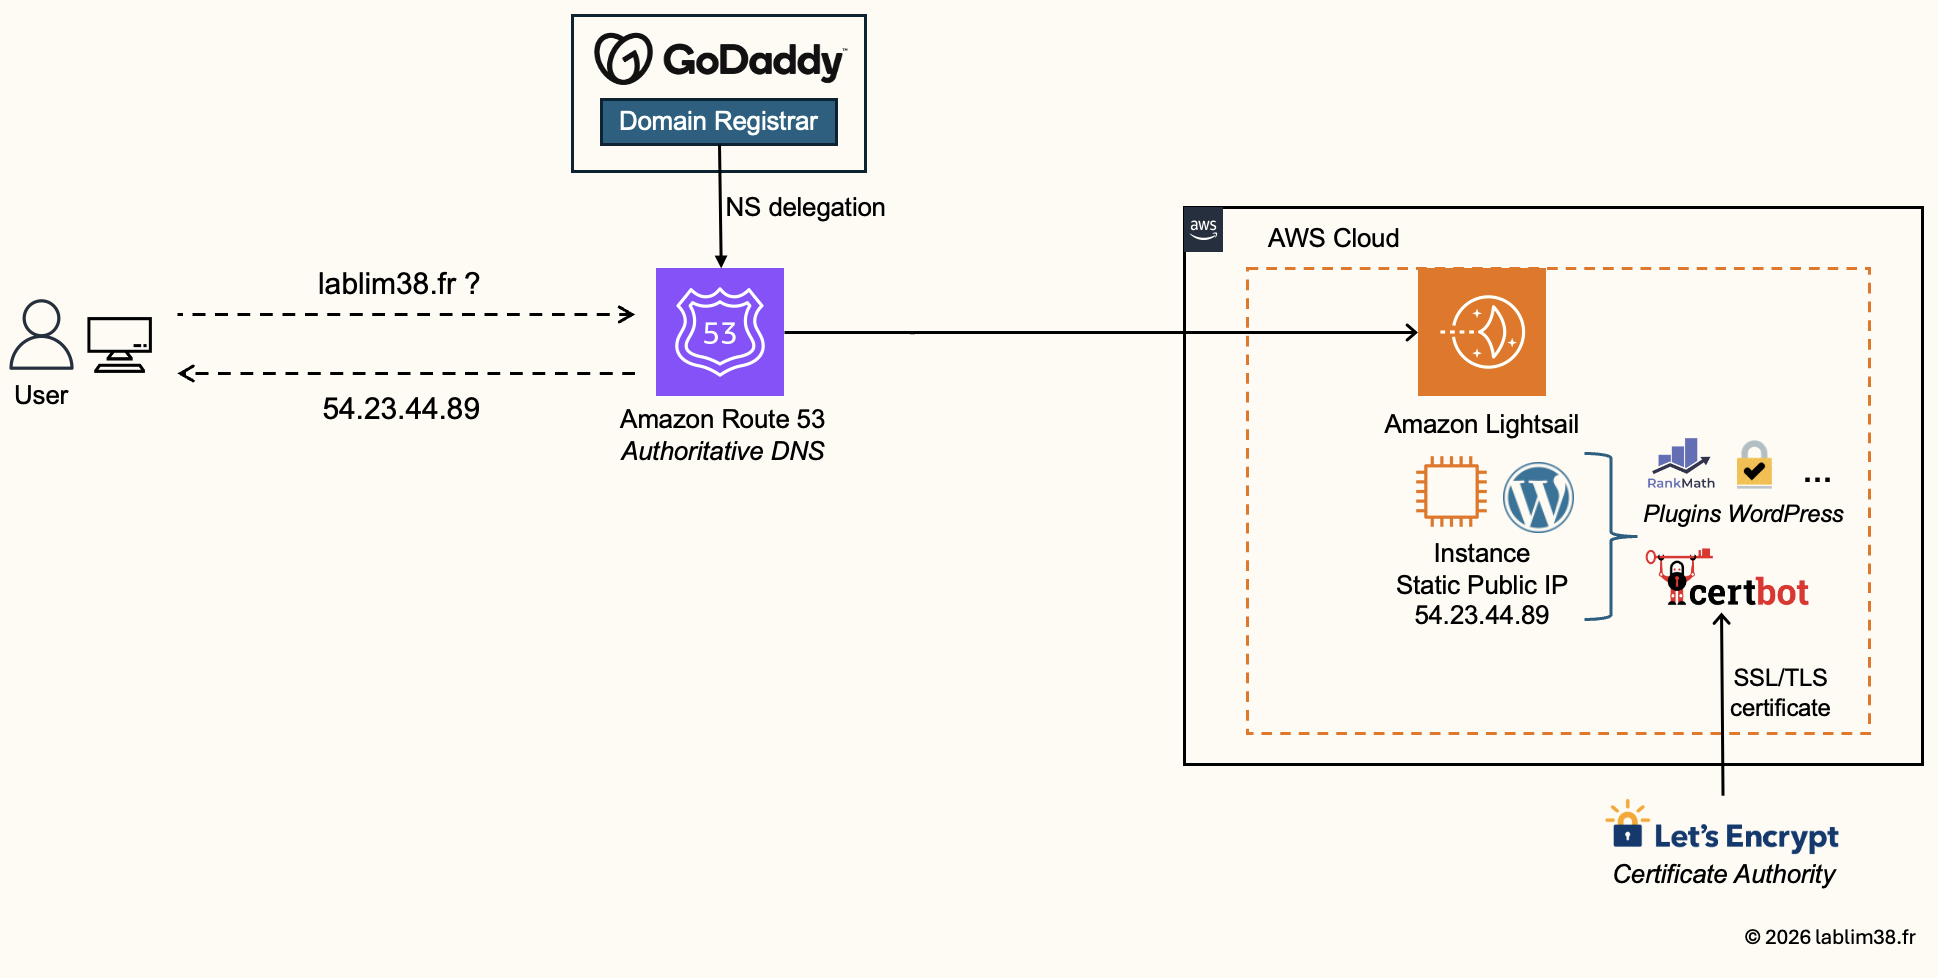
Here’s the stack I decided to use:
* Domain registrar: GoDaddy because I already had my domain there, but any registrar would work.
* DNS management: Amazon Route 53
* Cloud hosting: Amazon Lightsail, instead of a traditional EC2 setup because it simplifies deployment and cost management for small projects.
* CMS platform: WordPress, it remains one of the easiest and fastest ways to build a modern blog without reinventing the wheel
* Security & optimization plugins: WordPress plugins for caching, backups, SEO, and security hardening
Prerequisites
The only prerequisite is having an AWS account. Creating one is straightforward, and AWS usually provides free-tier credits and temporary free usage for many services when you start.
One important detail though: AWS Free Tier benefits do not fully apply to Amazon Lightsail in the same way they do for some EC2 services.
When using a newly created AWS account with restricted “free-tier-only” settings, I was blocked during the Lightsail instance creation process until upgrading the account configuration. So don’t panic if that happens to you: it’s normal. You could absolutely build the same project using Amazon EC2. But for this kind of learning project, I think Amazon Lightsail makes much more sense.
AWS Best Practices (highly recommended):
#1. Never use the root account for daily usage.
Your AWS root account has unlimited privileges. Using it every day is basically the cloud equivalent of driving without brakes. Instead, create an IAM administrator user, use that account for daily administration and keep the root account only for emergency situations.
#2. Enable MFA immediately
Multi-Factor Authentication is non-negotiable, even for a personal lab environment. Enable MFA on the root account and your IAM admin account. Using an authenticator app takes 30 seconds and massively improves account security.
#3. Create a budget and billing alerts.
Cloud costs can escalate surprisingly fast if you forget running resources. Budget alerts give you a safety net while learning. Set up a monthly budget of 10€ and email alerts at 5€, 8€ and 10€
Step 1 – Buying the Domain Name with GoDaddy
Before deploying anything on AWS, the first thing we need is a domain name. The blog itself will be hosted on an Amazon Lightsail instance, but obviously nobody wants to access a blog through a random public IP address.
You can buy the domain directly through AWS or use a third-party domain registrar. I use GoDaddy because it’s simple, beginner-friendly, and domain prices are often pretty competitive for small personal projects. The purchasing process on GoDaddy is honestly straightforward and well guided. I bought lablim38.fr for 13€ for 2 years.
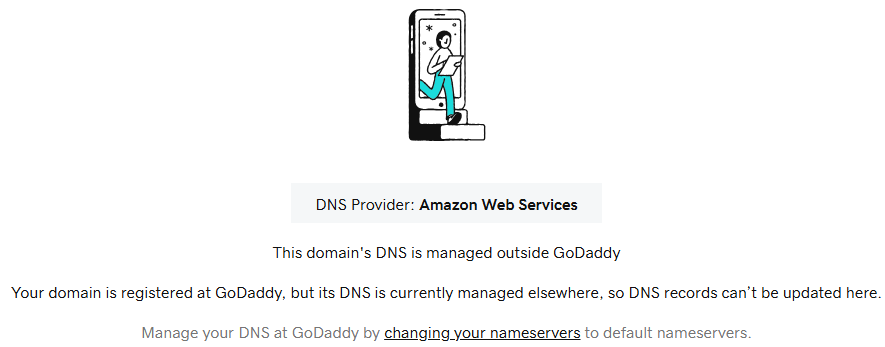
Once the domain is purchased, GoDaddy can technically manage all your DNS records directly from their dashboard. Because the actual application will live entirely inside AWS, it’s more convenient to manage DNS directly within Amazon Route 53 instead of splitting everything between two platforms. So the idea is to keep the domain registration at GoDaddy and delegate DNS management to Amazon Route 53.
Step 2 – Configuring Amazon Route 53
Now that the domain name is purchased, it’s time to configure DNS properly. This is where Amazon Route 53 comes into play.
What is Route 53? In simple terms, Amazon Route 53 is AWS’s DNS service. It translates a human-friendly domain name like lablim38.fr into the public IP address of your server. Without DNS, your visitors would need to remember IP addresses instead of simple domain names.
For this project, the cost is extremely low: around 0,5€/month. So basically… almost nothing.
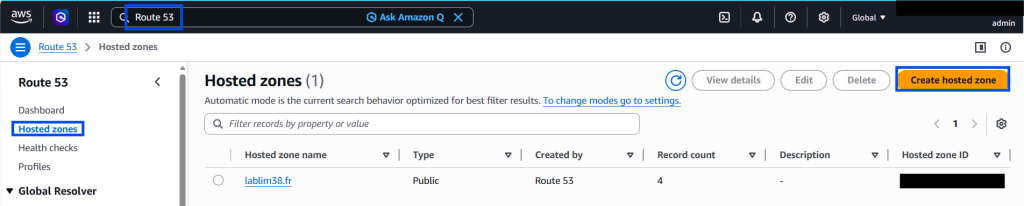
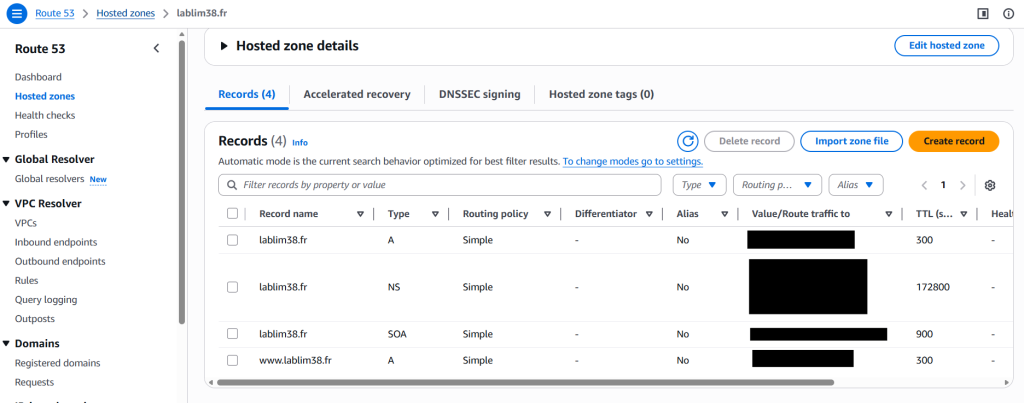
Creating the hosting zone
Inside your AWS account, open the AWS Console and search for Route 53. Then go to Hosted Zones and click Create Hosted Zone.
You’ll create a Public Hosted Zone (PHZ) using the exact same domain name you purchased from GoDaddy.
You can also add tags for organization purposes, but that’s optional.
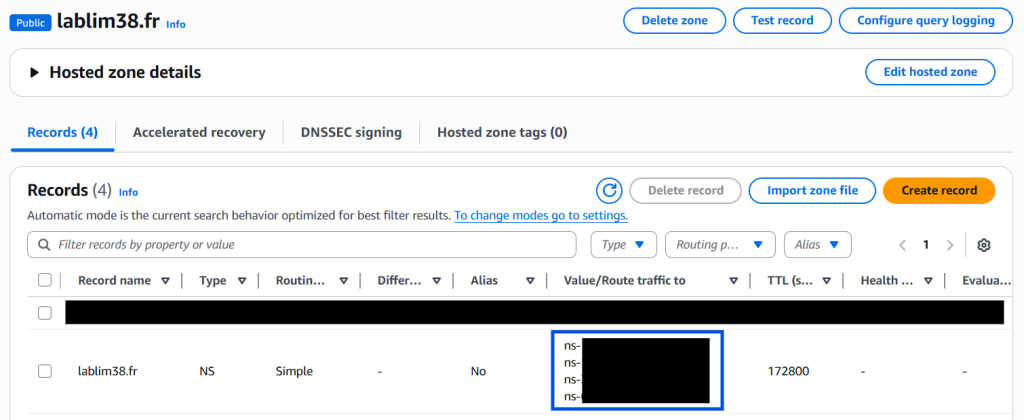
AWS automatically creates the Name Servers
Once the hosted zone is created, AWS automatically generates NS records (Name Servers) and SOA records.
The important part here is the NS records, AWS will provide 4 different name servers for redundancy and high availability. They are responsible for resolving queries for your domain.
Example:
ns-123.awsdns-45.com
ns-456.awsdns-78.net
ns-789.awsdns-12.org
ns-321.awsdns-65.co.uk
Updating GoDaddy to use AWS DNS Servers
Right now, GoDaddy is still using its own default DNS servers. The goal is basically to tell GoDaddy: “Hey, you keep the domain registration… but AWS will now handle all DNS resolution.” To do that:
- Go to GoDaddy → Domain → DNS Management
- Find Nameservers
- Replace GoDaddy default nameservers with the 4 AWS Route 53 nameservers
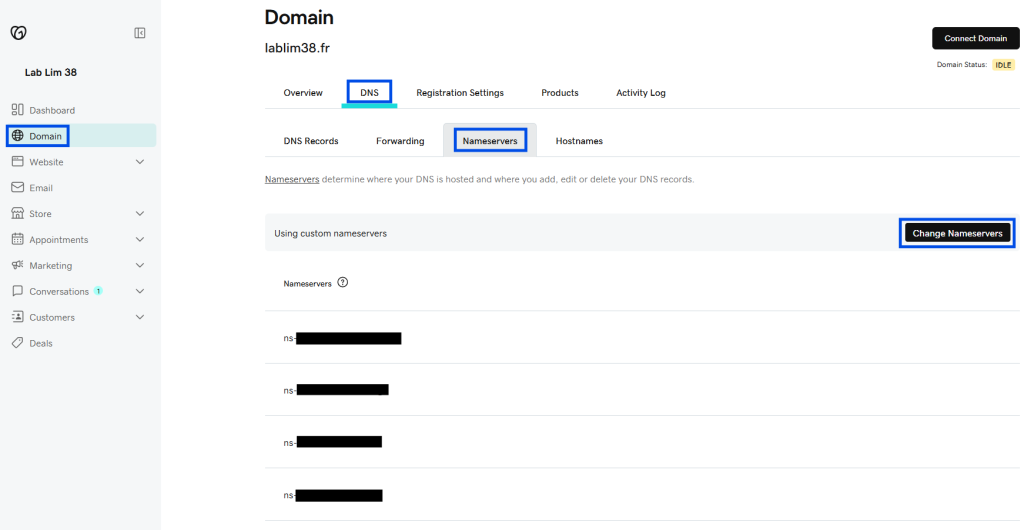
DNS propagation is not always instant. It can take a few minutes, sometimes a few hours. So don’t panic if everything doesn’t work immediately. That’s completely normal in the DNS world.
Verifying the Configuration
Once the configuration is correct, GoDaddy will indicate that AWS is now your DNS provider.
Congratulations! 🎉At this stage, the domain name exists, DNS is fully configured and AWS is ready to route traffic correctly. In the next step, we’ll deploy our WordPress instance on AWS and finally connect the domain name to the server’s public IP address. This is where things start becoming real.
Step 3 – Launching your AWS Lightsail Instance
Now we finally get to the fun part: deploying the actual server hosting the blog.
What is AWS Lightsail? Amazon Lightsail is basically AWS’s simplified cloud hosting platform. You can think of it as a beginner-friendly layer built on top of traditional AWS infrastructure. Instead of manually configuring EC2, networking, storage, firewalls, security groups and OS, Lightsail abstracts most of that complexity away and lets you deploy applications in just a few clicks. For a personal blog or a small website, it’s a great option.
Creating the Lightsail Instance
Just like with Route 53, open the AWS Console, search for: Lightsail. Open the service and click Create instance.
AWS then walks you through the deployment process.
Instance configuration:
Availability Zone: choose the AWS Region / Availability Zone closest to your audience. It helps reduce latency.
Platform: Linux / Unix
Blueprint: Apps + OS → WordPress
SSH Key: Default SSH Key. Even if you don’t plan to use SSH immediately, keeping secure access configured from day one is a good habit.
Plan Type: General Purpose. Sufficient for this type of project.
Network type: Dual-stack to enable IPv4 and IPv6.
Instance size: I strongly recommend starting with at least 1 GB RAM, 2vCPUs and 40 GB SSD.
Yes… I tested the cheaper $5/month option and the performance was poor, updates were painful. Spending slightly more here dramatically improves the experience.
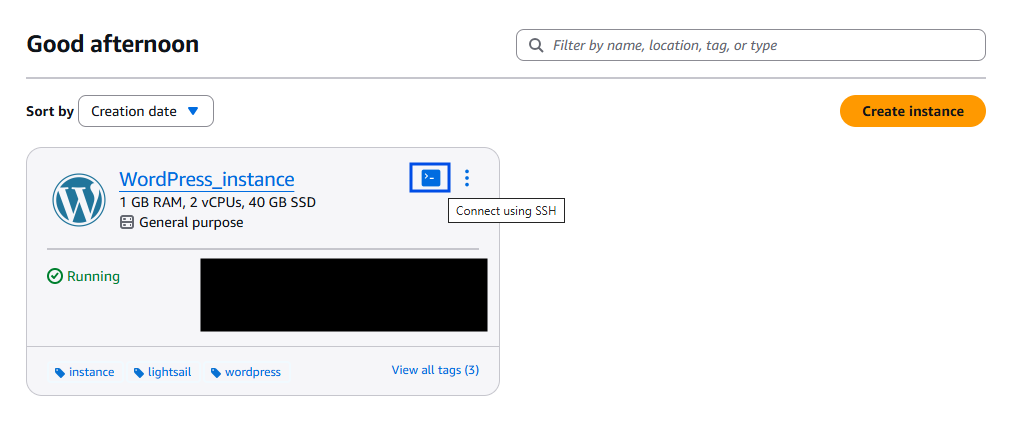
Launch the Instance
Now, simply give your instance a name and click Create Instance.
A few minutes later, your WordPress server is online.
Creating a Static IP address
At this stage, the instance is still using a dynamic public IP address. Every time the server is restarted, the public IP may change. Then, your domain name will no longer point to the correct server, DNS resolution breaks and your website becomes unreachable. To solve this problem, we need to create a static IP address and permanently associate it with the Lightsail instance.
Inside Amazon Lightsail: Networking → Create Static IP.
Before creating it, make sure your instance is attached/selected correctly. Once the static IP is created and linked to the instance, your server keeps the same public IP permanently.

Connecting Route 53 to the Static IP
Now we will connect the domain name to the server’s static public IP.
Inside Amazon Route 53, we’ll create DNS A records.
– One for the Root Domain: record name blog-name.com pointing to the static IP address.
– One for WWW version : www.blog-name.com pointing also to the same static IP address, in case visitors may access the site using www.
After DNS propagation, both URLs will point to your WordPress instance hosted on AWS.
You’ll also notice other records automatically created by Amazon Route 53, especially NS records and SOA records.
– The NS (Name Server) records are responsible for DNS redundancy, high availability.
– SOA records (Start Of Authority) is a technical DNS record containing DNS versioning information, TTL parameters, etc.
In practice, you almost never modify it manually. AWS handles it automatically behind the scenes. Thankfully! Because DNS is already confusing enough sometimes.
Step 4 – Securing the Blog with HTTPS
The blog is online and reachable from the internet. But the connection is not encrypted yet. It means the traffic is sent over plain HTTP, passwords could theoretically be intercepted. Let’s fix that by enabling HTTPS. It encrypts the communication between your visitors and your server. This protects login credentials, admin sessions, cookies, personal data and overall trust.
AWS Certificate Manager is AWS’s managed SSL/TLS certificate service. Normally, it’s an excellent option. However, there’s one annoying limitation in our case: you cannot directly attach an ACM certificate to a standalone Amazon Lightsail WordPress instance the same way you would with a Load Balancer or any other AWS managed services.
So for this setup, I decided to use Certbot. It’s free, widely adopted, based on Let’s Encrypt and easy to deploy.
Connecting to the Instance via SSH
To set-up the encryption, go back to your Amazon Lightsail instance.
Then, open the instance and click Connect using SSH. AWS provides a browser-based terminal directly inside the console, which is very convenient for quick administration tasks.
Installing Certbot
We’ll run the following commands.
– To update the package list: sudo apt update
– To install Certbot and Apache integration: sudo apt install certbot python3-certbot-apache -y
– To generate the SSL Certificate by mentioning your domain name : sudo certbot --apache -d blog-name.com
During the installation process, Certbot will ask you for an email address, acceptance of the Terms of Service and finally, the domain name to secure. Then it automatically generates the SSL certificate, configures Apache, enables HTTPS and sets up HTTP → HTTPS redirection.
Step 5 – Retrieving the WordPress Password
We are almost done. We need to retrieve the WordPress password to access the admin panel and to start playing with WordPress.
Once again, go back on the instance, in AWS Lightsail : Click on the instance and scroll down in the management page.
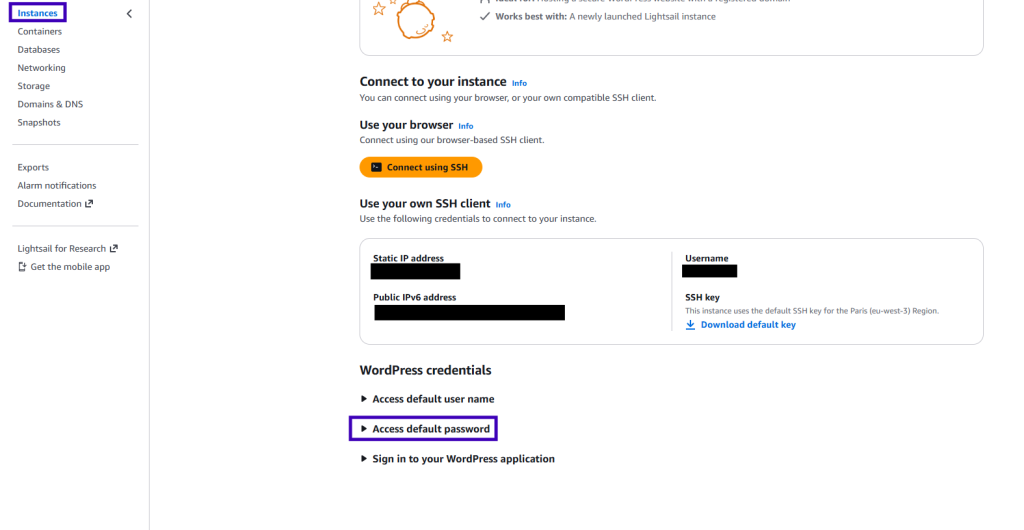
AWS provides official documentation explaining how to retrieve the default WordPress username and administrator password.
I recommend simply following the official AWS instructions here since the process is already well documented.
Step 6 – WordPress setup & First configuration
The infrastructure is fully operational:
- the domain name is configured
- DNS is managed through Amazon Route 53
- HTTPS is enabled
- and the AWS server is online
It’s finally time to work on the actual blog itself. This is where WordPress starts shining 🌞
Accessing the WordPress Admin Panel
Since the WordPress image was preconfigured directly inside Amazon Lightsail, the CMS is already installed and running.
You can access the administration panel through https://blog-name.com/wp-admin
Use the username provided earlier and the password you just retrieved from the Lightsail instance documentation.
First Security Action : change the Default Password
⚠️ Before doing anything else: change the default password immediately and avoid weak or reused passwords.
A strong password is still one of the easiest ways to improve security instantly.
My WordPress Setup
I won’t go into every single WordPress plugin out there because that would deserve an entire book on its own. At this stage, the blog is fully operational. You are free to customize the design, install plugins based on your needs or simply start publishing content. This is really where the fun part begins: shaping the blog into something that reflects your own use case, without being constrained by the setup itself.

Personally, I wanted the setup to remain lightweight, fast, maintainable and easy to scale later if needed.
I intentionally avoided installing 47 random plugins on day one.
The current stack is simple:
- basic security and performance plugins
- GeneratePress theme (minimalist and extremely fast)
- WPForms for contact forms
- WP Mail SMTP for reliable email delivery
For now, that’s enough to get a clean and professional blog online. But the flexibility with WordPress is enormous: themes, plugins, automation, SEO tools, security hardening, caching, backups, analytics… That’s both exciting and slightly dangerous for productivity 😆
This is only the Beginning
This project will continue evolving as I learn more about AWS, cloud infrastructure, networking and cybersecurity.
I am sure there are still many things to improve, but the goal of this article was simply to document what I consider to be a solid and beginner-friendly foundation for hosting a secure WordPress blog on AWS without over-engineering everything.
For less than 8€/month (7€ for the Lightsail VM and around 0,50€ for Route 53), I think the result is pretty cool.
If you’ve made it this far: Congratulations! 👏 Your blog is now online, secured with HTTPS, connected to AWS and fully managed by you. That’s already more infrastructure knowledge than many people realize.
Feel free to reach out if you want to discuss the setup, share ideas or suggest improvements.
New experiments, labs, and cloud/security projects will be added over time as part of my learning journey. This is only the beginning 🚀
Cheers,
1 thought on “Building a Self-Hosted WordPress Blog on AWS.”