Acronis has introduced its new Infrastructure-as-a-Service (IaaS) offering: Acronis Cyber Frame, a turnkey hyperconverged and virtualized infrastructure solution designed specifically for Managed Service Providers (MSPs). This opens up the possibility of hosting and managing customer infrastructures directly from a single interface since the service is natively integrated with the broader Acronis ecosystem.
All infrastructures deployed on Cyber Frame are automatically backed up to the Acronis Cloud. There is no backup infrastructure to build, no agents to deploy, and no backup policies to configure before obtaining a first level of protection. As soon as virtual machines and workloads are running, backup protection is already in place. Beyond backup, all deployed workloads are automatically visible within the console, allowing MSPs to easily apply additional protection plans such as DR, EDR, RMM, and all other cyber protection services.
In this article, the goal is simple : start with an empty Cyber Frame environment and progressively build a secure, production-inspired SMB infrastructure while discovering every major feature of the platform. We will examine networking, virtual machines, storage, security, and connectivity features before leveraging the native cyber protection capabilities that make the Acronis platform unique.
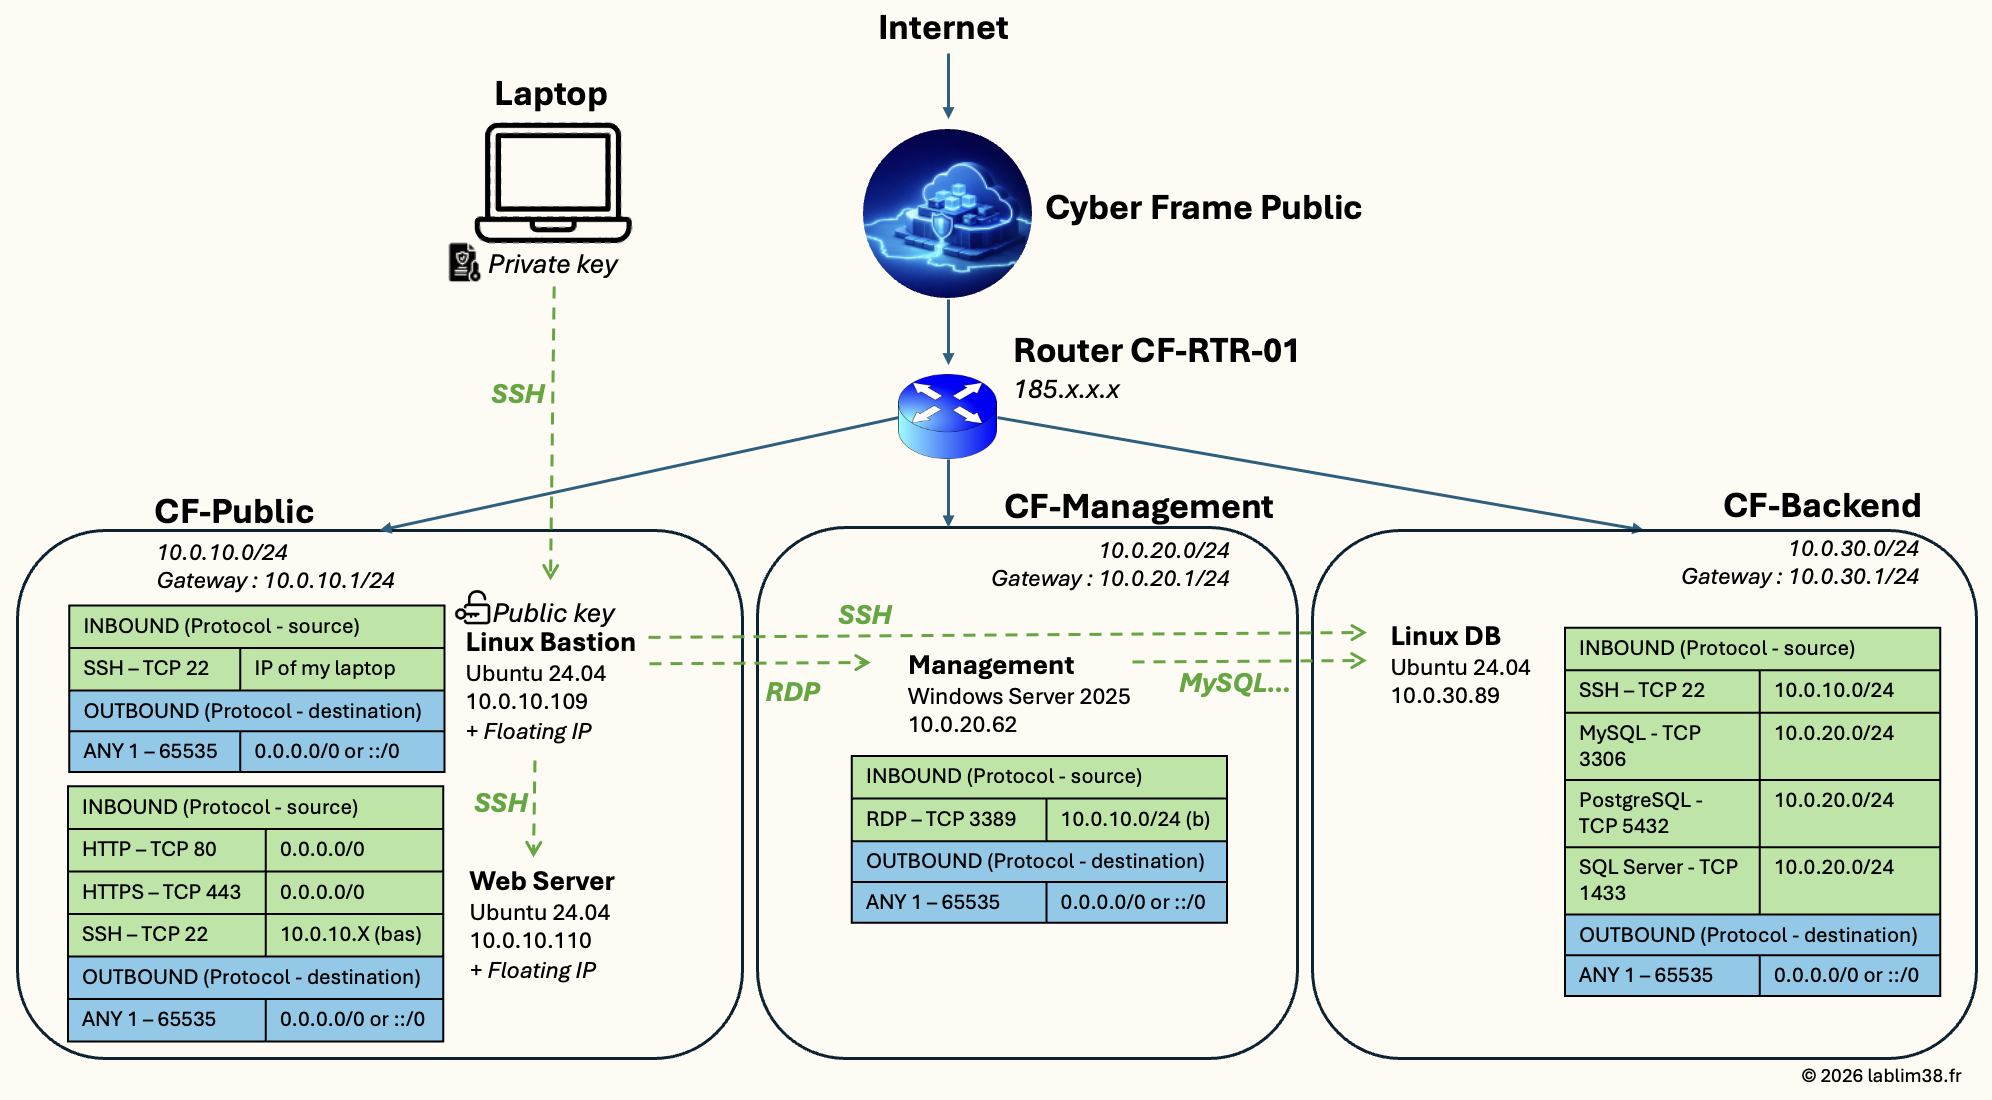
Our customer infrastructure
Let’s get started! To showcase the capabilities of Acronis Cyber Frame, we will build a simple yet realistic SMB infrastructure inspired by what many organizations use in production today. The environment will be segmented into three dedicated subnets to separate public-facing services, management workloads, and backend systems. At the core of the environment, a virtual router will connect all three subnets to the Cyber Frame public network.
Public Subnet
The public subnet will host two Linux virtual machines:
– A Bastion Host, which will act as the secure entry point to the environment.
– A Web Server, which will host our public-facing application.
The Bastion Host will be accessible via SSH from my personal workstation and will serve as the only administrative gateway to the infrastructure.
The Web Server will allow inbound HTTP and HTTPS traffic (TCP 80 and TCP 443) from the Internet, while SSH access will be restricted to the Bastion Host only.
Management Subnet
The management subnet will host a Windows Server used for administration and management tasks.
Remote Desktop Protocol (RDP) access will only be allowed from the Bastion Host, ensuring that the server is never directly exposed to the Internet.
Outbound Internet access will remain enabled to allow Windows updates, software downloads, and communication with external services when required.
Backend Subnet
The backend subnet will host internal applications and database services.
SSH access will be permitted from the Bastion Host for administration purposes.
Database ports such as MySQL (3306), PostgreSQL (5432), and Microsoft SQL Server (1433) will be accessible from the Windows Management Server, allowing administrators and applications to interact securely with backend services while keeping them isolated from the public Internet.
Our lab environment will include:
- Three isolated subnets
- Multiple virtual machines
- SSH key-based authentication
- Security Groups
- An optional Site-to-Site VPN connection
- Public and private network segmentation
Nothing overly complex, but everything required to host a customer’s infrastructure securely while following modern cloud architecture best practices. For simplicity, outbound traffic is allowed for all servers in this lab environment. In production environments, organizations may further restrict egress traffic according to their security requirements and compliance policies.
Public-facing resources will be assigned Floating IP addresses, allowing external connectivity while preserving network isolation for internal systems.
Deploying your first Cyber Frame environment
Let’s assume you are already an Acronis partner and have one or more customer tenants in your Acronis Cyber Protect Cloud console. Perhaps you are already using Acronis for backup, cybersecurity, endpoint management, or disaster recovery, and now want to consolidate infrastructure hosting within the same platform.
The first step is to activate and provision Cyber Frame for your customer.
From the customer tenant, scroll down to the Infrastructure section and select Cyber Frame. Here you will find the list of available clusters where new projects can be deployed. To get started, select a cluster and click Provision.
In the screenshot below, the button displayed is Redeploy Virtual Appliance because the service had already been provisioned at the time of writing. During your initial deployment, you will see the Provision button instead.
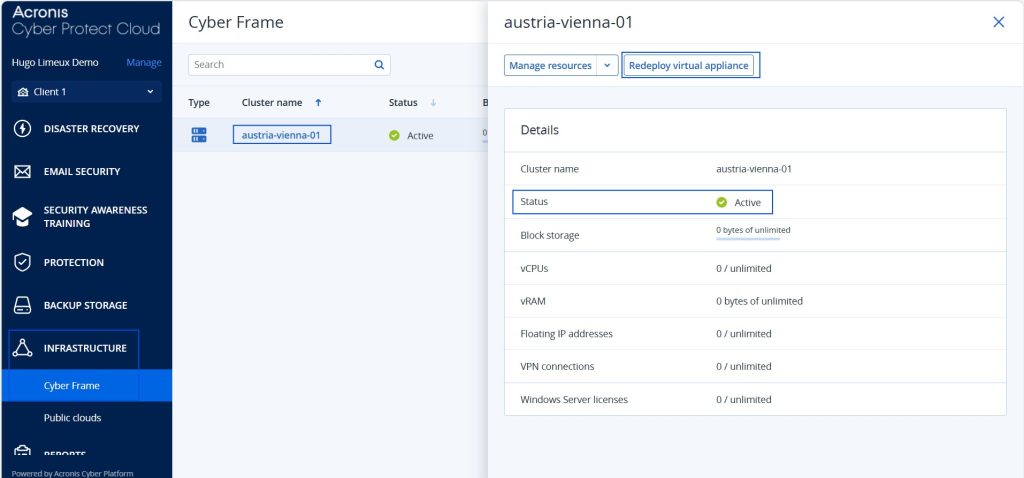
Each customer project is automatically isolated from the others, allowing service providers to deploy and manage multiple environments without manually linking projects or creating complex administrative structures.
Once the provisioning process is complete, open the newly created project or click Manage Resources.
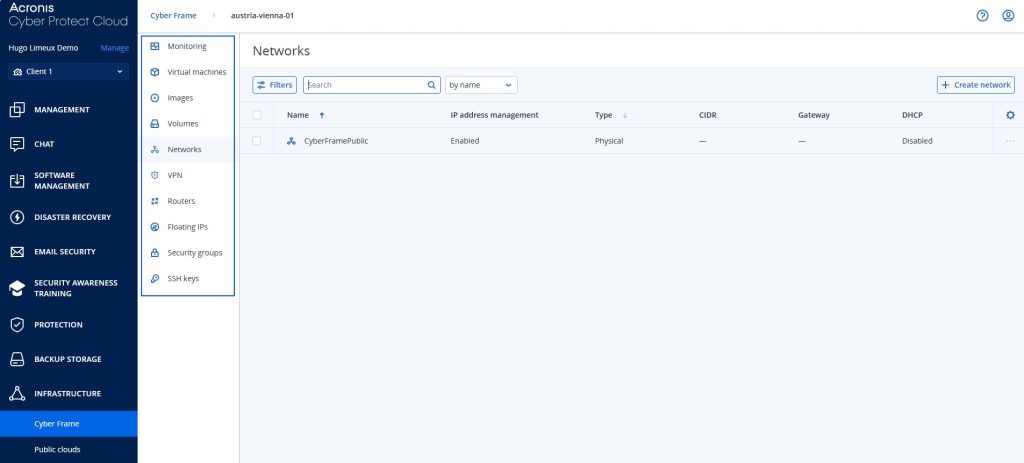
You are now presented with the Cyber Frame management console, the central place where your infrastructure will be built and managed.
From this interface, you can:
- Create and manage virtual machines
- Deploy operating system images
- Provision and attach storage volumes
- Configure networks and routing
- Allocate Floating IP addresses
- Create Security Groups
- Manage SSH keys
- Configure Site-to-Site VPN connections
In other words, everything required to deploy a complete customer infrastructure is available from a single console! 😀
Step 1 – Network Segmentation and Router
Before deploying any virtual machines, we need to build the network foundation of our infrastructure.
Cyber Frame automatically provides a public network named CyberFramePublic. This network acts as the bridge between the virtual networks we create and the outside world, providing Internet connectivity and access to physical networks.
To follow security best practices, we will create the three subnets corresponding to the architecture presented earlier. This segmentation helps reduce the attack surface and allows us to apply different security policies to each layer of the infrastructure.
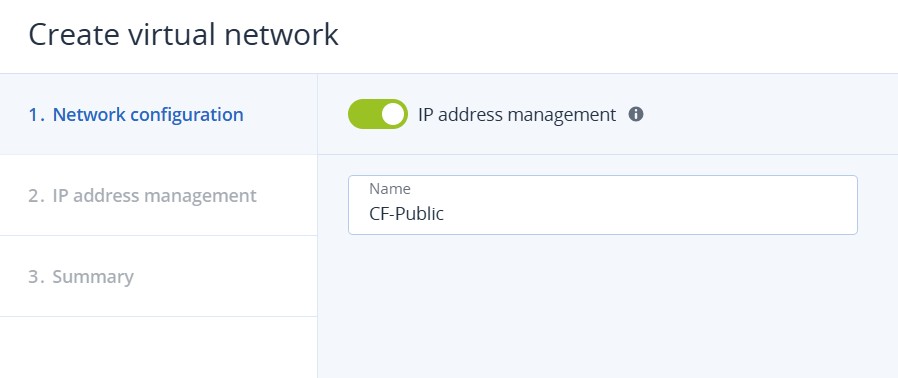
Creating a Network
From the Networks section, click Create Network in the top-right corner.
Define a name for the network and enable IP Address Management.
This option allows Cyber Frame to automatically manage IP address allocation and network services within the subnet.
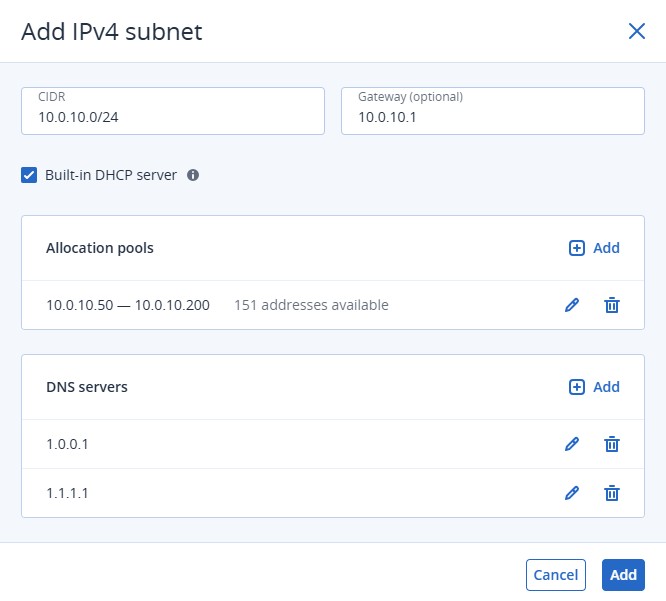
Next, configure the subnet itself by specifying:
- The CIDR range (for example,
10.0.10.0/24) - The Gateway address (for example,
10.0.10.1) - Optional Allocation Pools, which define the range of IP addresses automatically assigned to virtual machines
- The DNS Servers used by workloads in the subnet
For this lab, I chose Cloudflare’s public DNS servers (1.1.1.1 and 1.0.0.1)
You can also enable the built-in DHCP service. This option lets the DHCP server operates only within the current network and is not exposed to other networks. It automatically assigns IP addresses to virtual machines deployed inside the subnet, simplifying network management.
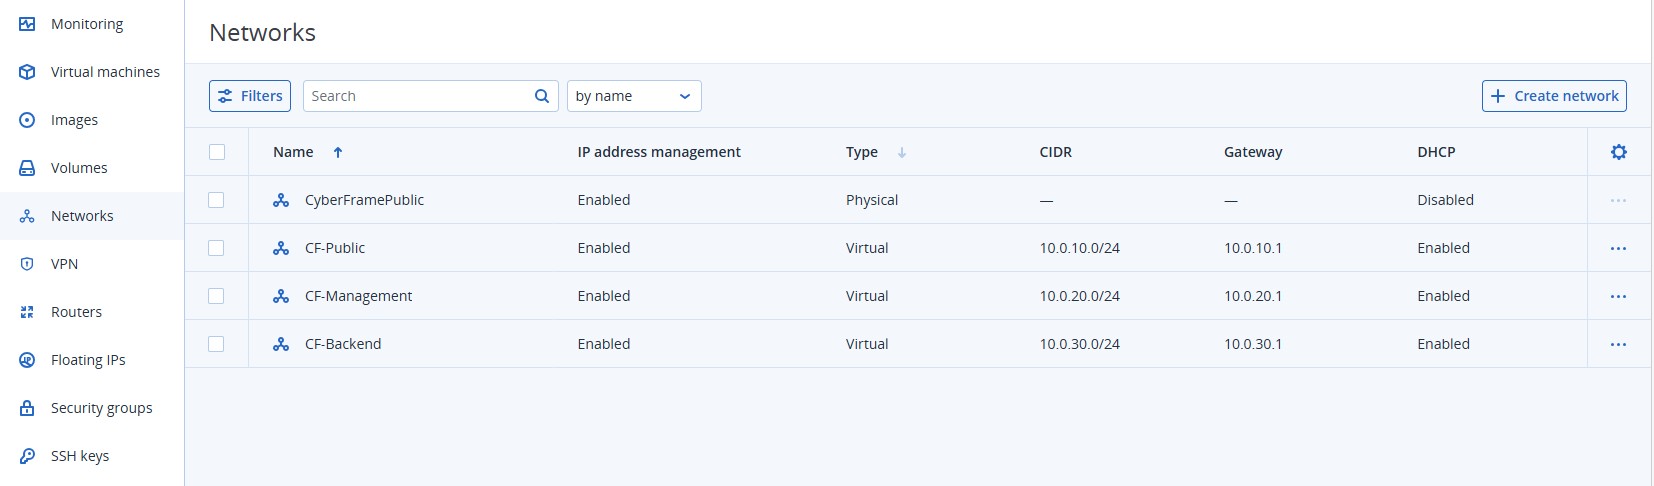
Repeat the process until the three subnets have been created. Once completed, they should all appear in the Networks section.
Creating the Router
With our network segmentation in place, the next step is to connect these subnets and provide Internet access.
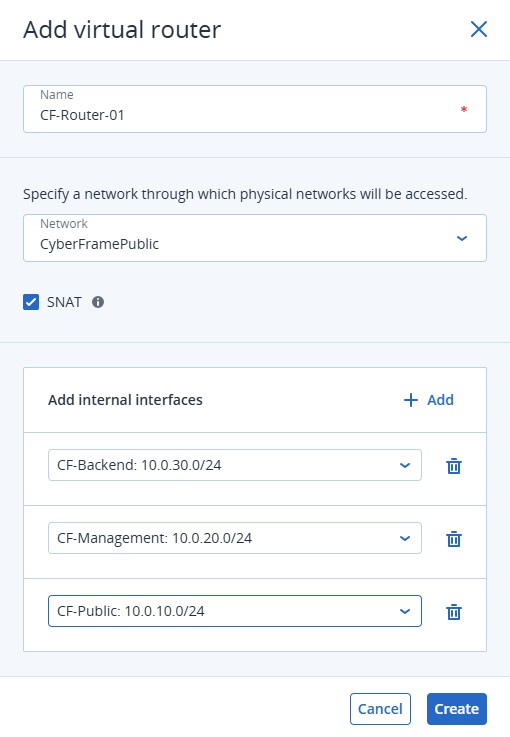
Navigate to the Routers section and click Add Router.
Provide a name for the router.
Select the external network through which physical networks will be accessed.
Cyber Frame already provides the required public network, so simply select: CyberFramePublic
You can enable SNAT (Source Network Address Translation). The router replaces the private IP addresses of virtual machines with its public-facing address when communicating with external networks. This allows workloads located in private subnets to access the Internet while keeping their internal addresses hidden.
Add the interfaces corresponding to the three subnets created earlier Public Subnet, Management Subnet and Backend Subnet.
The router will then provide connectivity between the subnets and allow them to communicate with each other while maintaining their logical separation.
Step 2 – Creating Security Groups before deploying Virtual Machines
At this point, many administrators would immediately start deploying virtual machines. I prefer to define the security model first. The service will let us attach the appropriate policies directly during the provisioning process rather than securing the environment afterward. This approach follows the principle of security by design and helps ensure that every system is protected from day one.
We will create four Security Groups, one for each virtual machine.
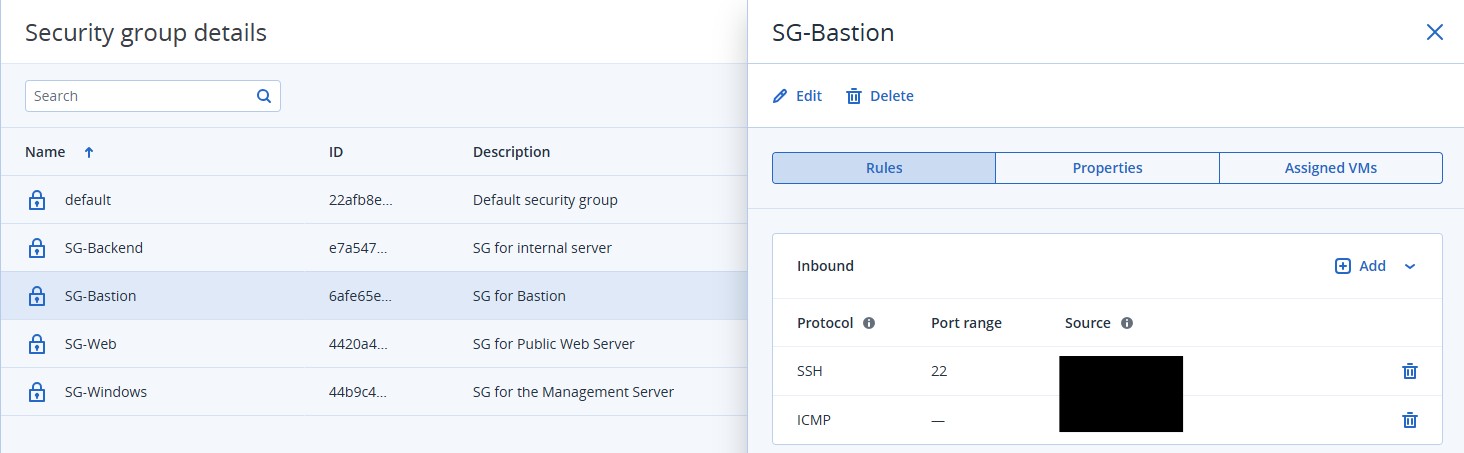
SG-Bastion
Protects our Linux Bastion Host, our administrative entry point into the environment.
Inbound Rules
|
Protocol |
Port |
Source |
|
TCP |
22 (SSH) |
My public IP address |
Outbound Rules
|
Protocol |
Port |
Destination |
|
Any |
1 – 65535 |
0.0.0.0/0 |
The Bastion Host requires Internet access for OS updates, package downloads, DNS resolution, and administrative tasks. Restricting outbound connectivity at this stage would unnecessarily complicate the lab without providing significant security benefits.
SG-Web
Protects the public-facing web server.
Inbound Rules
|
Protocol |
Port |
Source |
|
TCP |
80 (HTTP) |
0.0.0.0/0 |
|
TCP |
443 (HTTPS) |
0.0.0.0/0 |
|
TCP |
22 (SSH) |
10.0.10.0/24 |
The first two rules allow users on the Internet to access the website, while SSH administration is restricted to the Bastion host.
Outbound Rules
|
Protocol |
Port |
Destination |
|
Any |
1 – 65535 |
0.0.0.0/0 |
Outbound Internet access allows the server to install updates, download packages, obtain SSL certificates, and communicate with external services when required.
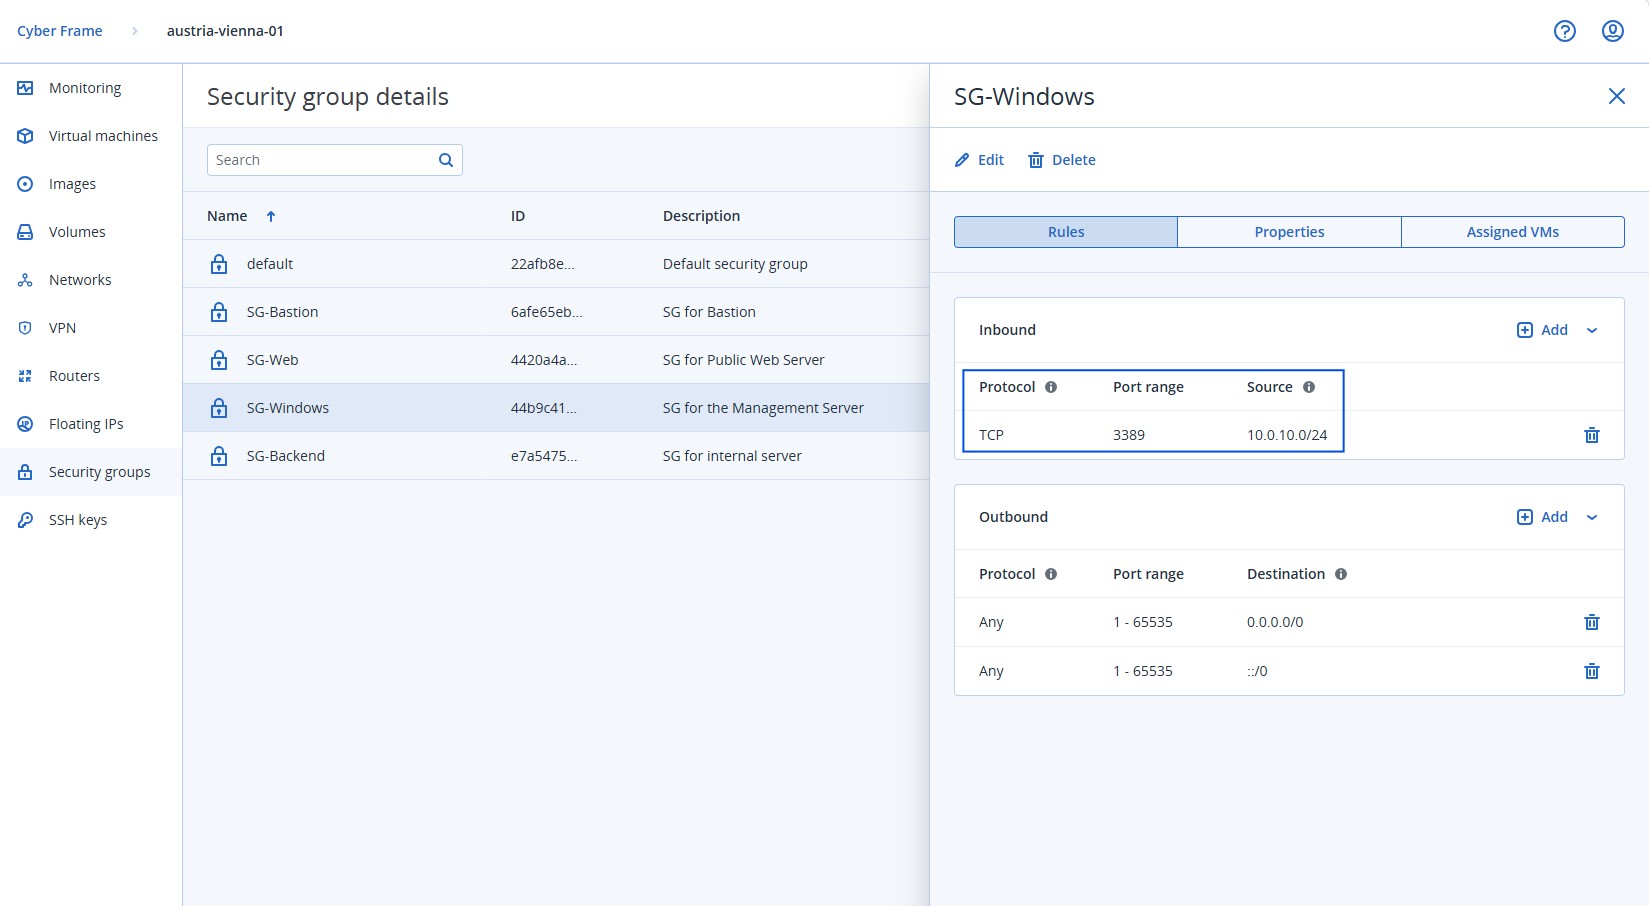
SG-Windows
Protects the Windows Management Server.
Inbound Rules
|
Protocol |
Port |
Source |
|
TCP |
3389 (RDP) |
10.0.10.0/24 |
Only systems located in the Public subnet can initiate Remote Desktop connections: the Windows server is never directly exposed to the Internet.
Outbound Rules
|
Protocol |
Port |
Destination |
|
Any |
1 – 65535 |
0.0.0.0/0 |
Outbound access is required for Windows Updates, software installation, communication with cloud services, and integration with Acronis protection services.
SG-Backend
Protects our internal application and database server.
Inbound Rules
|
Protocol |
Port |
Source |
|
TCP |
22 (SSH) |
10.0.10.0/24 |
|
TCP |
3306 (MySQL) |
10.0.20.0/24 |
|
TCP |
5432 (PostgreSQL) |
10.0.20.0/24 |
|
TCP |
1433 (Microsoft SQL Server) |
10.0.20.0/24 |
These rules allow the Windows Management Server to connect to backend databases while preventing direct access from the Internet.
Outbound Rules
|
Protocol |
Port |
Destination |
|
Any |
1 – 65535 |
0.0.0.0/0 |
As explained earlier: outbound traffic remains unrestricted in this lab environment. Production deployments may choose to implement more restrictive egress filtering policies based on security and compliance requirements.
Creating the Security Groups:
Navigate to Security Groups and click Create Security Group.
Once a Security Group has been created, you can immediately configure its inbound and outbound rules as well as review the virtual machines assigned to it.

After all four Security Groups have been created, they will appear in the Security Groups dashboard.
At this stage, no virtual machines are assigned yet because we have not deployed any workloads. Likewise, the rules currently reference entire subnets. Later, once the virtual machines have been provisioned, you may choose to further tighten security by replacing subnet-based rules with individual IP addresses.
For example, instead of allowing RDP access from the entire Public subnet 10.0.10.0/24, you could modify the Windows Security Group to allow inbound connections exclusively from the Bastion Host’s IP address, implementing an even stricter least-privilege model.
Step 3 – Creating the SSH Key
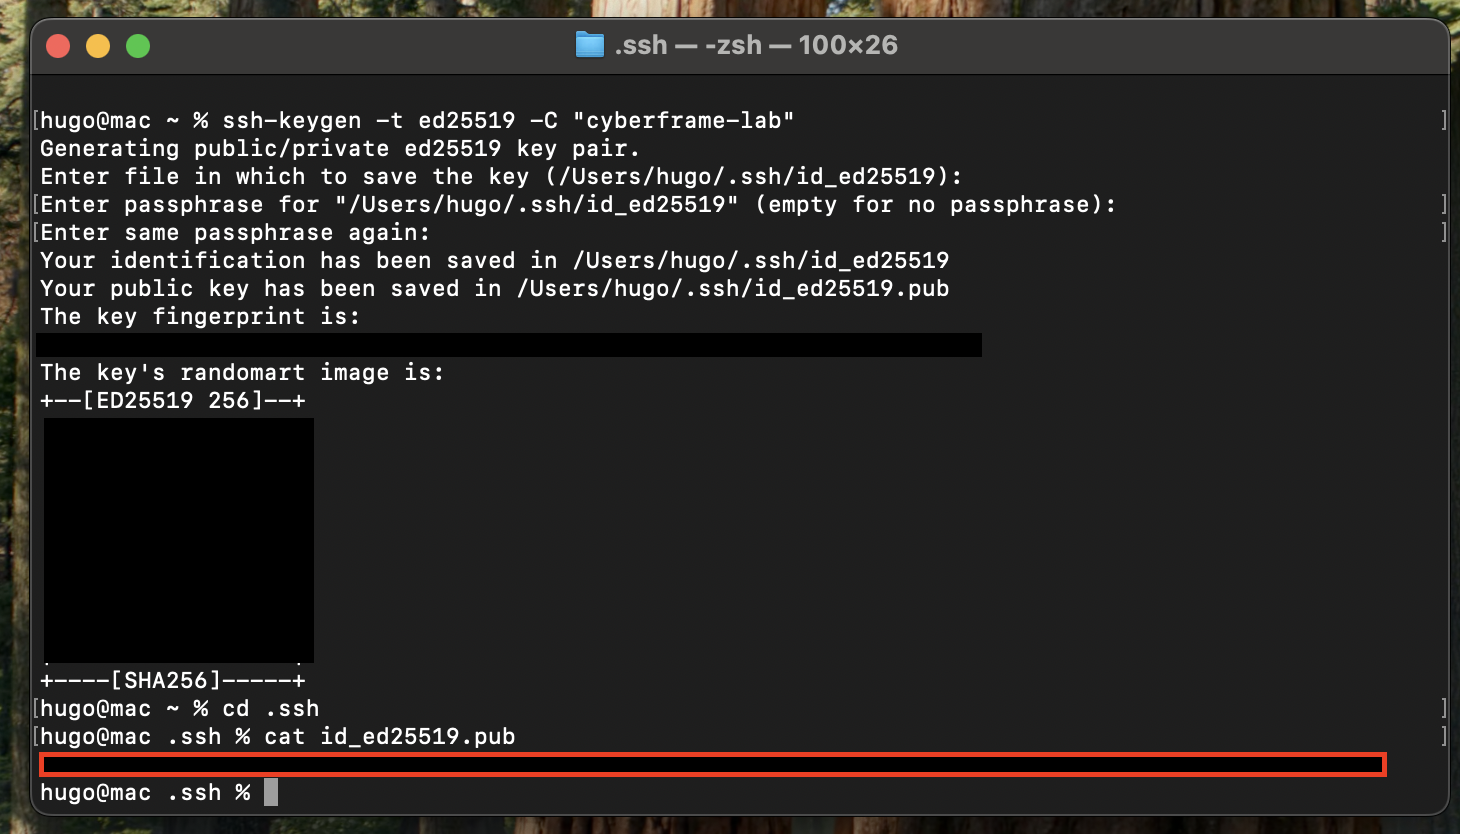
We are almost ready to deploy our virtual machines. There is one final security component to prepare: the SSH key that will be used to securely access our servers. Modern cloud environments typically use SSH key-based authentication. It provides stronger security and eliminates the need to expose credentials during remote administration. I generated a new SSH key pair directly from my Mac using the following command:
ssh-keygen -t ed25519 -C "cyberframe-lab"The Ed25519 algorithm is widely recommended because it offers strong security while remaining lightweight and efficient.
During the key generation process, you can either accept the default file location or choose a custom path. You will also have the opportunity to protect the private key with a passphrase, which adds an additional layer of security in case the key is ever compromised.
Once the key pair has been created, display the public key using:
cat ~/.ssh/id_ed25519.pubThe output will look similar to the following:
ssh-ed25519 AAAAC3NzaC1lZDI1NTE5AAAAI... cyberframe-labCopy the entire public key, including the ssh-ed25519 prefix and the comment at the end.
Important: Only the public key should be copied into Cyber Frame. Never share or upload your private key (id_ed25519).
Importing the SSH Key into Cyber Frame
Now return to the Cyber Frame management console : SSH Keys > Add SSH Key.
Provide a name and, if desired, a description for the key.
Then paste the complete public key that was generated on your workstation.
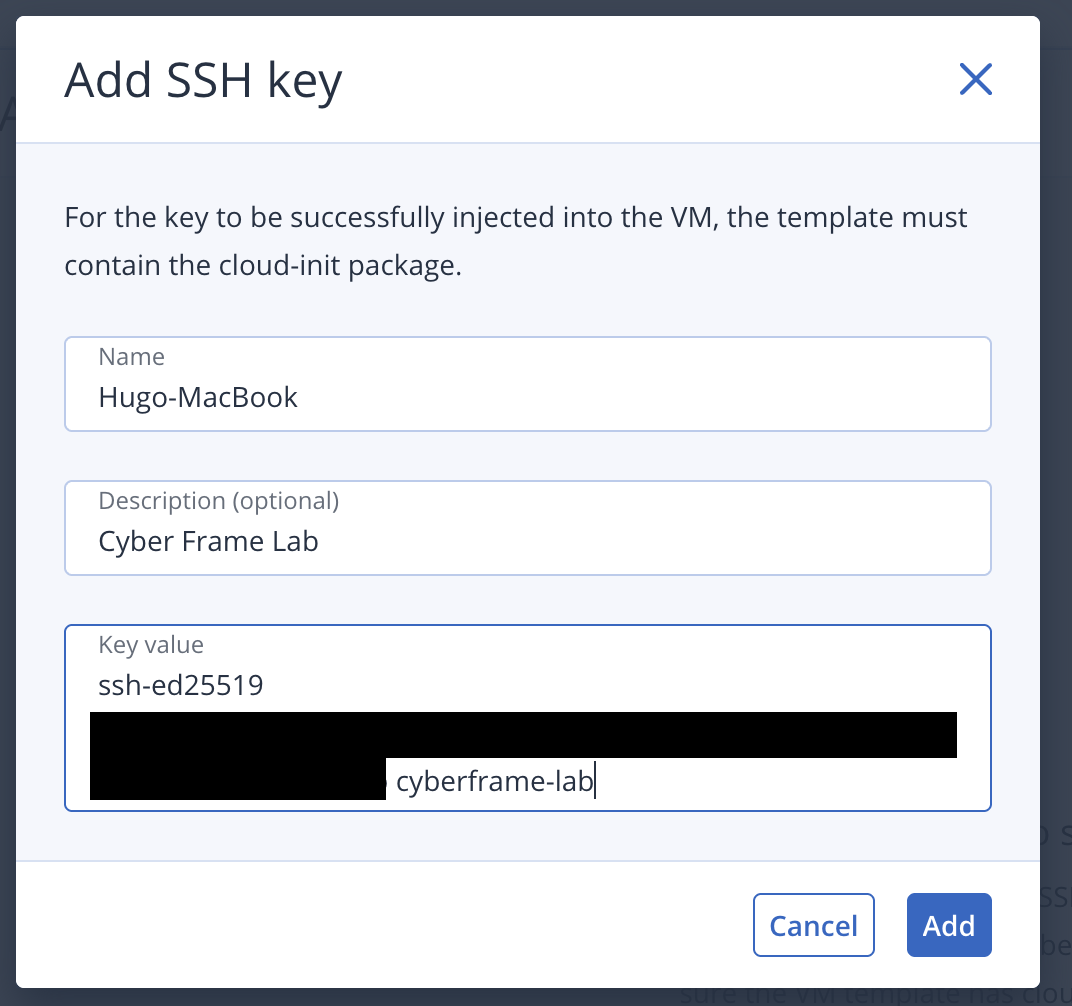
Once imported, the key becomes available during virtual machine deployment and can be automatically injected into supported Linux instances.
As soon as a VM is provisioned, Cyber Frame will configure SSH access for us, allowing secure passwordless authentication from our workstation.
Step 4 – Deploying the Virtual Machines
We can finally start deploying the virtual machines that will form our SMB infrastructure.
Navigate to Virtual Machines > Create Virtual Machine.
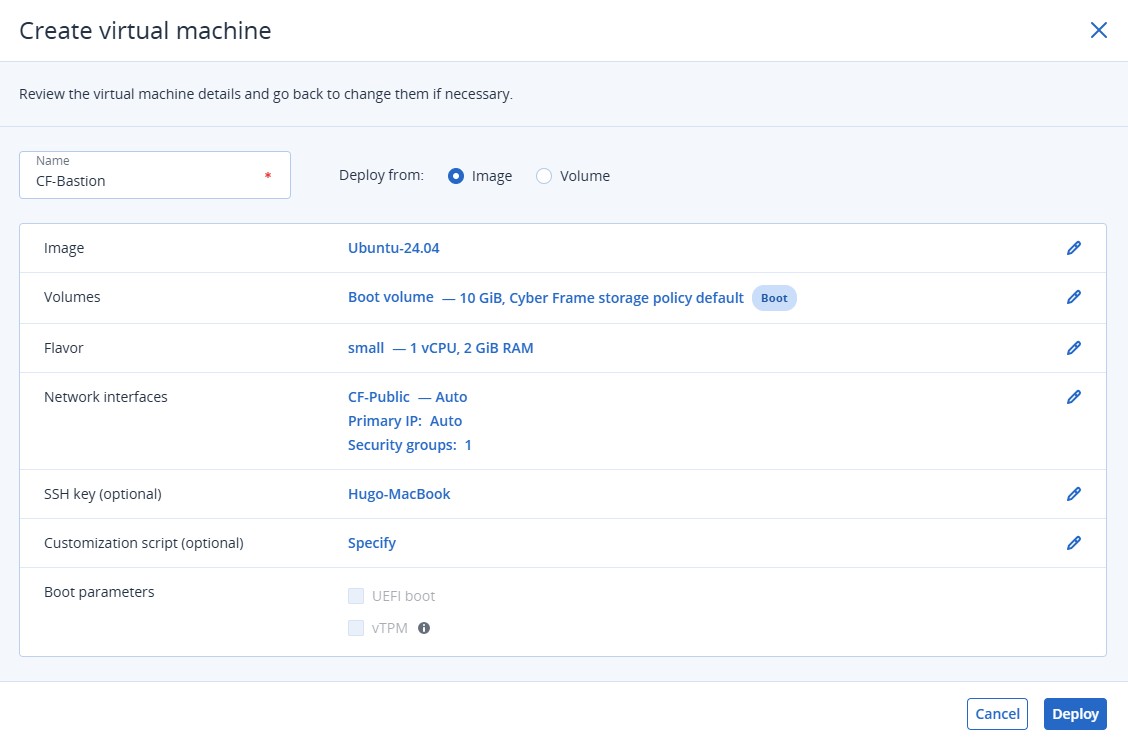
Deploying the Bastion Host
We’ll start with the Bastion Host, which will serve as the secure administrative entry point to the environment.
The first parameter to configure is the OS image. Cyber Frame provides several preconfigured templates, including Linux and Windows distributions. For the Bastion Host, I selected Ubuntu 24.04 LTS. A boot volume is automatically created and attached to the virtual machine based on the image requirements. Additional storage volumes can also be attached if needed, a feature we will explore later in this article.
The flavor defines the virtual machine sizing (vCPU and memory allocation). For this lab, I selected a small instance with 1 vCPU and 2 GiB RAM. The goal is to explore the Cyber Frame platform rather than benchmark performance. In production environments, you can simply select a larger flavor to meet your customer’s requirements.

The network and security groups: one of the advantages of preparing the environment beforehand becomes apparent during deployment. Because the network infrastructure has already been configured, the target subnet is immediately available. IP addresses are automatically allocated from the predefined allocation pool and SG can be attached directly during deployment.
This means every VM is deployed with the appropriate network configuration and security policies from day #1, eliminating additional post-deployment configuration steps. For the Bastion Host, I selected the Public subnet, SG-Bastion and the SSH key imported during the previous step.

Cyber Frame also allows you to execute customization scripts during deployment, enabling advanced automation scenarios such as package installation, system hardening, or application deployment.
Once everything is configured, click Create Virtual Machine. The provisioning process only takes a few moments.
The remaining VMs are deployed using the same process while selecting the appropriate OS, subnet, and SG for each workload.
CF-Web
* Ubuntu 24.04 LTS
* Public Subnet
* SG-Web
* Same SSH key as the Bastion Host
This server will host our web services and will later be exposed through HTTP and HTTPS.
CF-Windows-Mgmt
* Windows Server 2025
* Management Subnet
* SG-Windows
* Medium-sized flavor
This server will be administered through RDP, there is no need to associate an SSH key.
The additional resources provide a more comfortable experience for administrative tasks and future management workloads.
CF-Backend
* Debian 13
* Backend Subnet
* SG-Backend
* Same SSH key as the Bastion Host
This server will host internal services and database workloads that should remain isolated from direct Internet access.
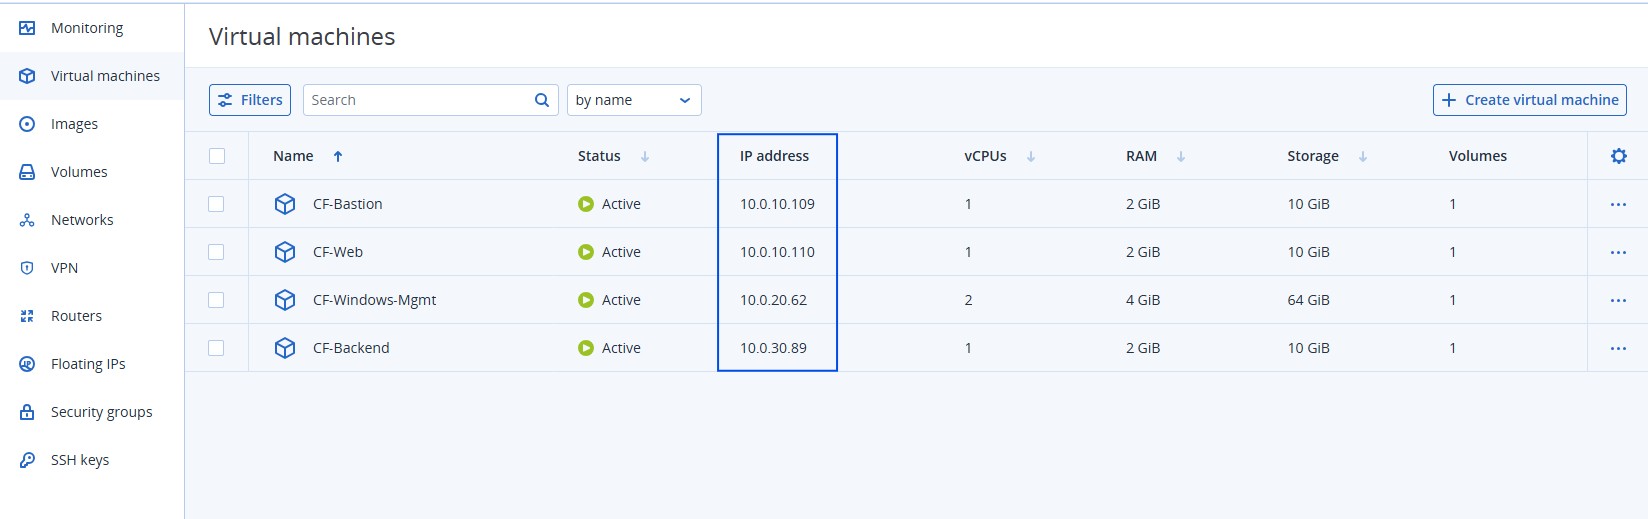
Once the provisioning process is complete, each VM receives a private IP address from its respective subnet.
You may choose to further refine your Security Groups now that the exact IP addresses of the virtual machines are known.
Step 5 – Assigning Floating IPs & validating connectivity
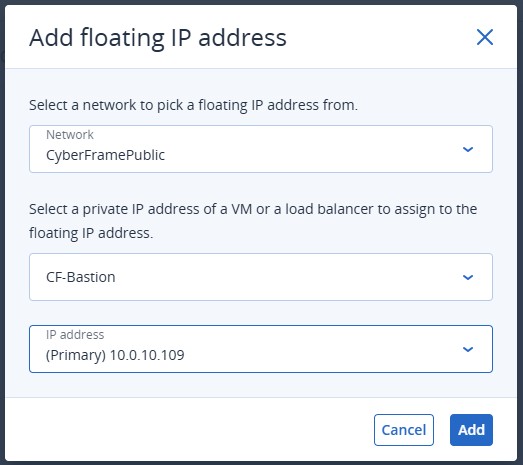
To allow external access to resources located in the Public Subnet, Cyber Frame provides Floating IPs. A Floating IP is a public address that can be dynamically associated with a virtual machine, allowing it to communicate with external networks such as the Internet while keeping its private address unchanged.
We will assign Floating IPs to the two systems located in the Public Subnet: CF-Bastion and CF-Web.
– Navigate to Floating IPs > Add Floating IP.
– Select CyberFramePublic as the source network from which the public address will be allocated.
– Choose the target virtual machine and its associated private IP address.
– Within a few seconds, Cyber Frame assigns a public IP address to the selected workload.
– Repeat the operation for the Web Server.
Testing the connectivity
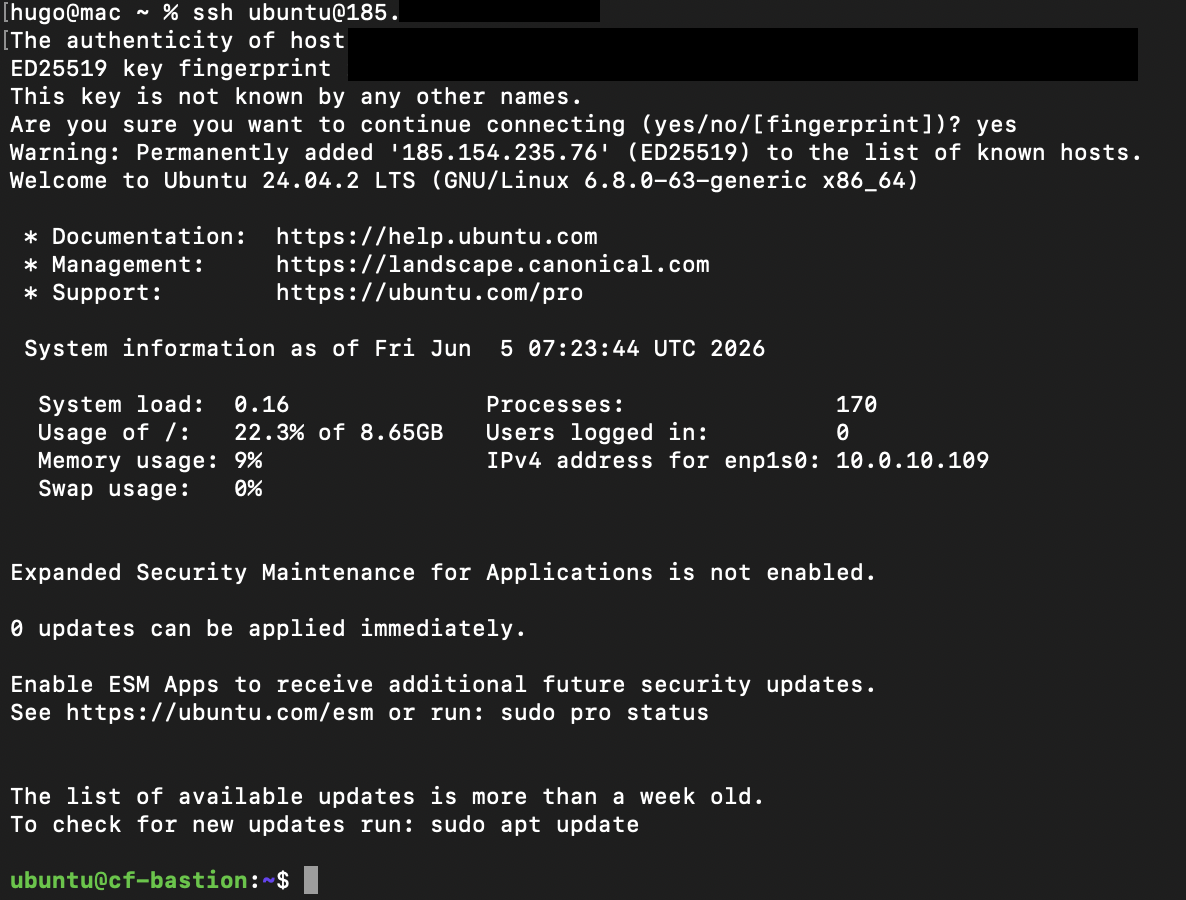
For testing purposes, I temporarily added ICMP rules to the relevant SG. This allows ping traffic between systems and helps verify connectivity during the deployment phase. After assigning the Floating IP, the Bastion Host immediately responds to ICMP requests sent from the Internet.
Likewise, SSH access is now available using the public address assigned to the Bastion Host.
From your workstation, connect using:
ssh ubuntu@BASTION_PUBLIC_IPIf everything is configured correctly, you should obtain a shell on the Bastion Host.
Why a Bastion Host?
The Bastion Host acts as a secure jump server and is one of the most common administrative patterns used in professional cloud environments.
Instead of exposing every server directly to the Internet, administrators connect to a single hardened entry point and then access internal resources from there.
Our architecture now looks like this:
Internet
    |
Floating IP
    |
CF-Bastion
    |
    +--> CF-Web
    |
    +--> CF-Windows-Mgmt
    |
    +--> CF-Backend
Accessing internal servers through the Bastion.
Now that we can access the Bastion Host, we can use it to reach systems that are not directly exposed to the Internet.
The Web Server has the private IP address 10.0.10.110. If you attempt to connect from the Bastion Host and receive the following error:
Permission denied (publickey)it usually means that your SSH key is not available through the current SSH session.
A quick way to verify this is:
ssh-add -lIf no identities are listed, load your SSH key locally:
ssh-add ~/.ssh/id_ed25519You can confirm that the key is loaded with:
ssh-add -lYou should see an output similar to:
256 SHA256:xxxxxxxx cyberframe-labNext, reconnect to the Bastion Host while enabling SSH Agent Forwarding:
ssh -A ubuntu@BASTION_PUBLIC_IPOnce connected to the Bastion, verify that the forwarded key is available:
ssh-add -l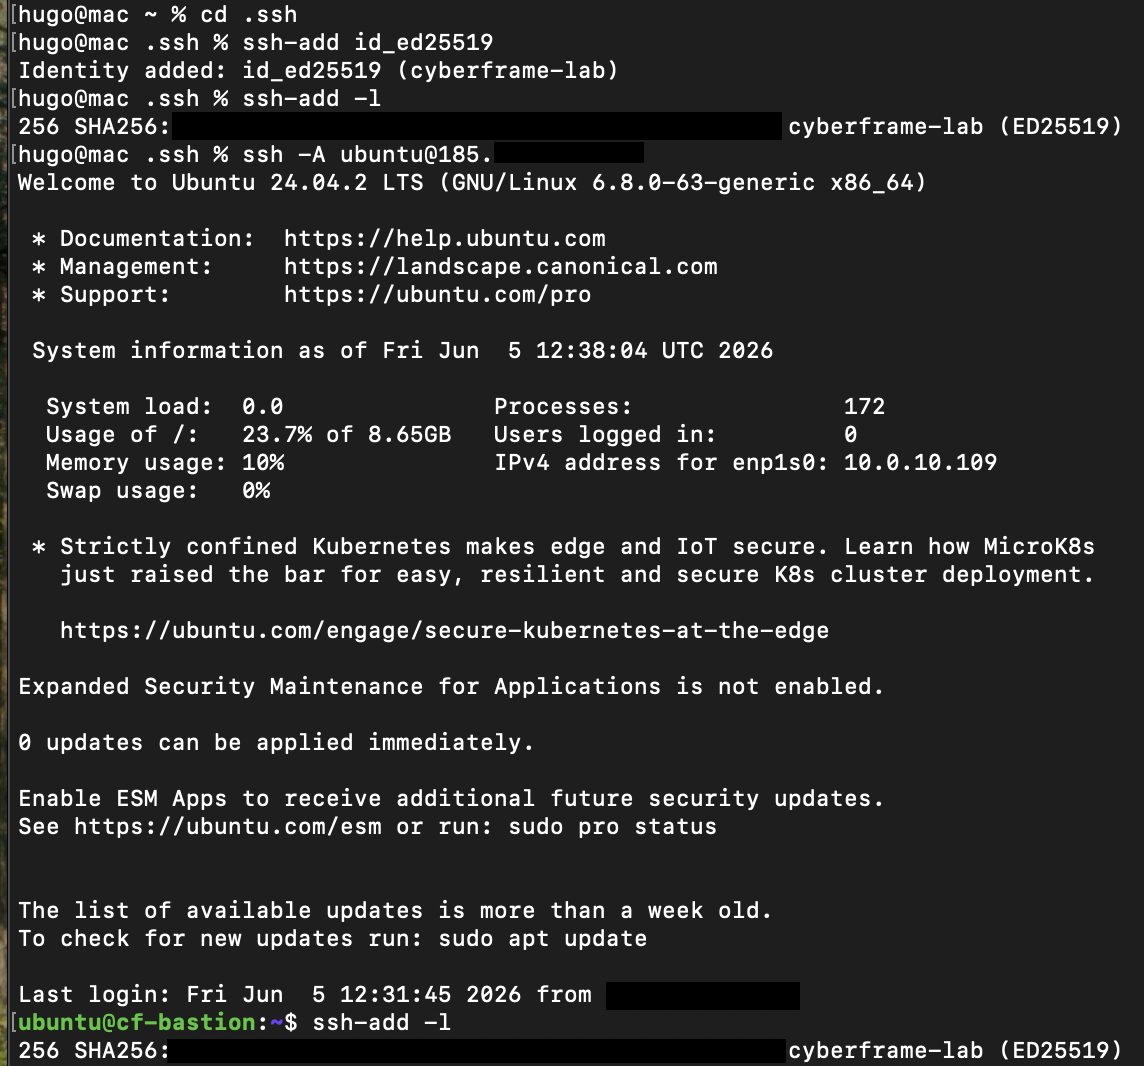
Finally, connect to the internal Web Server:
ssh ubuntu@10.0.10.110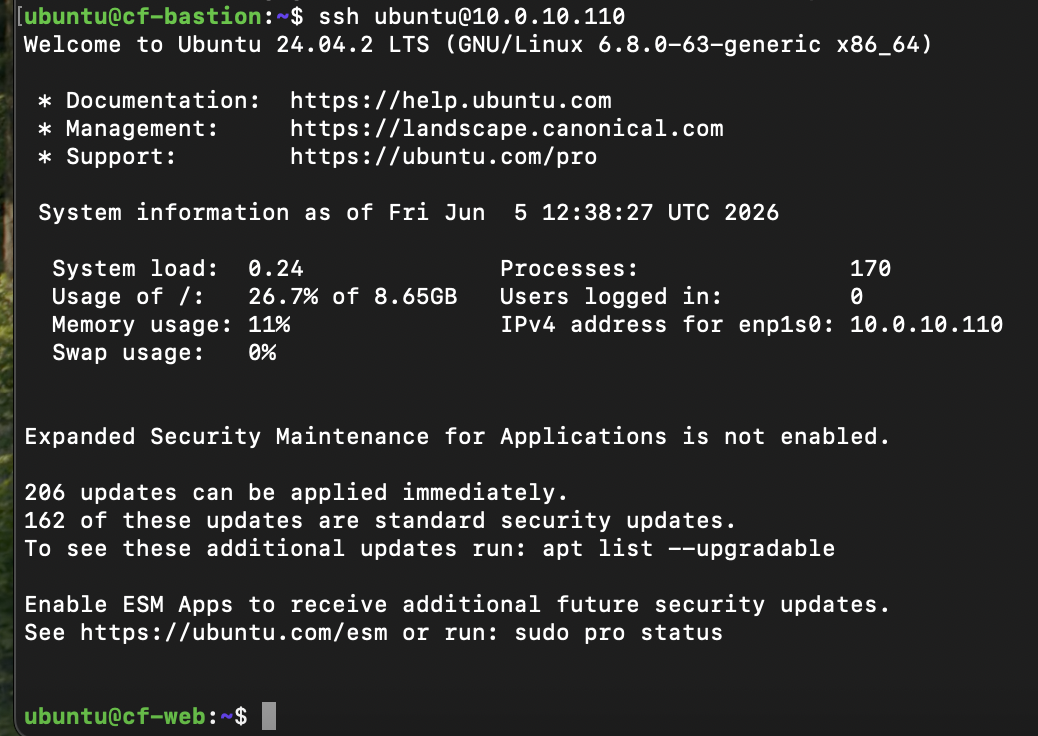
Because the SSH key is being forwarded from your workstation, there is no need to store private keys on the Bastion Host itself.
This approach is more secure and mirrors the way many enterprise environments manage administrative access to private infrastructure.
In production environments, SSH ProxyJump is often preferred over Agent Forwarding because it reduces the attack surface and providing the same user experience.
Step 6 – Deploying services on the Web server
It’s time to put that infrastructure to work by deploying our first service on CF-Web.
We will use Nginx, one of the most popular web servers in the world, widely used to serve static websites, host web applications, and distribute traffic across multiple backend servers. It is lightweight, fast, and easy to deploy.
Connect to the Web Server through the Bastion Host and install Nginx:
sudo apt update
sudo apt install nginx -y
Once the installation is complete, verify that the service is running:
systemctl status nginxYou should see an output similar to:
active (running)
At this point, Nginx is already serving its default welcome page. To confirm that the web server is responding locally, run:
curl localhostThe command returns the default HTML page generated by Nginx.
Let’s replace the default page with something a little more personal. Edit the default index file:
sudo nano /var/www/html/index.html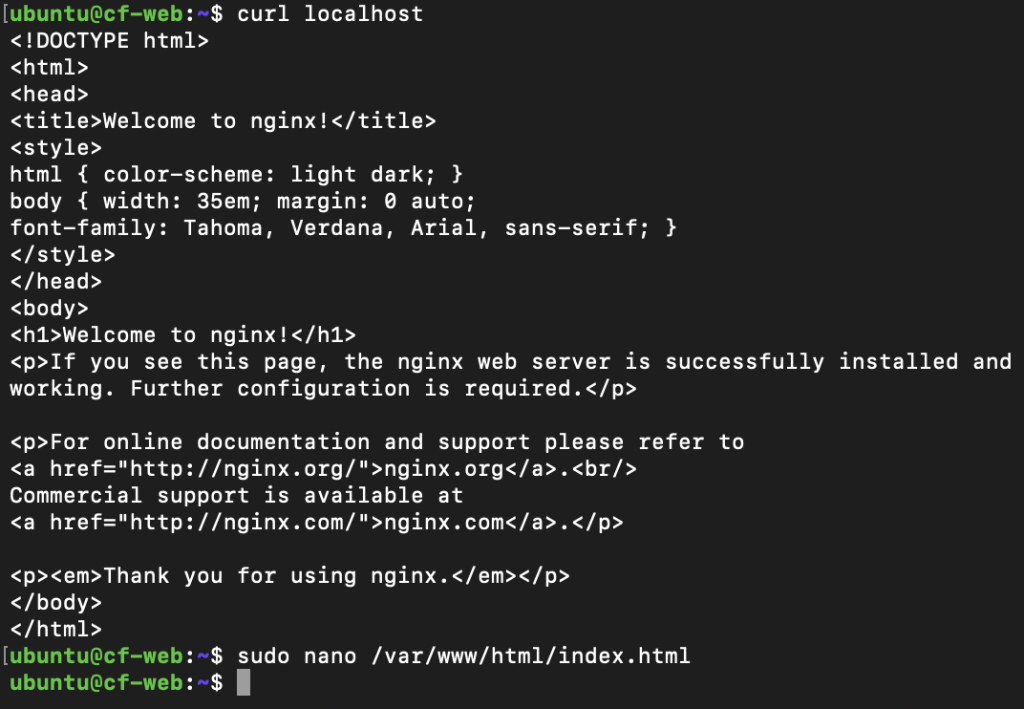
You can add any static HTML content you like. For this lab, I kept things simple:
<h1>Acronis Cyber Frame Lab</h1>
<p>CF-Web running on Ubuntu 24.04</p>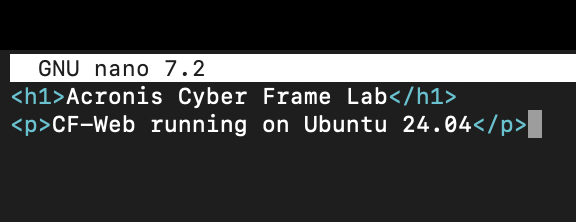
Save the file and exit the editor.
Earlier in this guide, we assigned a Floating IP to the Web Server and configured inbound HTTP and HTTPS rules in the Security Group.
This means the service should now be reachable from the Internet. Open your browser and navigate to:
http://WEB_SERVER_PUBLIC_IPIf everything has been configured correctly, your custom page should appear immediately.
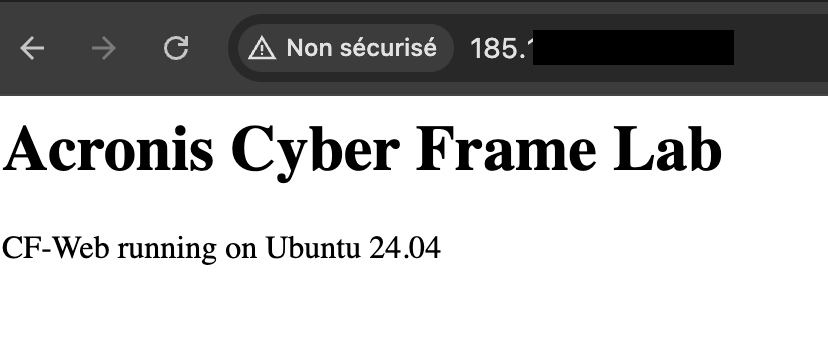
This test validates the VM and its security group are operational, Nginx is running correctly and the floating IP is properly assigned.
Our first workload is successfully hosted on Cyber Frame and accessible from the Internet 🙂
Step 7 – Deploying Backend Services
Let’s move on to the private side of the infrastructure and deploy our first backend service.
From the Bastion Host, return to your shell:
exitThen connect to the Backend Server located in the private subnet:
ssh debian@10.0.30.89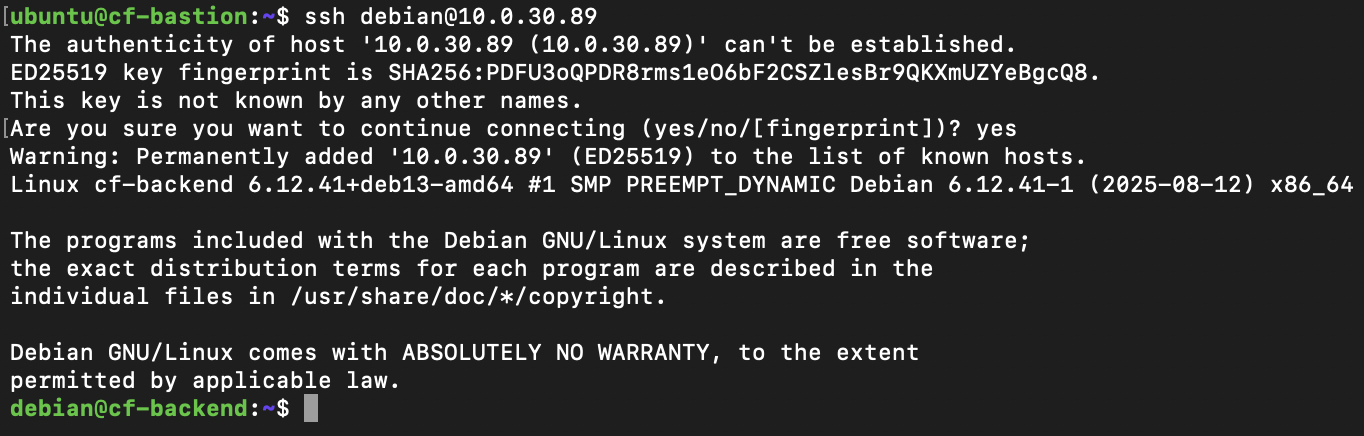
One of the most common workloads hosted on backend servers is a database engine.
We’ll deploy PostgreSQL, one of the most widely used open-source relational database systems.
Install PostgreSQL and verify the service is running correctly:
sudo apt update
sudo apt install postgresql -y
systemctl status postgresql
You should see a status similar to:
active (running)
Step 8 – Expanding Storage with Additional Volumes
Virtual machines rarely operate with a single disk throughout their lifecycle. As applications grow, administrators often need to add dedicated storage for databases, logs, backups, or application data. Cyber Frame makes this process straightforward through its Volume management capabilities.
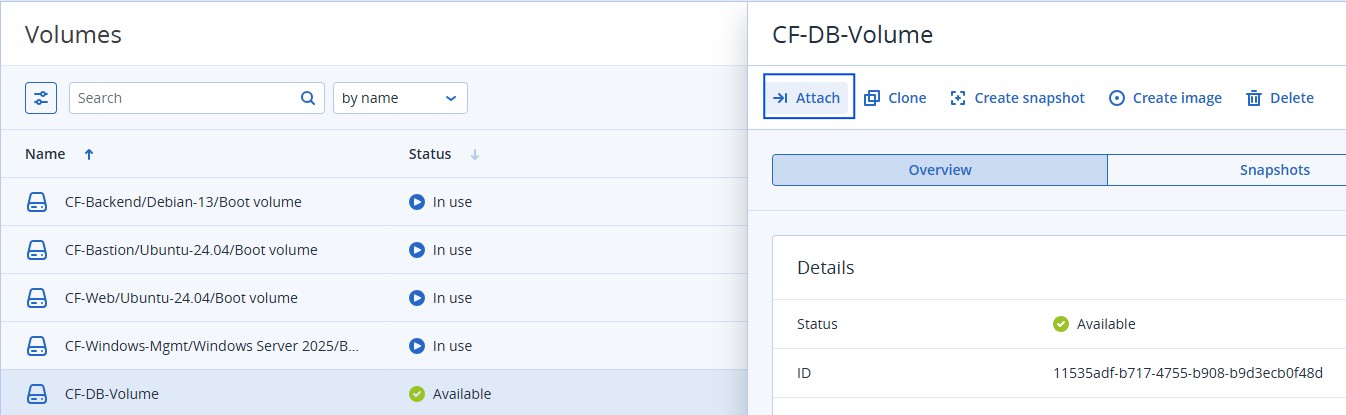
In our scenario, allocating a dedicated disk for database data is a realistic use case.Volumes > Create Volume
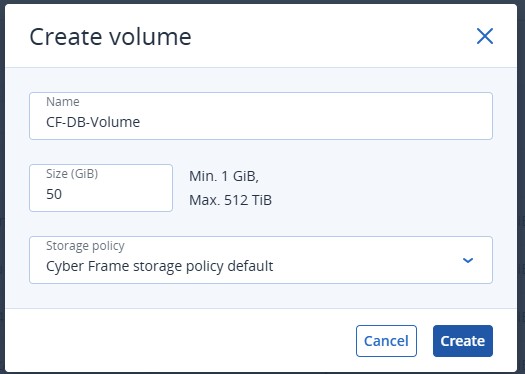
Once provisioned, don’t forget to attach it to the Backend Server.
Discovering the New Disk
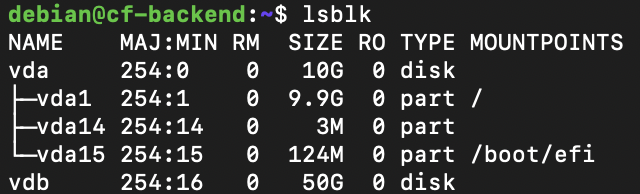
After attaching the volume, reconnect to the Backend Server and list the available block devices:
lsblkYou should see a new device similar to:
vdbThis indicates that the OS has detected the newly attached storage.
Formatting and Mounting the Volume
Before the disk can be used, it must be formatted with a filesystem.
Create an ext4 filesystem, a mount point and the volume
sudo mkfs.ext4 /dev/vdb
sudo mkdir /data
sudo mount /dev/vdb /data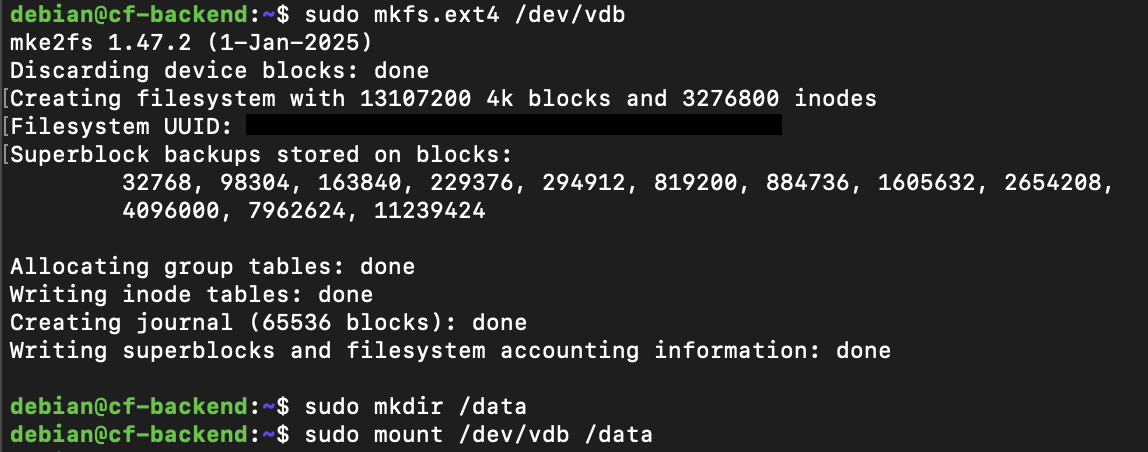
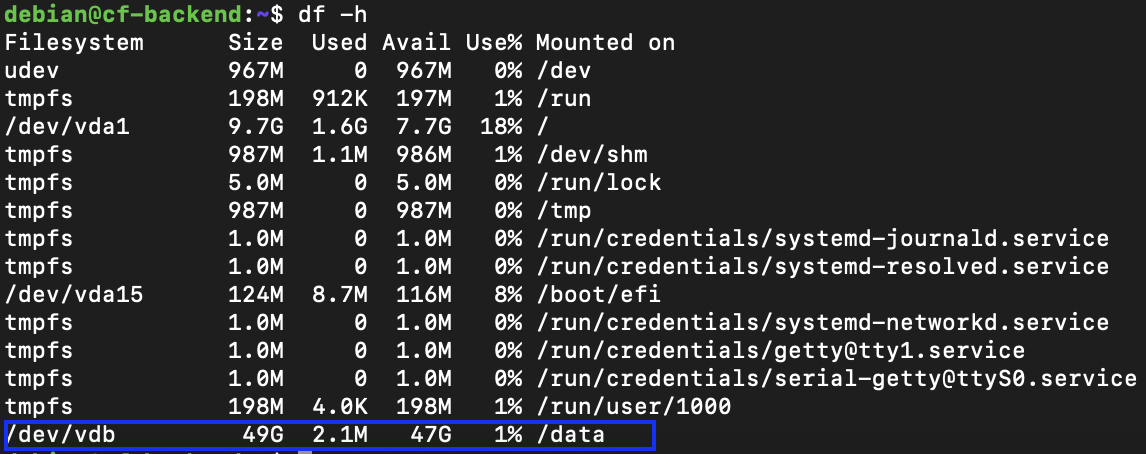
Finally, verify that the filesystem is available:
df -hYou should now see the new volume mounted under /data
Why Separate Data from the Operating System?
Using dedicated storage volumes provides several advantages:
* Easier capacity expansion
* Better separation between system and application data
* Simplified backup strategies
* Greater flexibility when migrating workloads
* Reduced risk of filling the operating system disk
For database workloads in particular, separating data from the operating system is considered a best practice and is commonly implemented in production environments.
Step 9 – Connecting the on-prem infrastructure with a Site-to-Site VPN
Our lab environment is fully operational without a VPN. But you can operate a hybrid infrastructure where some workloads remain on-premises while others are hosted in the cloud.
In such scenarios, Cyber Frame supports Site-to-Site IPSec VPN connectivity, allowing secure communication between customer locations and cloud-hosted resources. We can, for example, keep business applications and databases hosted inside Cyber Frame while allowing users and services located at a company office to access them through a private encrypted tunnel.
This section presents the design principles of a Site-to-Site VPN configuration but was not fully implemented in this lab environment.
VPN Configuration overview
Cyber Frame provides a dedicated VPN module that guides administrators through the creation of an IPSec tunnel.
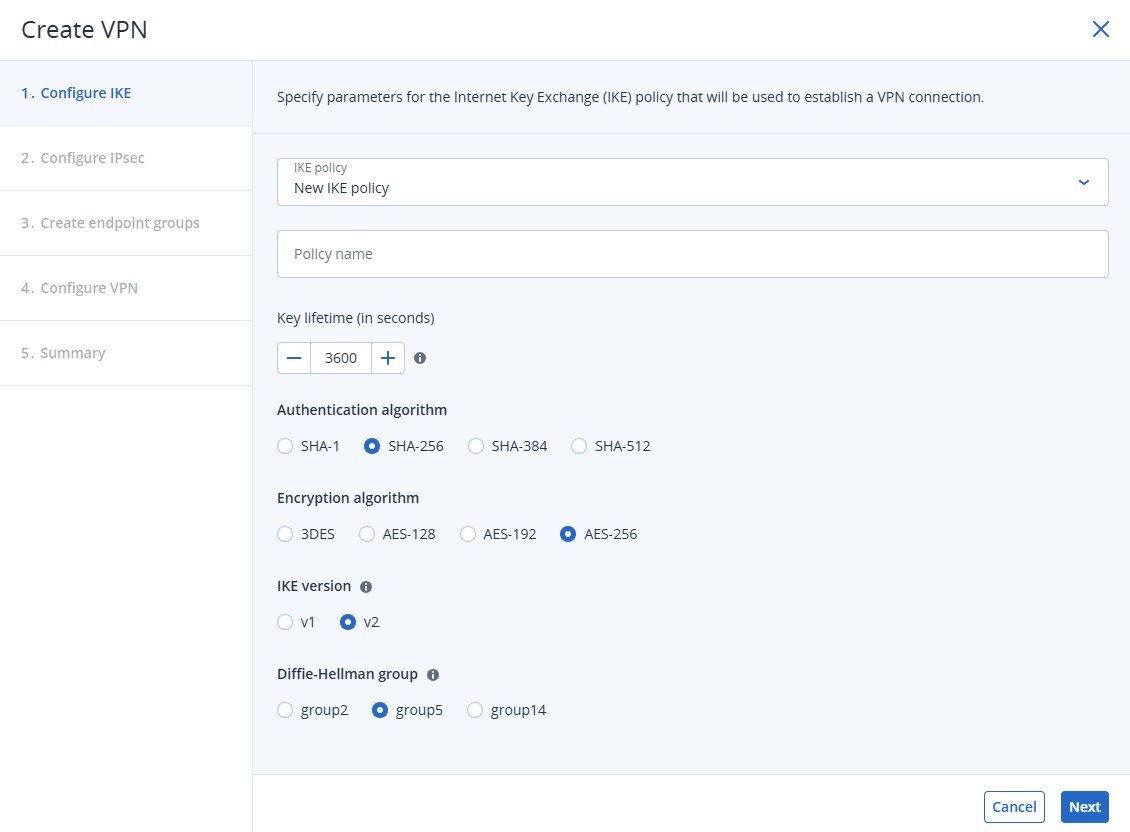
IKE Policy Configuration
The Internet Key Exchange (IKE) policy defines how both VPN endpoints authenticate and establish the secure tunnel. It includes:
* Authentication algorithm (SHA-256, SHA-384, etc.)
* Encryption algorithm (AES-256, for example)
* IKE version (IKEv1 or IKEv2)
* Diffie-Hellman group
IPsec Policy configuration
It defines how traffic is encrypted once the tunnel has been established.
Endpoint Groups
It defines which networks are allowed to communicate through the VPN tunnel.
For our example architecture, the local endpoint group could include the management and backend subnets
The remote endpoint group
It represents the customer network located outside Cyber Frame, or any other on-premises subnet.
Only traffic destined for these configured networks will traverse the VPN tunnel.
Once the corresponding VPN configuration is created on the remote firewall or router, Cyber Frame can establish a secure IPSec tunnel between both environments.
Step 10 – Native integration with Acronis services
As mentioned in the introduction, one of the most interesting aspects of Cyber Frame is not the infrastructure itself, but what happens once the infrastructure has been deployed.
We have been working entirely within the Acronis Cyber Protect Cloud console. There was no need to switch between multiple portals or integrate a third-party infrastructure platform with separate protection tools. As soon as the virtual machines were provisioned in Cyber Frame, they automatically appeared within the Acronis ecosystem.

This is where Cyber Frame begins to differentiate itself from a traditional IaaS platform. Infrastructure workloads deployed on Cyber Frame are automatically backed up to the Acronis Cloud without requiring additional backup infrastructure, storage repositories, or manual integration steps. Backup protection is available from the moment the workloads are deployed.
Beyond backup, the virtual machines are immediately available for the application of additional Acronis protection services. Just as you would with any other protected workload, you can assign protection plans to enable the Disaster Recovery (DR), the cybersecurity with EDR, XDR, MDR, the Remote Monitoring and Management (RMM), etc. The process is identical to what Acronis partners already use for physical servers, workstations, and cloud workloads.
Conclusion
Acronis Cyber Frame is more than just another Infrastructure-as-a-Service platform. In this article, we deployed a complete SMB-style environment from scratch, including network segmentation, routing, security groups, SSH-based administration, public-facing services, backend workloads, additional storage, and optional VPN connectivity. The infrastructure itself is intentionally straightforward. Any modern cloud platform can provide virtual machines, networking, and storage.
Cyber Frame is still a young platform, but after building and testing this environment, my first impression is positive: the deployment process is straightforward, the interface remains easy to use, and the native integration with Acronis protection services provides a compelling value proposition for MSPs looking to simplify their infrastructure and security operations.
Happy building!